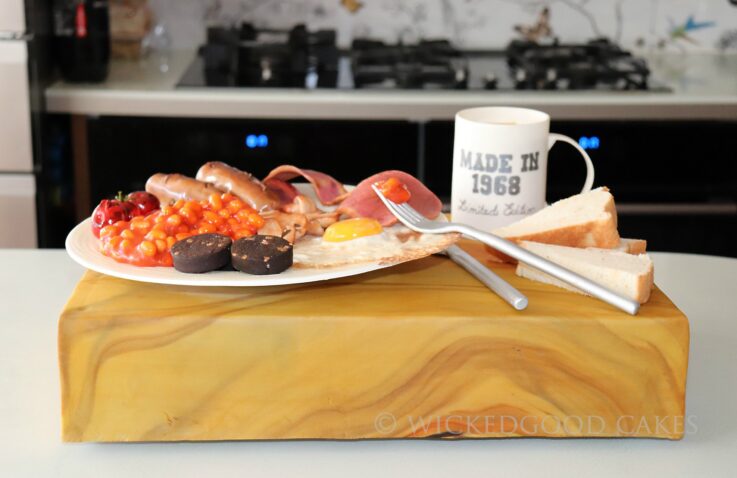
1The plate and mug were both made with a very simple pastillage recipe. I used at least one coat of Dinky Doodle Shell and Shine. I used mainly Sugarflair dusts and gels with a couple of Pro-Gel colours here and there. I made the plate and mug about 2 weeks in advance as they are thick items and I wanted to be certain that they’d be able to support the weight of the decorations. The plate in particular took several days to dry properly. The chopping board was covered with Massa in various shades of brown, cream and orange, all marbled together. I looked at several chopping boards and actual pieces of wood online to work out how I wanted this to look, and in addition to marbling the pastes I also ran streaks of gel to give more depth to the board.
How To Create An Edible Breakfast Cake By Liz Richardson
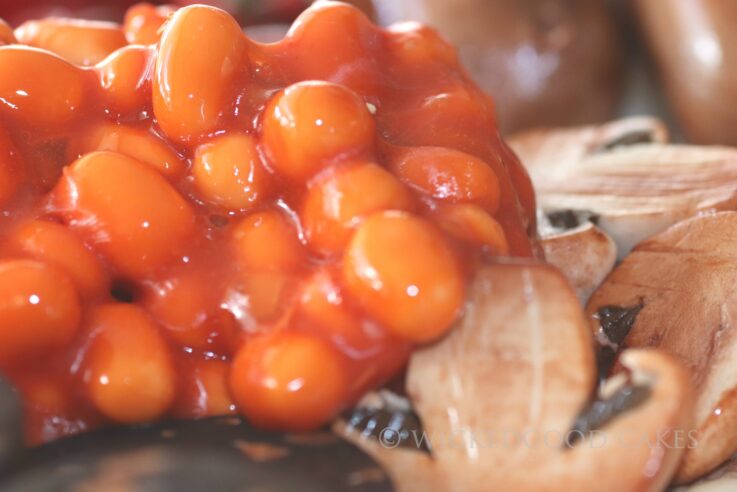
2The bean sauce and the tea were both made with versions of piping gel, the baked beans were all hand rolled from pale orange Saracino, and I believe there were around 200 in the end. I simply took small chunks of the paste and rolled them into ovals. I used the gelatine recipe by Veena Azmanov, see the recipe with a direct link for her site. Veena’s recipe gave me exactly the look I was going for, and once I’d coloured it up (using white gel to make it opaque, and orange and brown for the colours, trying to match it as best I could to a tin of beans I had next to me) it looked really good.

3Tomatoes – These were made by rolling balls from red paste. Once rolled, I looked at the tomatoes I’d cooked and tried to mimic the area where the heat had split the skins, using a sharp knife to cut bits of ‘skin’ into the tomato. When I was happy with the general shape (again, really trying not to make them all the same) I dusted with deep red colour then used dark brown gel mixed with a little ISP to give me the fried look, then glazed with several coats of Shell and Shine.
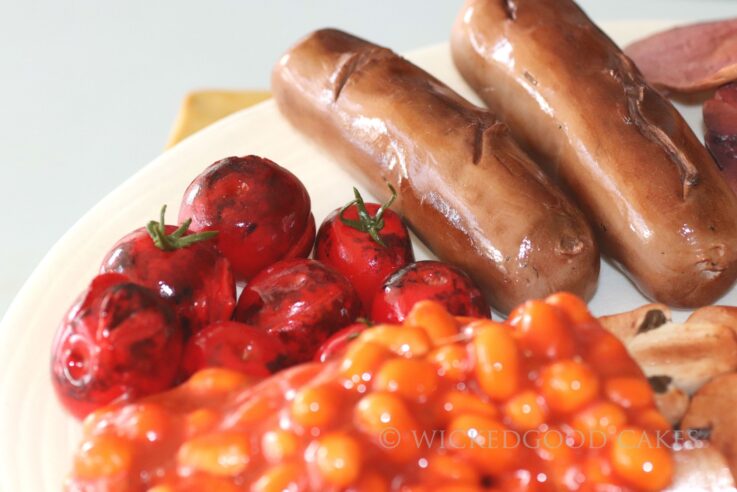
4Sausages – I started with a pale pink colour but I just couldn’t colour match this to the raw sausage I had in front of me (I wanted to match it to that as I needed the paler colour to show through once dusted to give me the striped look you get from a sausage fried in a pan). I decided to add a little grey to the pink which gave me a more realistic colour, and as I was making herby sausages, I kneaded in a fair bit of dried mint. In hindsight I’d use either fully dried green paste or a dried herb with a larger flake as this did get a little lost in the paste. Again, using a real sausage I studied it for how it split and where to put the dusts for the best effect. This was dusted with orange and several shades of brown ranging from light to very dark, then glazed 2 or 3 times.
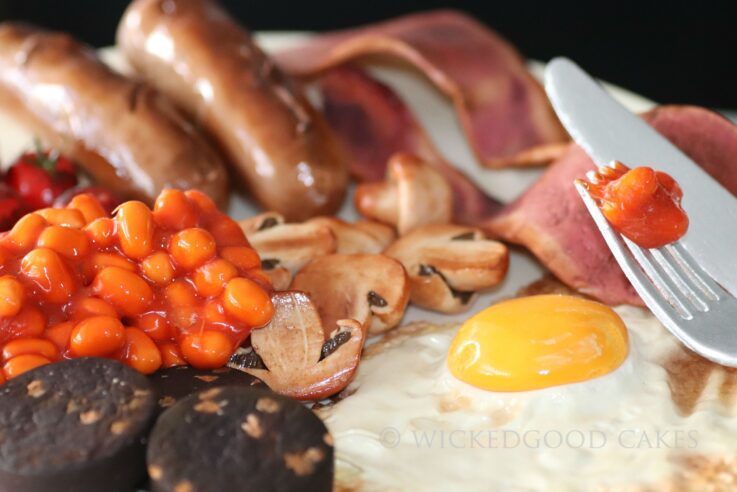
5Fried Egg – For this I followed a photo. I started with a ball of egg yellow sugarpaste for the yolk, rolling into a ball and setting aside while I made the white. For the white, I used a ball of white and pushed it out into the general shape I wanted, but quite a lot smaller. The paste needed to be quite deep around where the yolk was to be – maybe 7 or 8mm, thinning considerably towards the edges. For the crispy look I used various sizes of ball tool and dimpled the paste around the edges, taking it to almost transparent in areas (this is why you start with a smaller shape than you want to end up with – my first attempt was like an ostrich egg). I coloured this up with dusts in orange and shades of brown, keeping it lighter in the thicker areas and really quite dark in the places where it was really thinned out. This was then glazed several times.
