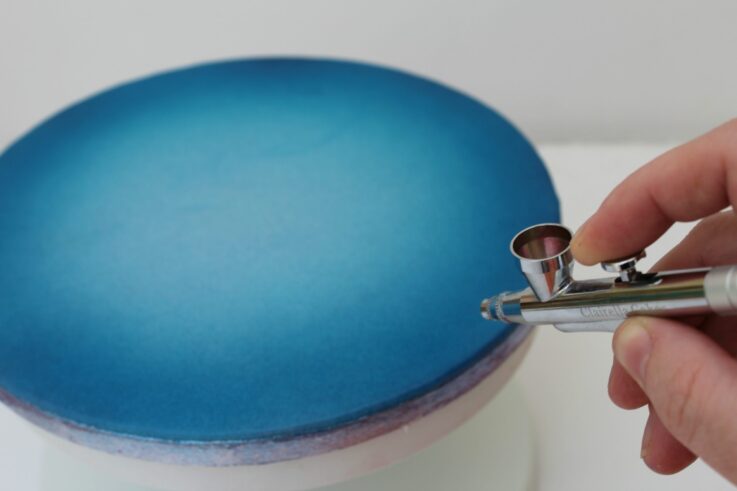
1Ensure that your airbrush is completely clean & spraying evenly. Add a quarter of a cup of blue airbrush paint to your cap & test the flow of colour first on kitchen paper on medium mode. Once happy, move to cake board. Turn the turntable whilst airbrushing & concentrate on the outer edge. Move your arm backwards and forwards at the same time for a light covering. Repeat 2 or 3 times until desired colour is achieved & then set aside.
Meadow Fairy Cake by Claire Anderson
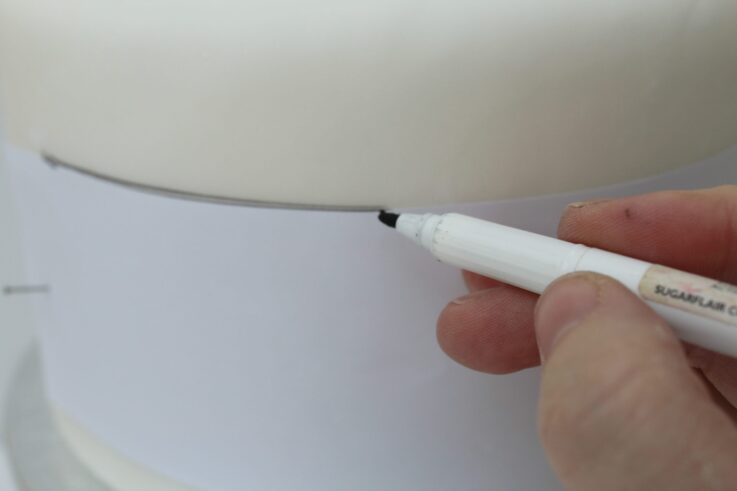
2Place your bottom tier on the turntable & on a cake uncovered board. Use paper as a guide draw a line around the bottom tier roughly 2 inches from the top of the cake.
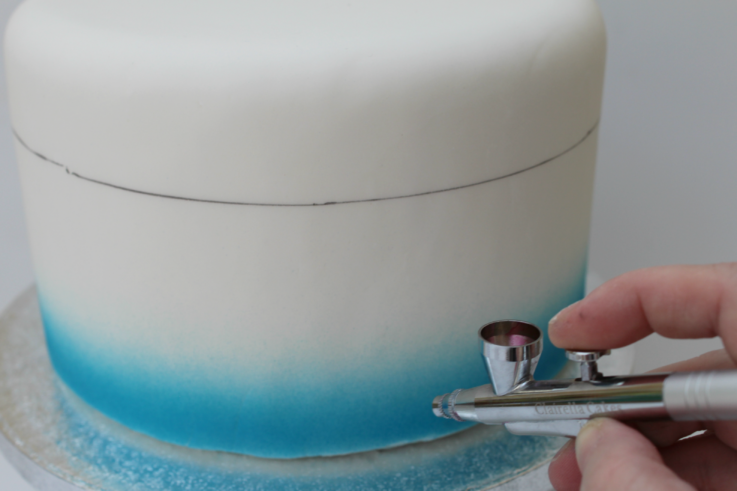
3Testing the flow of your colour first on kitchen paper, airbrush the bottom tier on medium mode using Kroma blue. Spin the turntable slowly at the same time as moving your arm in a sweeping motion from left to right, maintaining an even light flow of colour around your cake. Focusing on the bottom 2 inches. Repeat this action.
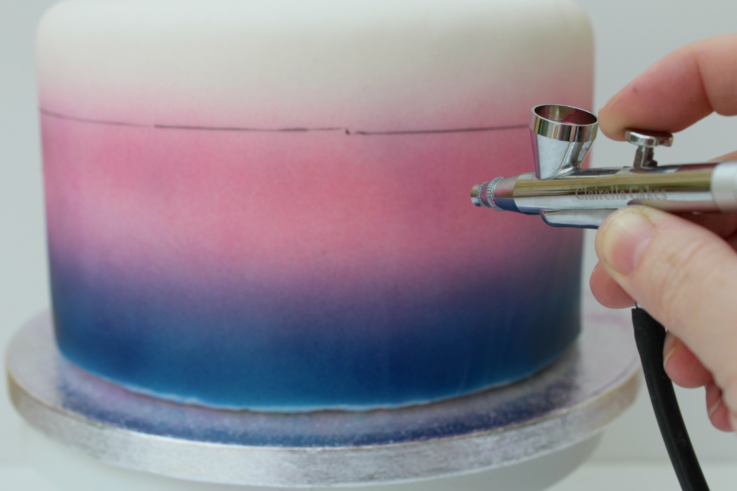
4Airbrush up to the line with the pink in the same way as before, however, this time you are covering the blue too to make a deep purple colour.
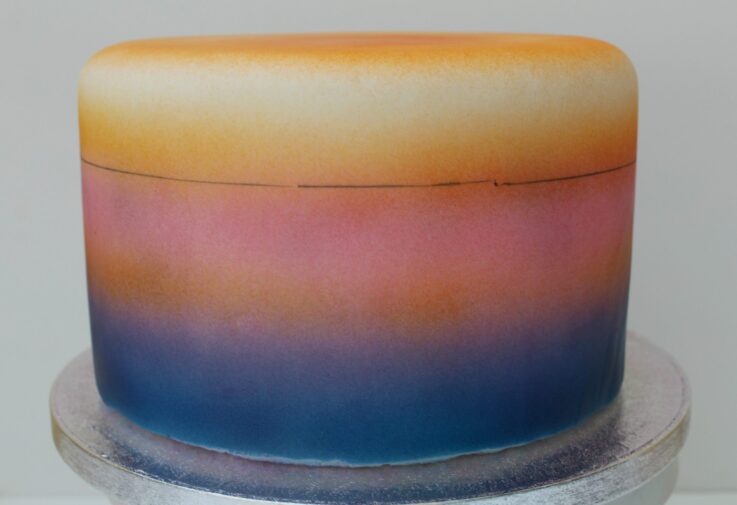
5Next mix the pink with a little yellow to create a vibrant orange colour. Airbrush as before whilst revolving your turntable. Just 1 line of colour above the purple. Then on the black line & on the top of the cake.
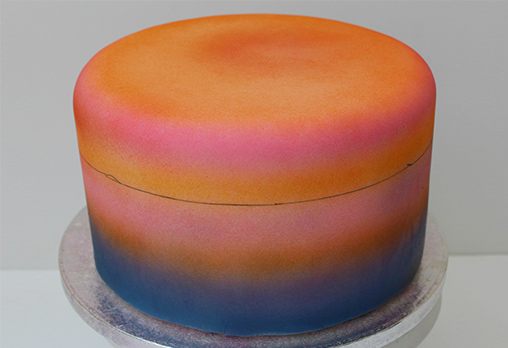
6Airbrush a line of pink around the top edge of the cake.
7Airbrush lines of the mixed orange & pink on the middle tier. These can be quite random and in any direction to create a sunset set sky effect.
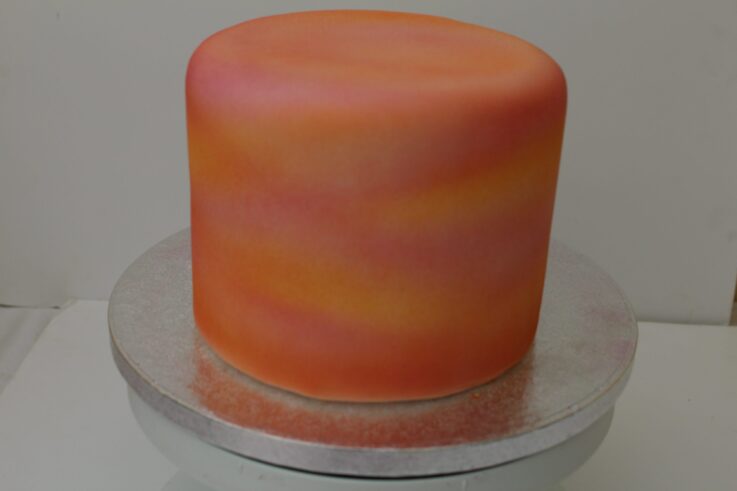
8Build up the stripes of colour until the whole tier is covered. Set aside to dry.
TIP – Be careful how you move airbrushed cakes! Either slide a cake lift underneath the cake or move the board & slide the cake off. Touching must be avoided as you will leave marks on the cake.
TIP – Be careful how you move airbrushed cakes! Either slide a cake lift underneath the cake or move the board & slide the cake off. Touching must be avoided as you will leave marks on the cake.
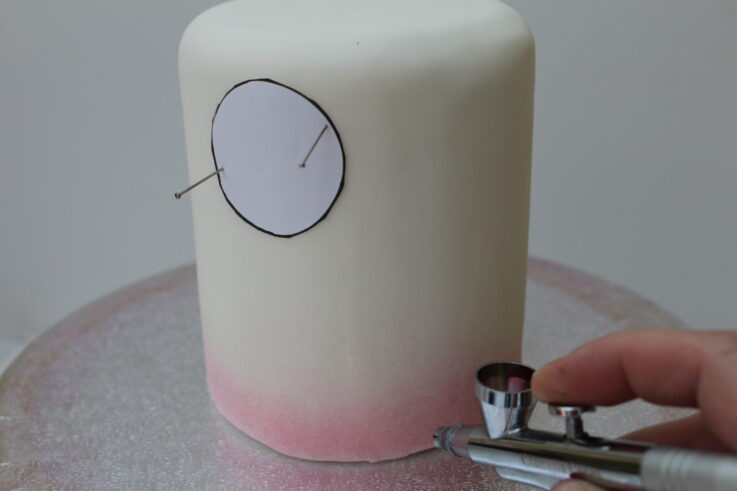
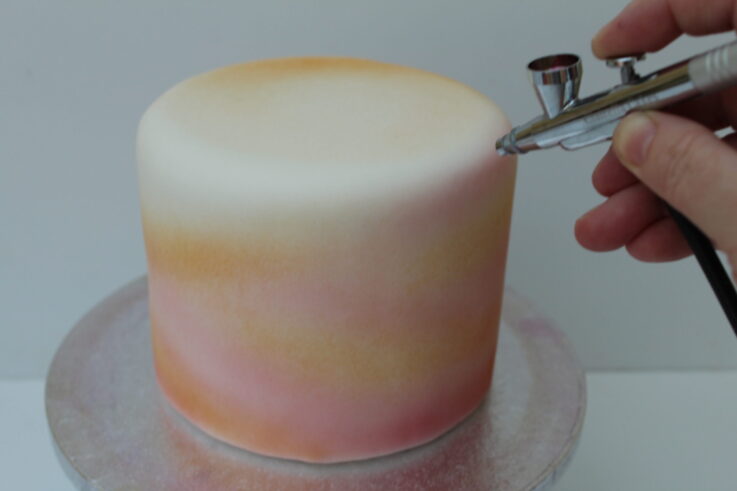
9Place the top tier on the turntable. Using sterile pins – pin a small paper circle onto the cake. Once again on medium mode whilst revolving your turntable, airbrush pink around the bottom of the cake.
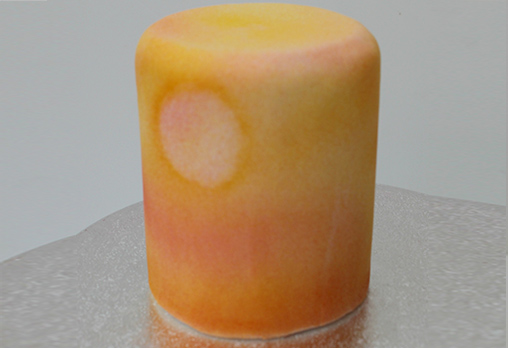
10Continuing airbrushing over the pink with yellow. Be very careful as the yellow can be very vibrant. Airbrush around the circle & then remove. Set aside all 3 tiers overnight if the cakes have been covered that day as the sugarpaste should not be soft when using your stencils. Airbrush the sun with pure yellow for brightness.
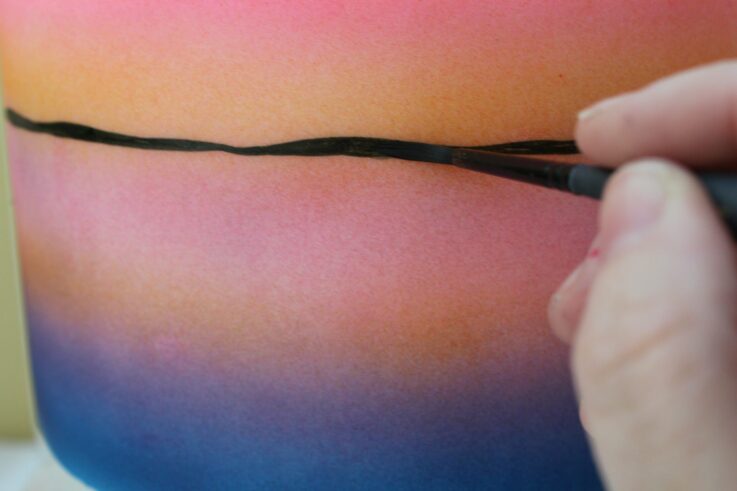
11Paint over the line on the bottom tier with black airbrush paint to give the illusion of a horizon.
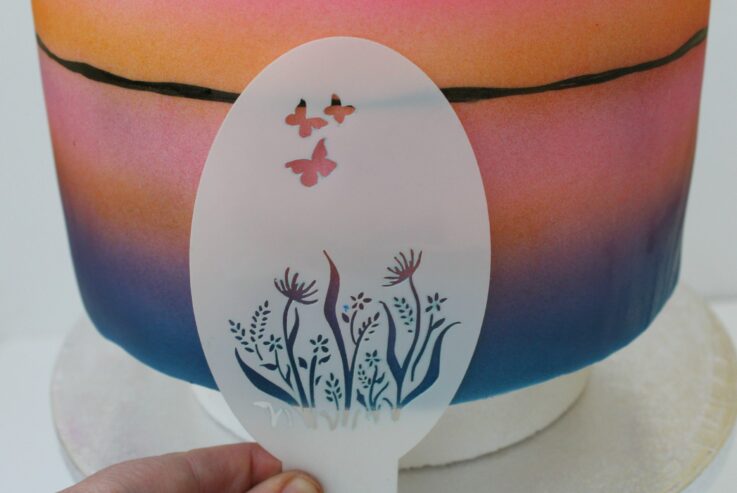
12Place the bottom tier onto your turntable. Raise the bottom tier by an inch or two so that you can stencil onto the bottom edge of the cake effectively. Separators are perfect for this.
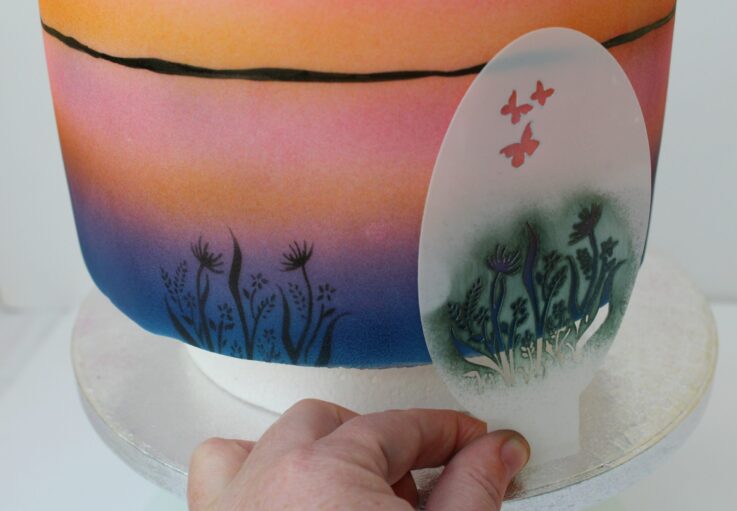
13Using the Meadow Stencil, airbrush with the black the bottom part of the design around the cake avoiding the butterflies. Build up the colour slowly. As you move around the cake, leave a space in-between so that your last bit can dry as you work your way around the cake. Fill in the gaps & it doesn’t matter if the design overlaps. Ensure that your stencil doesn’t get too saturated in colour by blotting it between 2 sheets of kitchen paper as you work your way around the cake.
TIP It is very important that your airbrush is on minimum mode when you stencil so that you can airbrush gently, build up the colour, get quite close to the stencil & avoid over spray around the stencil. If you are feeling nervous practice first on paper.
TIP It is very important that your airbrush is on minimum mode when you stencil so that you can airbrush gently, build up the colour, get quite close to the stencil & avoid over spray around the stencil. If you are feeling nervous practice first on paper.
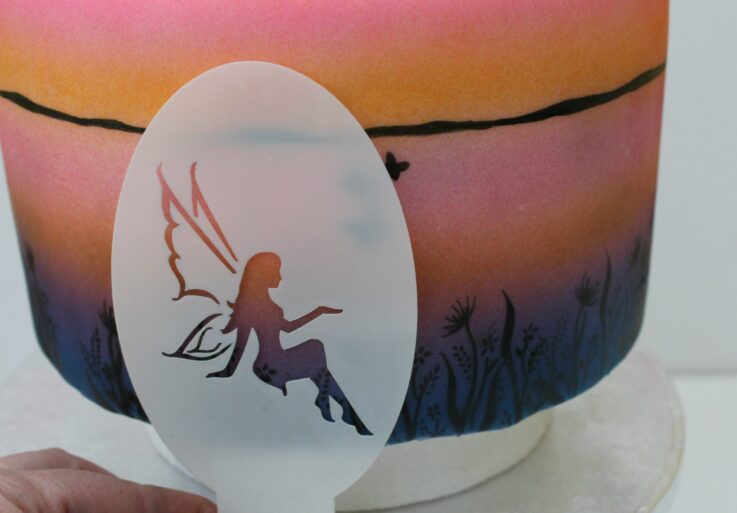
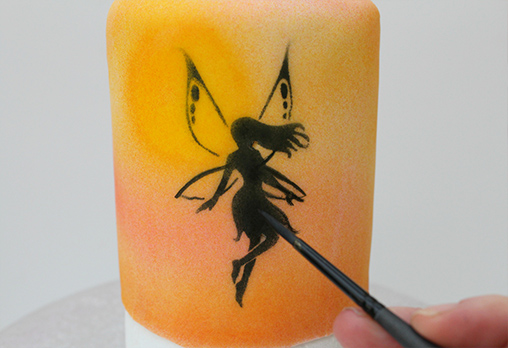
14Once you have completed the meadow around the cake & the design is dry, place the Meadow Fairy stencil on the left-hand side of the cake. You can airbrush one set of the little butterflies so that they appear to be flying from the fairy’s hand. Airbrush the fairy into position using black and ensure the airbrush is on minimum mode. Build up the colour in gentle layers. 2 soft layers of colour should be sufficient.
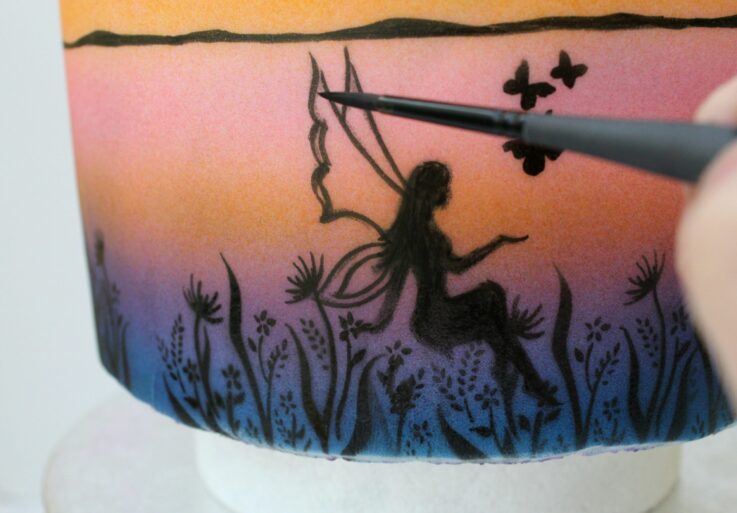
15You can leave your fairy how it is but feel free to paint extra details on the wings and possibly a toadstool for her to sit on.
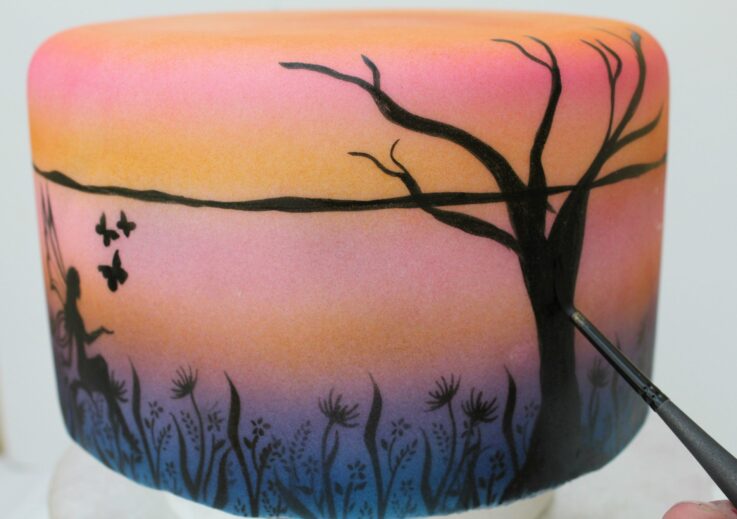
16Once you are happy with the fairy on the right hand side of the cake hand paint a simple twiggy tree. You don’t have to be an expert artist to do this!
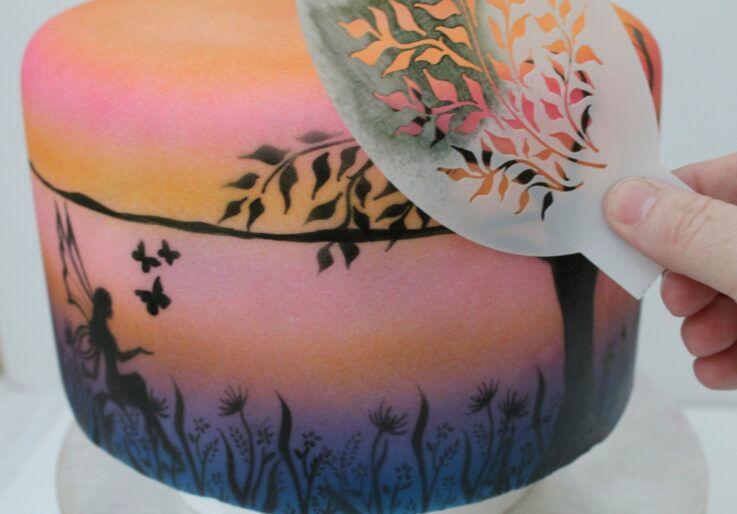
17Using minimum mode again on your compressor, carefully airbrush the leaves on the tree, moving the stencil in your hand into different positions. Once again be careful not to go over the leaves you have just done otherwise they will smudge, be patient & build the leaves up gradually. If your stencil gets too wet with colour ,remember to dab off any excess between 2 pieces of kitchen paper. Be gentle & do not rub as the stencils are finely cut. Airbrush as many leaves as you like onto the cake – it doesn’t matter if the leaves overlap or go in different directions as that can look more natural & artistic.
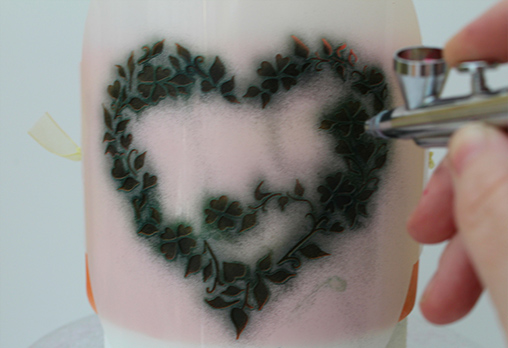
18Moving onto the middle tier of the cake, place the cake on top of a separator. Position the “Sweetheart” stencil onto the cake. Use 2 ribbons, threaded and knotted through the holes and then tie in a bow at the back as this is more secure than using pins and not as damaging. However it is important that the cake has been covered and left overnight so that the sugarpaste is not soft. Once again, airbrush the design on using the minimum mode on your compressor.
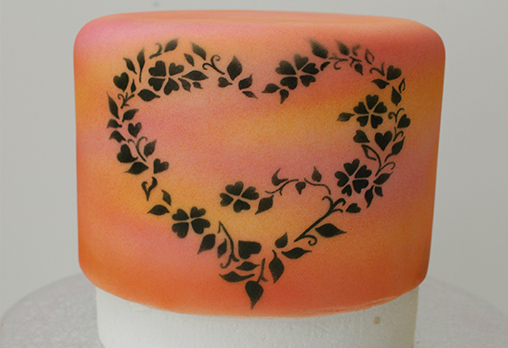
19Remove the stencil to reveal your pattern. Put the cake to one side to dry whilst moving on to the top tier.
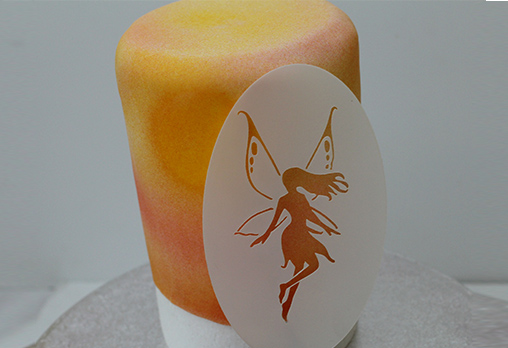
20The top tier should again be placed on a separator so that you have enough room to position your fairy correctly. You can also pin the tab of the stencil into the separator for added security. On minimum mode once again airbrush the fairy on to the cake slightly to the right of the sun. As it’s a narrower round tier the stencil won’t lay completely flat so hold the stencil into position and airbrush one side and then the other.
21Remove the stencil. You can hand paint any details you want onto the design with the black airbrush paint or you can just leave it as it is.
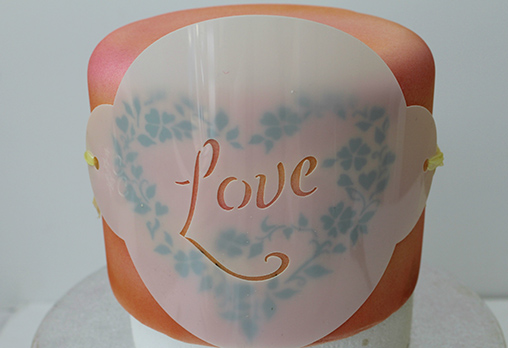
22Once the middle tier is dry, position the “Love” stencil onto the heart design. Once again, securing the stencil in place by tying ribbons to the holes either side of the stencil and then tying the ribbons together at the back. Airbrush the design once again using black with the compressor on minimum mode.
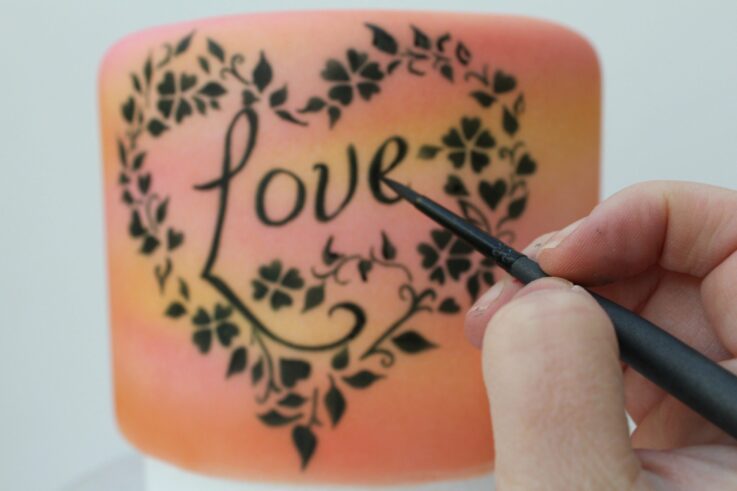
23Remove the stencil to reveal the design. You can fill in the lines or add extra flourishes to the letters using a fine paint brush with the black airbrush colour.
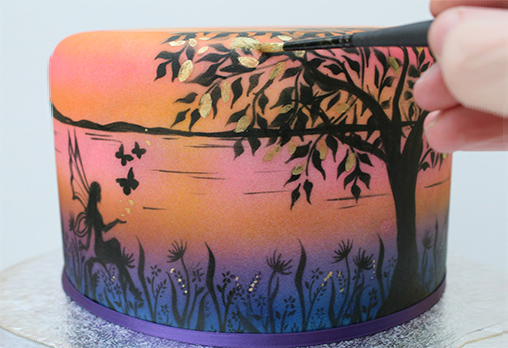
24Dilute the gold lustre dust with rejuvenator spirit and add the odd gold details to highlight the leaf details, just the odd spot here and there will add some richness to your cake.
Ensure that all the cakes are dry. Then dowel the bottom & middle tier and stack the cake using royal icing to ensure that the cake is secure. Make sure that all the designs are in the right position before the royal icing sets. Add the purple ribbon to the board & each tier. Secure the ribbon onto the cake using a dot of royal icing.
Ensure that all the cakes are dry. Then dowel the bottom & middle tier and stack the cake using royal icing to ensure that the cake is secure. Make sure that all the designs are in the right position before the royal icing sets. Add the purple ribbon to the board & each tier. Secure the ribbon onto the cake using a dot of royal icing.
25You have completed The Meadow Fairy cake – mission accomplished!

Ingredients
Cake (5” depth) 4”, 6”, 8” Rounds (all prepared & covered in white sugar paste)
Kroma Kolors:
Blue, Black, Yellow, Pink
50g Royal Icing
Gold lustre dust
Rejuvinator spirit
Edible Marker
Equipment
Airbrush Compressor & Cleaning Jar
Fairies and Star stencil set
10″ covered cake board
10″ uncovered cake board
Sterilised pins
Kitchen paper
Ribbons for tying stencils
PME Turntable
2 Paint brushes
2 separators
Painting palette
Dowels to stack
Purple ribbon
For US links or similar stencils contact: [email protected]
Let’s Chat with Claire…
Q. I adore your Claire, your designs have such a rich and warm feeling, how do you start designing?
A. I take inspiration from everywhere but I am drawn to colourful things, I am a colour magpie! There is so much beauty in nature whether it’s the beautiful colours of an autumn sunset or the vibrant colours from a coral reef but I can also be equally inspired by a t-shirt or wallpaper print! Once the idea for a design has been sparked, I sketch the designs out & make an inspiration board – even if it’s just for me, I need to put ideas together to see if they work visually. Sometimes 3 different cake designs can merge into one.
Q. What has been your favourite tool for 2017?
A. Well that’s easy – my new Clairella Cakes 7cc airbrush as the cup of the airbrush has a lid so I am spilling less colour on my shoes. It’s also light to hold like a pen & so easy to use, I really love working with it.
Q. Any disasters you would like to tell us about?
A. Every cake designer has disasters it is inevitable & all part of learning your craft. I once finished one cake order & dropped it on another finished cake. I could have cried at the time and to be honest I still can’t laugh about it. However, I fixed both cakes & they did look better than they had originally & both clients were very happy. I suppose that taught me to stop, have a break & eat as then my hands wouldn’t have been so shaky!
Q. What trends are you currently in love with?
A. I have loved the bright tropical trend this summer – there have been pineapples, watermelons & Flamingos everywhere. I like that kind of happy, holiday vibe. Unicorns too – who doesn’t love a unicorn?
