Sunflower and Rainbow Cake Decorating and Baking Tutorial

Tutorial Preview

Join NOW to access 1661 courses Watch Now
14 Day FREE Trial
Sunflower and Rainbow
with Paul Bradford
Skill level: Easy
HD Lessons: 16
Decorating time: 1 day (with drying time for airbrushing)
Now Playing
04:41

1. Making the Petals

Short on time? Why not watch the whole tutorial in 10 minutes by clicking here!

Paul starts the cake by working on the sunflower petals. A large lily cutter and veiner are recommended to cut out the petals and add detail to them. Paul shows us how he draws out a diagram prior to starting, to make sure he has an even-looking sunflower. You will also need a balling tool to add that realistic curve to the petals.

Now Playing
04:47

2. Layering the Cake

In this lesson, Paul focuses on the plant pot which is made of white and dark chocolate sponge from Sweet Success for nice layers when cut and some Terry’s Chocolate Orange for delicious orange-flavoured ganache. Paul starts by carving the cakes with a 6” round cake card and then cutting the cakes in half to create four layers which will then have the ganache added between them. If you have never tried orange-flavoured ganache before…get ready to become addicted! Set your cake scraps aside as they will come in handy for lesson 12.
Now Playing
05:20

3. Carving the Cake

Paul now shows us how he carves the cake to get that nice even gradient for the sides of the plant pot. You will need a 3” cake card, a large bread knife and a steady hand. Then it’s onto the ganaching and then into the fridge to set.
Now Playing
03:52

4. Icing the Cake

This is where we get a nice little workout while rolling out the sugarpaste. Try and aim to get it nice and neat all the way to the bottom, but as it will be hidden it’s not absolutely vital for it to be without a crease. Hands and cake smoothers at the ready.
Now Playing
11:33

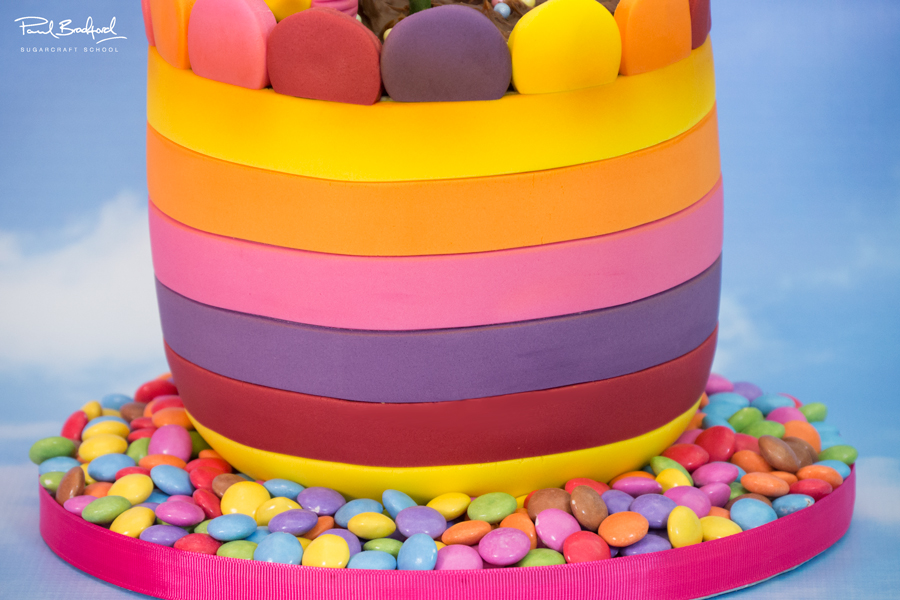
5. Applying the Rainbow Stripes

It’s time to use some bright and beautiful colours! First of all, get the cake nice and sticky with some edible glue and roll out and cut the various stripes. Have fun with this and pick any colour you like! However, if you want to go with what Paul has chosen, we have listed all the colours in the ingredients list below. It’s definitely a good idea to measure the cake, along with the thickness of your stripes to keep it lovely and uniform. Make sure you have extra of each colour as you will need it for lesson 11.
Now Playing
07:51

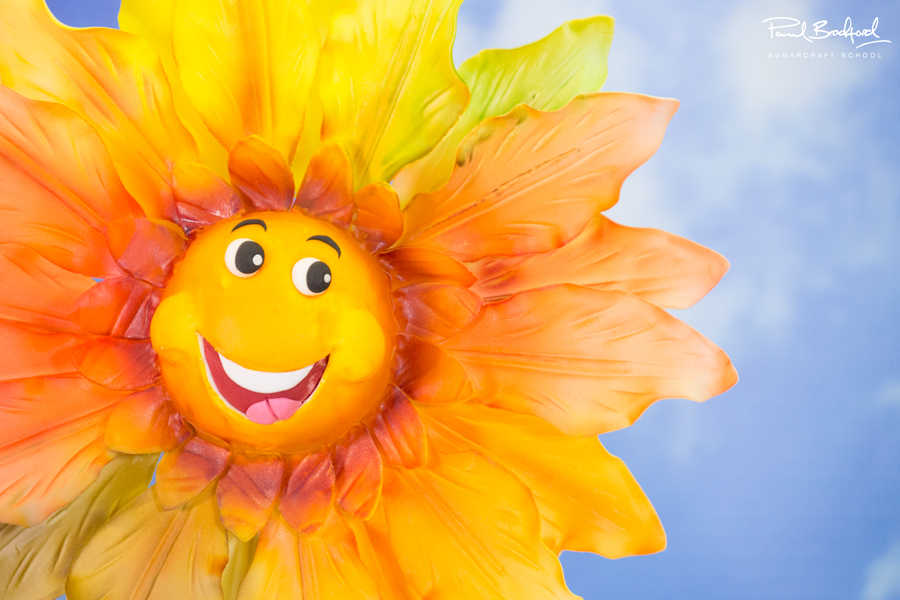
6. Sculpting the Sunflower's Face

We’re now onto the sunflower’s head and face. You will need a 2 ½ polystyrene ball, a 5ml thick wooden dowel and white and red sugarpaste. Paul uses a nice simple technique to get a flawless smile and cute little cheeks.
Now Playing
05:09

7. Adding Large Petals to the Sunflower

In this lesson, Paul shows us how to add the petals to the sunflower. Tweezers and some wire cutters willy be handy at this stage and make sure you have green floristry tape to hand to cover the dowel.  Paul finds that he needs to add some extra, smaller petals to fill out the flower so don’t worry if you find that it’s looking a little bare. Watch the next lesson to find out how to fill the gaps in the petals.
Now Playing
03:49

8. Adding Small Petals to the Sunflower

In the previous lesson, Paul noticed some gaps in the petals. In this lesson, he fills the spaces with some smaller petals and decides to use the oval “rugby shaped” cutters to cut petals out of sugarpaste which is rolled out to roughly 1 ½ ml thickness. Again, Paul uses a very similar technique as the larger petals, but due to their size, is able to get two to three textured with the veiner at a time. He then sticks them on to the flower head using CMC and hot water. Now the sunflower is looking lovely and full.
Now Playing
15:18

9. Airbrushing the Sunflower

This is where it get really fun! Airbrushing can be messy but so worth it, because of the realistic effect. In this lesson you will see how Paul manages to create a very vibrant looking sunflower. As the base colour is yellow, make sure you have plenty to hand.
Now Playing
12:17

10. Decorating the Sunflower's Face

First of all, Paul airbrushes the leaves with a forest green paint by The Sugar Mill. Next, it’s cutting out the mouth – make sure you have a very small and sharp knife/blade to hand. Paul then gives the sunflower a set of teeth, a cute little tongue and of course a set of eyes complete with some eyebrows for character. Now we need to let it dry so it may be best to leave it for half a day.
Now Playing
04:07

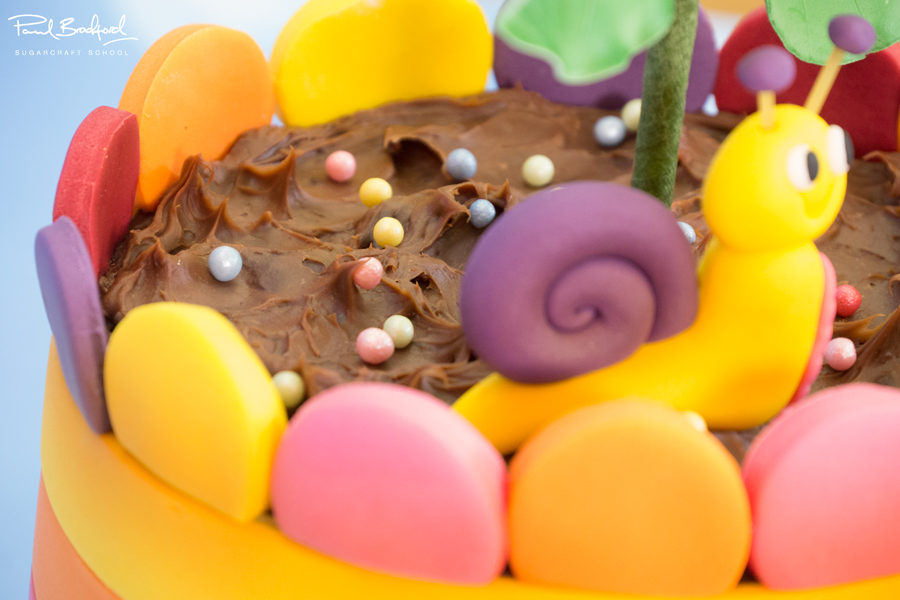
11. Applying Piping Gel to the Base

It looks as though Paul has been sneaking around during the night and has cut out some colourful circles! Use each of the colours of sugarpaste to cut these out and they will be used for the top of the flower pot. Now it’s time to transfer the cake onto the board and then layer on some piping gel, ready for lots and lots of yummy smarties! It’s a good idea to decide on which ribbon you would like to use and put it on just now before sticking down the smarties.
Now Playing
06:37

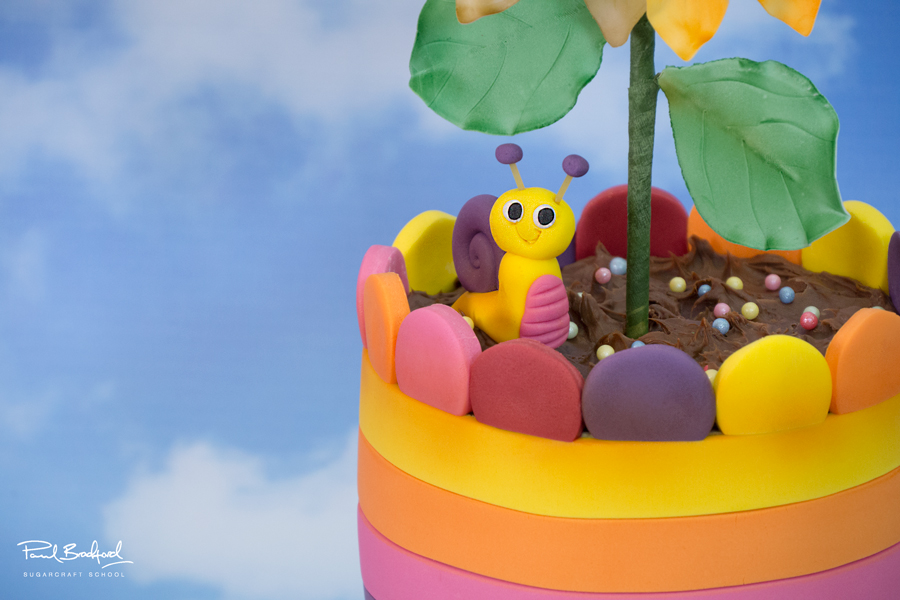
12. Decorating the Plant Pot

It’s time to put all of those smarties on. You know you’ve made a good cake when you want to eat the base as much as you do the cake. Paul uses approximately seven packets of smarties. For the soil, you can use your cake scraps from earlier or some ganache, whichever you prefer the look of. As Paul threw away all of his scraps, he opts for yummy ganache which works very well. Now it’s just a case of adding those colourful circles to the plant pot and then back to the sunflower.
Now Playing
07:06

13. Cleaning the Pot & Adding Leaves

At this stage, glaze spray will come in handy to get rid of any marks and streaks. If you don’t have any, some high percentage alcohol or a steamer will do the trick too. Now it’s time to add those leaves we prepared earlier. Paul decides to only use two of the leaves as they work well and look like a sweet little pair of arms.
Now Playing
09:32

14. Adding the Snail

Paul decides to add a tiny snail as a finishing touch. Don’t worry, you don’t need any extra ingredients – it’s very straight forward and easy to follow. And finally, one last bit of airbrushing to make it look realistic…. and we’re finished!
Now Playing
10:12

15. Fast Forward

Short on time? Why not watch the whole tutorial in 10 minutes by clicking here!
Now Playing
01:56

16. Other Ideas

Paul shares some additional ideas and how the cake design can be adapted. We would love to see your take on this cake! You can share your designs with us on our Facebook page.

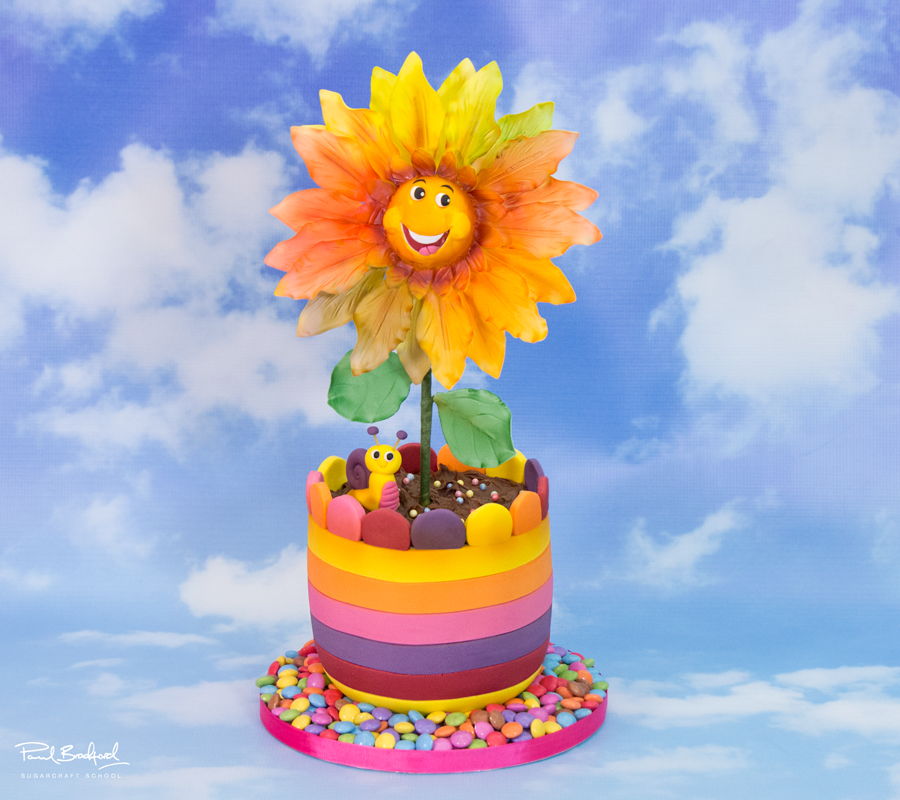
In this week’s tutorial, Paul covers a number of techniques including cake carving, ganaching, creating basic petals and detailed airbrushing.

Paul had the privilege of making this cake for a very special person – Leeanne, a friend of a student of Paul’s, sadly lost her battle with cancer last year. Her friend got in touch with Paul to ask if he could make a ‘sunflowers and rainbows’ themed cake for a charity party to raise money for the Teenage Cancer Trust. This is the cake that Paul created in memory of Leeanne – a very fun and cheery sunflower which we hope will bring a smile to your face.

If you would like to make a donation to the Teenage Cancer Trust, please click here.

Paul Bradford

Paul Bradford

Paul Bradford´s mission is to ‘Empower people to achieve their cake decorating dreams’ by providing a range of cake decorating courses and online tutorials through their website, which currently teaches 195,000+ students.  
14 Day Free Trial