Tutorial Preview
1. Carving and Ganaching
Paul carves the bears head, body and legs. He then applies his first layer of ganache.
2. Covering the Cake
Paul now shows you how to cover the body of the bear using sugarpaste.
3. Icing the Board and Adding the Arms
Paul shows us how to ice the board and add the bears arms.
4. Adding the Features
Paul begins to add the features to the bear’s face.
NOTE: There was an issue with the volume on the main camera in this lesson, apologises any inconvenience caused.
5. Piping the Bear
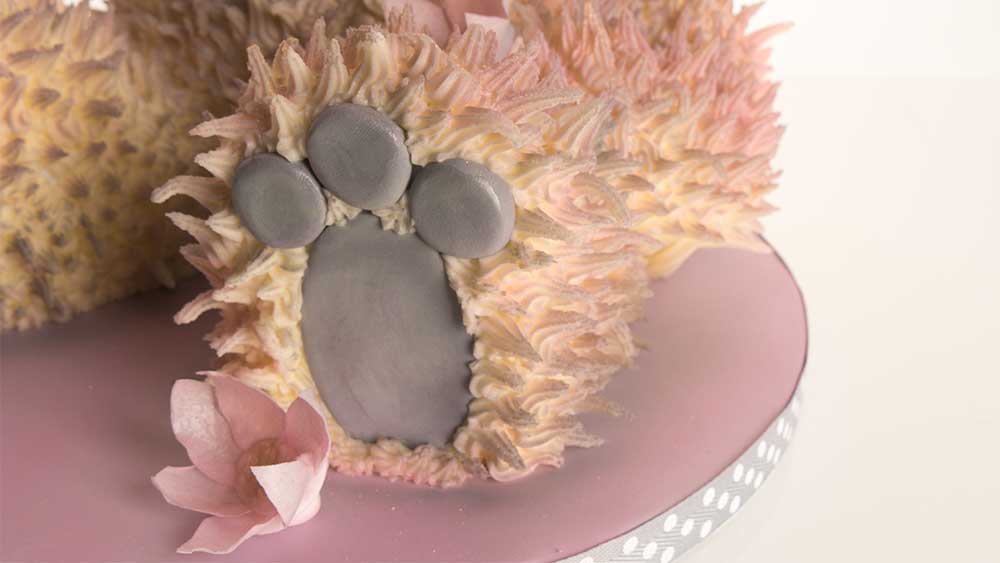
Paul mixes up his buttercream and begins to pipe around the bear’s body to create a fur-like effect.
NOTE: There was an issue with the volume on the main camera in this lesson, apologises any inconvenience caused.
6. Making the Hat
Paul shows us how to make the rim of the hat. He also begins to cut his petals out for the bear’s hat.
7. Lesson - 7 - Creating the Petals
In this lesson, Paul teaches us how to make the petals for the bears hat.
8. Finishing the Hat
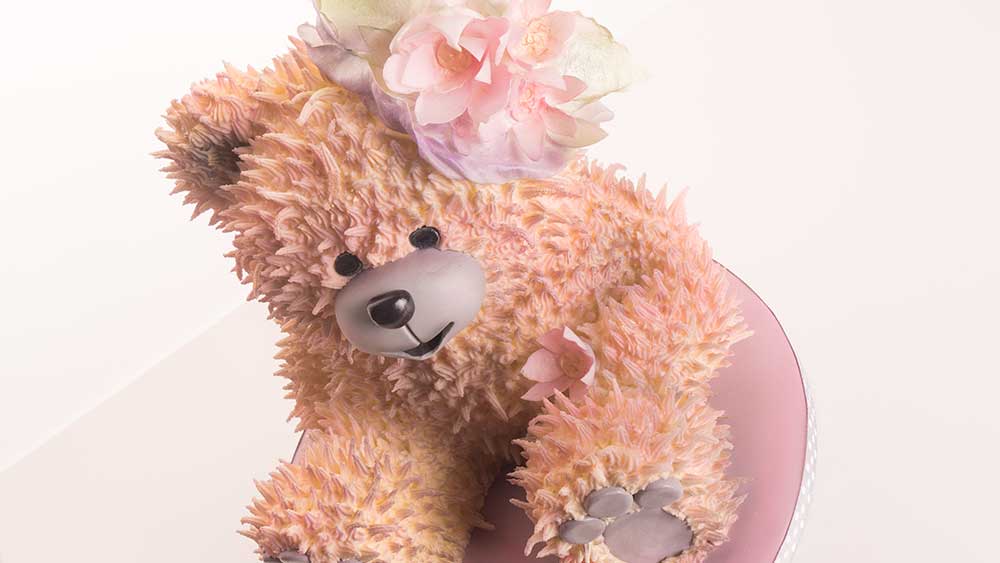
In this lesson, Paul puts the finishing touches to the hat and touches up the eyes.
9. Adding Some Colour
Paul gets out his airbrush and starts to add some more colour to our bear.
10. Finishing Touches
Paul makes his bear a cute button nose and adds the final touches to his cake.
11. Other Ideas
Paul shares some suggestions for other designs and interpretations you can make with the techniques you’ve just learned.
12. Pro Lesson
Paul discusses the cost, time and selling price of a cake such as this.
13. Highlights
We take a look at some of the highlights from the vintage teddy bear cake tutorial.
Learn how to make this vintage teddy bear out of cake!!!
In this week’s tutorial, Paul Bradford shows you how to make this vintage teddy bear cake.! So cute you’ll be struggling to cut into it!
Full of a host of great tips and techniques, this cake tutorial really lets you use your imagination.
In this tutorial, you will learn how to:
- Create edible flower petals
- Use an airbrush effectively
- Cake carve
- Make fur using piping techniques
- and much, much more
Don’t forget to share your interpretations of this wonderful cake with Paul and rest of the Sugarcraft community on our Facebook group.
Who knows? You may even end up featured in one of our monthly members’ cake blogs.
Cake
- 10” sqaure by 3” deep chocolate cake
Buttercream
- 500g butter
- 1kg icing sugar
Ganache
- 1.2kg
Cake Card and Drums
- 10” square cake card
- 12” round cake card (temporary)
Sugarpaste
- 1.5 kg of white sugarpaste (Renshaws)
- 500g of Lilac (Renshaws)
- 50g Black sugarpaste
- 150g Grey sugarpaste
- 300g Pink sugarpaste
Paints and Dusts
- Yellow, black, pink, green, purple and white airbrush food colour
- Pink dust
- Gold sparkle
Ribbon
- Grey and white polka dot
Other
- Bubble tea straws
- Wafer paper A4 (pink and white)
Knives
- Palette knife
- Sharp cutting knife
- Serrated knife
Cutters
- Oval cutter
- Large and medium size leaf cutter
- Medium and small lily cutter
Paintbrushes
- paintbrush
Modelling Tools
- PME modelling tools
Cakey Tools
- Rolling pin
Other
- Scissors
- No6 Star nozzle PME
- Piping bag
- Airbrush
Comments
Add a Comment
Hi Paul, Love it!!! I was wondering why you need to cover the ganached bear with fondant before you add the buttercream? Does it attach better? Thanks again for all of your wonderful tutorials!! I never miss a week! Sally
HI Paul, Great tutorial. I am a beginner watching free tutorials, appreciate this weekend premium tutorials option )). Can you please mention the dimensions of the frozen square cake ?
All the tools and ingredients are listed in the tabs below the gallery pics on the course, but for speed Paul uses a 10″ square cake (3″ deep) for this ….https://www.designer-cakes.com/online-cake-decorating-courses/vintage-teddy-bear-cake
The flowers on the hat are sooo cute. What paper are they made of ?
Paul uses rice paper (wafer paper) for the flowers on the hat 🙂
I posted a question on March 1st. I was wondering if you missed it.
The bear looks adorable. Instead of ganache, can I cover the cake with a thin layer of buttercream then pipe the buttercream fur?
Yes, buttercream will work, but it’s a little more tricky. Best to refrigerate the cake once covered with buttercream to make sure it sets then cover with a think layer of sugarpaste.
Hi
Really love this cake!What egg mix quantity of Paul’s chocolate cake does this cake use? How long does it need to cook?
Thank you!
Paul’s chocolate cake recipe with Ingredients and baking times is available in our free section…. https://www.designer-cakes.com/online-cake-decorating-courses/firm-and-moist-chocolate-recipe-a-free-course-by-paul-bradford
Paul has great staff working for him). Appreciate prompt answers. Have a question about buttercream. Do you think swiss meringue buttercream would work the same? The texture might be more fluffy and the fur coat would not look good? Health wise and taste wise it is supposed to be better. Less sweetness, more taste.
I am watching Paul’s buttercream tutorial, he suggests whipping less to avoid extra air. Have never heard him mention SM buttercream.
Hi can I ask if can use cakes for the hand part instead of fondant? I planning to just using buttercream for the cake without covering with fondant.
Hi there, love your tutorials, this site is amazing but I just need to know how do I get the template? Can’t see it any where, many thanks.
Sorry please ignore last comment, I have since found it.
No problem. Glad you’re enjoying the tutorials and good luck with the cake 🙂 – Matt
I have tried downloading the template and emailing it to myself but it wont let me! do I have to do anything in particular or even pay for the course but I don’t see where to pay for it) I have made the cake and ready to cut it out after work tomorrow and I cant print it out and don’t know the size, I have to have this cake made for Sat 3 days N.Z time. Any assistance much appreciated thank you!
hi Millie80,
Please accept my apologises, due to an IT issue we missed your question. I appreciate that it is too late now for the project that you were working on.
As you are on the free membership package it will have given you problems downloading the templates. I have added a clearer Upgrade button now to help you and others who will have experienced the same issue.
If you have any problems at all in future our customer support desk is available 365 days a year at: [email protected]
Hi, just wondering what the wilton tip no. equivalent would be for the pme no. 6 star tip??
Hi tayh92
I don’t think there is an exact equivalent for the two brands. The nearest may be either a Wilton 16 or 18. It’s difficult to be more precise as the tines of the Wilton tips are deeper than of the PME making them look bigger. I would suggest using the Wilton tip most used for small/ medium stars, shells and scrolls.
Hello. Very nice tutorial. What is the approximate weight of the final cake here. Secondly, aren’t there chances of buttercream making the fondant underneath wet owing to the moisture content and hence the fondant can slip down in pcs.
Thanks so much.
HI Soneeka, the finished cake would be somewhere between 7-8Kg. It’s important to ensure that the buttercream is of the right consistency, getting the stiff peak that Paul shows in the lesson. You need to ensure that the fondant isn’t sweating, otherwise you will have problems with the buttercream slipping. However, if you are concerned then a de-humidifier will help.
Hi
I read in a previous comment to someone that piping buttercream on a crumb coat is trickier and you recommend covering in sugar paste first. Can you tell me why?
Thank you
Melanie
hi Melanie,
The piped buttercream sticks better to sugarpaste. Piping on top of a crumb coat will work so long as the temperature can be regulated, but any heat at all and the piping will slide off the crumb coat.
Kind regards
David