
Here at the PBSS studio, we’ve been experimenting with Sugar High Inc’s popular Bakedrops and offer your some top tips for taking great looking photos in no time at all.
 Backdrops, Every Cake Decorators Secret Weapon
Have you ever wondered how to take great looking photos in close to no time? Look no further than the amazing backdrops, or Bakedrops as they are known, produced by our very own Guest Tutor, Brenda Walton from Sugar High Inc. They can be set up in minutes, come in a huge variety of designs and transform your photographs giving them a satisfyingly professional finish. Read on for our three top tips for taking great photos using Bakedrops. Here at the PBSS studio, we like to get a little creative and sometimes add a few props for added effect, as in the Steampunk Robot cake (top right), which was inspired by Genny Penny’s fantastic fabric robots, but they’re just us effective used on their own if you’re short on time.
You can also see the multi-talented Brenda making her extremely cute little Monsters in Bed Cake on our Online Tutorial Library, where you’ll see her creating the most adorable design, with her bubbly personality shining through!
Photography and Your Brand Image
Many designers make the most amazing cakes, taking hours in design and production, then all too often take a quick pic on their phone or tablet before hurrying it out the door. Why? Lack of time to have a ‘professionally’ taken photograph is usually the excuse. But these days most phone or tablet cameras take exceptional pictures, so as long as the subject is worthy, in focus and a suitable background is chosen, there’s no reason why you can’t take a ‘professional’ looking photograph in almost the same time as it takes to capture a not so great one.
 I often speak to cake designers who simply aren’t charging enough for their creations. Why? “Nobody will pay that in my area for a cake!” My immediate response is – how do you know? “Well, I just do.” It’s true that there are far more cake designers around now than 10, five and even one year ago. This increased competition often causes designers to price down. However, the most successful of designers quickly learn to present themselves and their cakes well, have a well thought marketing strategy and consistent branding – all of which are most immediately reflected in the presentation and photography of their cakes. The more professional your marketing, the higher value customers will associate with your cakes.
Image is everything when it comes to showing your clients what you can do and that little extra effort makes all the difference. Photographs of your cakes are often the first impression prospective clients have of your business and skill, so if they aren’t presented well, you’re losing out on potential business. This applies to photographs you display on your website, social media channels and third party websites.
Approximately 3% of the population will pay the required price for a designer cake and too many cake designers listen to the 97% who aren’t really their target customers, who constantly mutter that horrific sentence “I wouldn’t pay that for a cake”. But how do you get to the 3%? It’s not as difficult as it may seem. Photography is a great place to start and for even more tips and insights, you may want to take a look at our Pro Videos.
Top Tips for Quick, Professional Photos
Here are our three top tips for taking great looking photos in minutes:
1 | Lighting & Night-time Photography
It’s best to avoid harsh lighting, ie: just using ceiling lights, which can cast shadows over your cake. This is especially important if you’ve finished your cake late in the evening and need to take photographs with no natural day light. Try and use various light sources, such as lamps, rather than just using your ceiling light, to soften the lighting. You can also purchase these LED lights which are very affordable and battery powered. A tripod may be a useful purchase too, both for your camera and your LED light. Place two lights around the cake, at a 90 degree angle to one and other to cancel out any shadows.
2 | Backdrop Sizes & Cake Placement
It’s usually better to use a larger backdrop, and bring the cake away from it as much as you can. This will give your photographs more depth and remember you can always crop the image, even if you’re using a phone or tablet.
3 | Bakedrop Designs
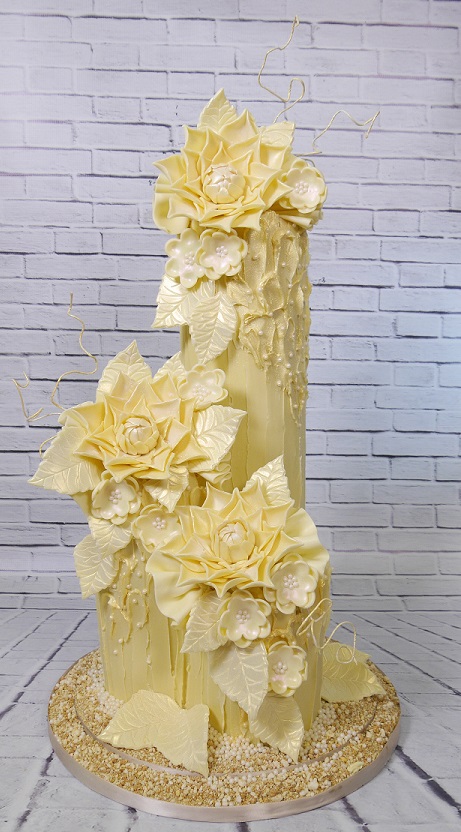
When choosing a backdrop, make sure it complements both the colours and feel of the cake – above we have an example of Paul’s elegant Waterfall cake (top middle), and a lovely white brick Bakedrop. Both are individually strong designs but when put together, the colour of the cake clashes with the background, doing neither justice. With the Happy-Broom-Broom design (top left), we have opted for a cloud Bakedrop to complement the colours and whimsical design of the car – simple and effective. Finally, the rustic wood Bakedrop used for the Steampunk Robot, though quite a busy background, complements the aesthetic of the cake and props.
Attended Courses
The cakes shown above are Paul’s brand new range of Attended Courses which he’ll first be teaching in Linlithgow and Ireland, and then on tour in Australia and New Zealand in September 2015. A full schedule will be published soon, but in the meantime the Linlithgow dates can be found in our Attended Courses listings. Next year, our Accredited Tutors will bring the courses to many more locations throughout the world.
The key issue is to present your cakes well. All of the photographs you can see here have been taken on simple Bakedrops which took less than five minutes to set up. For our UK customers, you can purchase Bakedrops from The Cake Decorating Company and if your’re based outside of the UK, you’re best bet is to go direct to Sugar High Inc.
Happy snapping!
David
