Tutorial Preview


Highlights
This is the place to be if you are struggling for time. In this video you will find all the key parts of the tutorial to enable you to make this wonderful cake.
1. Carving the Body
In this lesson Rose shows us how to prepare the body shape for this wonderful cake. Rose is using three 8” round madeira cakes which are 3” in depth. Once they have been stacked use a 3” cake card on top of the cakes toward the back as your guide when you are carving. Make sure to cut little by little and always step back and asses. If you find you cut off too much don’t worry. You can always re-apply it with a little ganache and as well once the sugarpaste goes on you will beef up the shape again. Generally you want to carve an egg shape but with a clear stomach and back.
2. Carving the Head
For the head Rose uses two 6” round cakes but one of them is cut in half so the height should be roughly 4 ½ “ tall. For the head you want to create a rounded shape and then cut at a slight angle into it to create a flat face shape. The cut out two circles half with into the cake to wholes for the eyes.
3. Finishing the Head and Applying Ganache
Here is a brilliant example of correcting your carving! In this lesson Rose decides that she would like to add some extra volume to the head and she achieves this by cleverly using the spare bit of cake from the previous lesson. You can do the same for any part of the cake and as madeira cake is nice and light it will attach easily. Now it’s just a case of covering the cake in warm ganache and then popping it in the fridge for a few minutes.
4. Covering the Cake
In between the last lesson Rose went round the cake with a palette knife dipped in warm water to smooth the cake and now it is ready to be covered. This will be the base layer as more sugarpaste will be used to create the fur texture and so on. The sugarpaste is rolled out to 3mm and it is best to try and cover the whole cake with one piece of sugarpaste. You can do the same as Rose and use extra pieces to close up any gaps and simple blend them in by rubbing it with your hand.
5. Building up the Face
To get the realistic flesh colour simply add some chestnut colour by sugarflair to your white sugarpaste and then to give it extra strength add approx half a teaspoons of tylo powder. Make a large ball of sugarpaste and work with it on a flat surface so that the back of it is flattened. Once you have got it nice and smooth attach it to the face with some edible glue and hold it in place for a few minutes.When it comes to adding the rest of the sugarpaste make sugar you work with it quickly once it’s rolled out or it will begin to crack easily.
6. Adding Detail to the Face Pt 1
If you have ever doubted to use of a dresden tool this will convince you otherwise. This is the only tool used to get most of the detail for the face and it’s really quite amazing how versatile it is. When you have made the mouth be sure to put something in it and leave there while you continue as this will allow it to dry and not lose it’s shape.
7. Adding Detail to the Face Pt 2
Let’s start on the eyes shall we? For the eyes we will be using flower paste as we need something a little stronger to keep it’s shape. Make sure you roll out the balls nice and smooth so that they don’t look strange once they are painted. Making the tongue is nice and simple using some pink colouring gel in the white flower paste and rolling out a flat oval shape with a line indented in the middle of it.
8. Dusting the Face and Adding Teeth
Rose mixes black dust with shadow grey dust to get the nice orangutan flesh colour and brushes it on with a large soft brush. You definitely want to use a brush similar to her so you don’t scratch or mark the sugarpaste. For the teeth Rose simply makes small balls of white flower paste and flattens them and then squares them off with her fingers. Then all you need to do is secure them to the mouth with a bit of water.
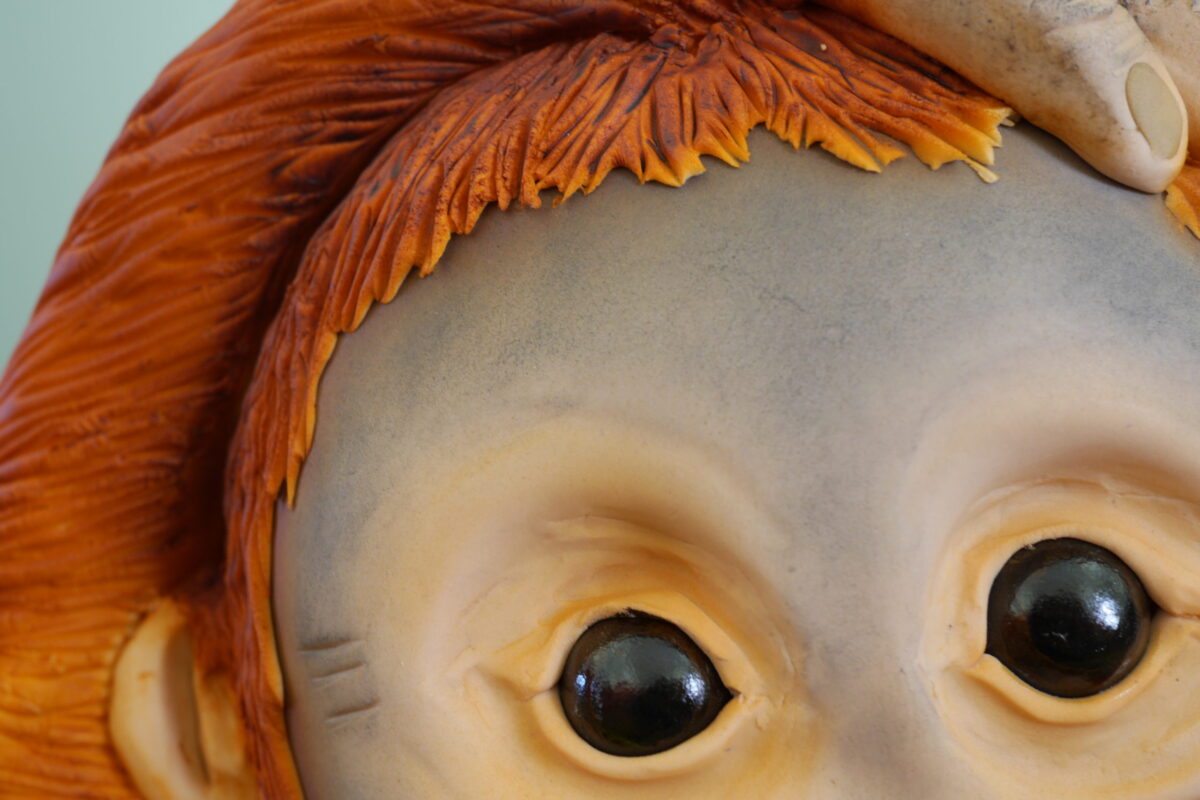
9. Finishing the Eyes
Now that the eyes have set it’s time to put them on the cake and add some eyes lids. You will love this technique and be amazed by the almost seamless join of the eyelids to the face. First of all paint the eye sockets with some edible glue and then hold the eyes in place for a minute or so. For the eyelids Rose rolls out small sausages, inserts them around each eye and then gradually pushes them in and blends them with a dresden tool, a little bit of water and her fingers.
10. Making the Legs
Rose decides to use rice krispie treats for the legs as opposed to cake which will keep the weight down and will be a lot easier to work with. If you would rather make your own rice krispie treats click here for the recipe. Rose uses 5 and half bars and needs them together and then shapes them into large sausage shapes. She then shapes them and then covers them in sugarpaste. Once you have done this you can start texturing them and all you need is a dresden tool. Watch Rose’s brilliant technique for creating a realistic hair texture.
11. Creating Hair for the Head
In this lesson Rose begins to add hair to the head. First of all she rolls out a large piece of sugarpaste which is added on top of the head like a blanket and then she begins to create the hair with a dresden tool. The key is to work in rough rows. Be quite rough and random and don’t spend too much time on it or you will begin to become too methodical and it will begin to lose its realism so stick on some music and let your hand be free.
12. Creating Hair for the Body Pt 1
Much the same technique as the previous lesson with another large piece of sugarpaste being rolled out and added to the body. Just make sure you measure how much you need before rolling out the sugarpaste so you definitely cover it in one piece. You should be ok just using water to attach the sugarpaste but if that doesn’t work you can use edible glue. When cutting out sections you don’t need mark it out with the dresden tool before cutting it as it makes the cut easier and neater. Top tip from Rose there.
13. Creating Hair for the Body Pt 2
Now to add hair to the rest of the body. When merging the body with the head brush a little water where they join and begin to blend them together with the dresden tool and try and make it as seamless as possible. For the front of the body Rose uses a tool called a coarse texture brush by Kemper. Don’t stab to the brush into the sugarpaste but place the brush flat against it and simply dab it to create a slight indent creating a nice soft hair effect.
14. Adding the Arms
If you find that the rice krispie treats aren’t needing together very well simply put them in a microwave for a few seconds. This will warm up the marshmallow which will in turn allow them to stick together more easily. When making the arms bear in mind that they should be longer than the legs. You will want to have a long dowel to hand for this lesson and you will use it when attaching the right arm. As the arm is quite heavy it would be very difficult to have it stay resting on the head without support. Place the dowel through the elbow and have it go right through the arm and into the body. Once the arms are it’s time to add the hair with the dresden tool.
15. Adding Hair to the Arms
When adding hair texture to the arms make the strokes with the dresden tool nice and long as you want the hair to appear longer on the limbs. If you find that the arms aren’t quite as thick as you’d like simply roll out another piece of sugarpaste and attach it onto the arm and merge it in with some water and the dresden tool.
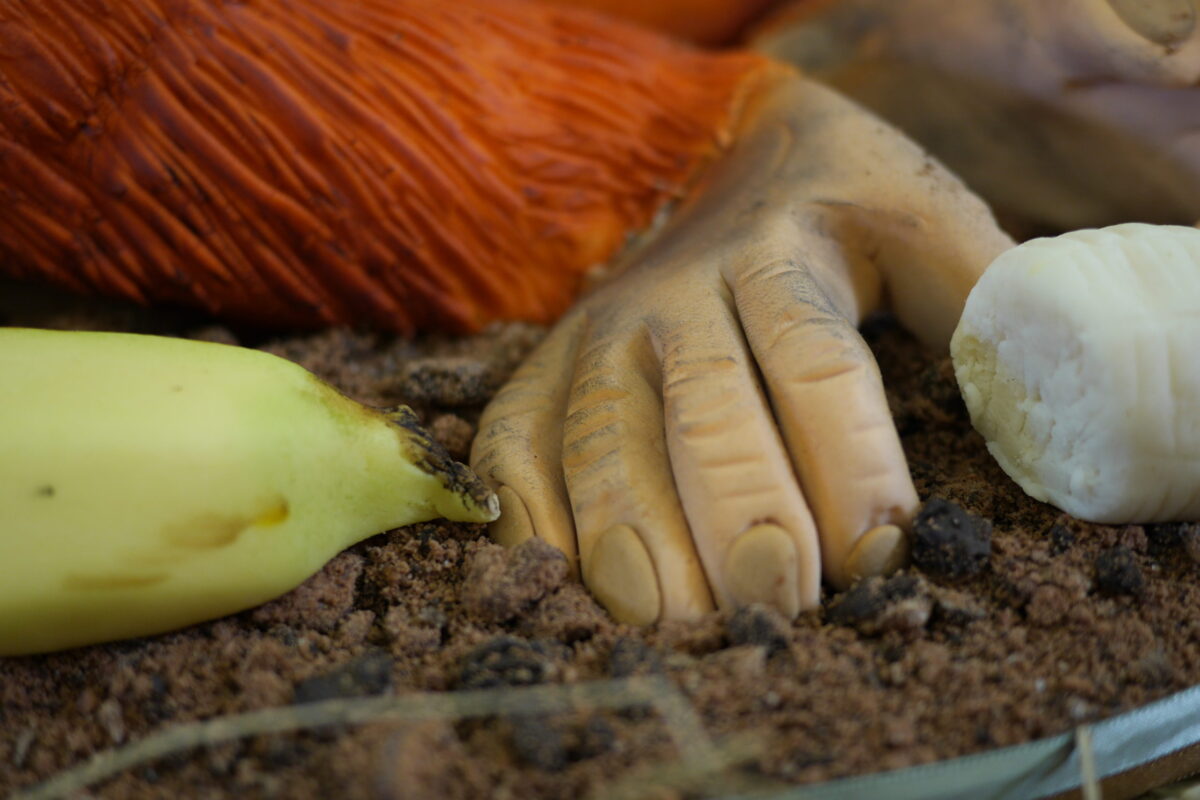
16. Making the Hands
Hopefully you have kept the flesh coloured sugarpaste you made earlier sealed and prevented it from drying as we’re about to use it again. Make two (exact same size and weight) balls of sugarpaste and flatten them down into a curved tear shape. From here cut out the fingers and round them off. When you are indenting them in preparation for the nails make sure you put the nail for the thumb in the right place so that it is not facing up the way but to the side.
17. Making the Feet
When making the feet bear in mind that while they should be a little larger than the hand the toes are in fact quite long and are very similar to the hands. For the nails Rose has simply taken some of the flesh coloured sugarpaste and added a little dark brown to it. When attaching the hand to the body don’t worry about merging them in as you will do this with some extra white sugarpaste. Simply roll out four thin strips around 3ml in thickness and add them like cuffs slightly overlapping the hand.
18. Making the Ears
Rose shows us how to make some cute little orangutan ears. She starts of by making fairly small but thick D shaped pieces of sugarpaste and then makes indents with the dresden tool. When putting the ears on just use a little bit of water and then make little sausages of sugarpaste which you will put at the back of the ear to help blend it in.
19. Airbrushing Pt 1
Rose starts of with airbrushing the feet, hands and face. Always start of by spraying lightly and gradually adding more pressure as you can easily correct a lack of colour but it is quite difficult to undo spraying on too much. Don’t worry about some of the colour going on to the body as the colour you will use for the body is much darker and won’t be seen. As for the teeth, they can be wiped clean with a wet toothbrush.
20. Airbrushing Pt 2
In this lesson Rose moves onto airbrushing the rest of the body. It’s not only about being consistent with the pressure put through the airbrush but as well the distance the airbrush is from the cake. Rose advises that you colour in a circular motion as this helps keep the colour even.
21. Airbrushing Pt 3
Now it’s time to start adding some shading and again be very careful here as you will be using a darker colour and want to make sure you don’t over spray or spray inaccurately. Just think where all the natural shadows and darkness such as under the arms and near the board and so on.
22. Working on the Board
For the board Rose decides to create a nice earth effect by using bourbon cream and Oreo biscuits. She puts them in a plastic food bag and then crushes them with a rolling pin. The different shades of brown creates a realistic earthy look as well as tasting lovely if anyone so happen to eat the board as well. To stick it down she uses ganache that has been warmed up to a runny consistency so she can spread it easily.
23. Making the Banana
In this final lesson Rose teaches us something we can use time and time again. How to make an incredibly realistic banana! All the different colours of dust and so on are listed in the ingredients section below. Make sure you have a banana in front of you to study as you go along. Have cake smoothers to hand and use your fingers to rub the sugarpaste to get a nice shiny appearances like the skin of a banana. Make sure as well that you have some more of the darkened sugarpaste that you used for the nails as you will use this for either end of the banana.
24. Other Ideas
In this lesson Rose shares some ideas that you can implement to make this cake unique to you. We are sure you have some of your own fantastic ideas and we would love to see them. Please share your pictures with us on our facebook page as well as Roses’s.
25. Pro Lesson
In this lesson Rose gives us some inside information on costs and provides advice on pricing your cake if you are making it for a client.
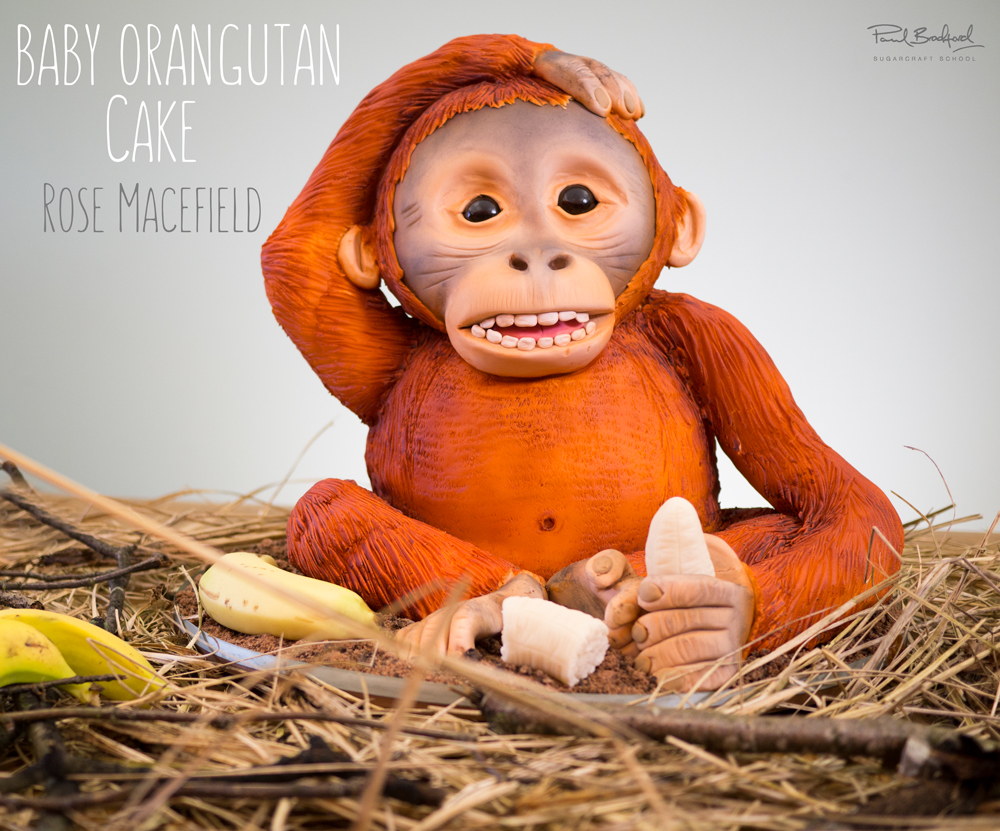
Rose Macefield introduces us to this adorable little (quite big for a cake, actually) baby orangutan cake. This tutorial is stacked full of various skills such as advanced cake carving, modelling, airbrushing, dusting and much more. Not only will you learn how to make this fantastic cake but you will even learn how to make a realistic banana. A banana we might add that has been mistaken for a real one.