- You cannot add another "Fire Engine Cake" to your basket. View basket Continue shopping
Tutorial Preview
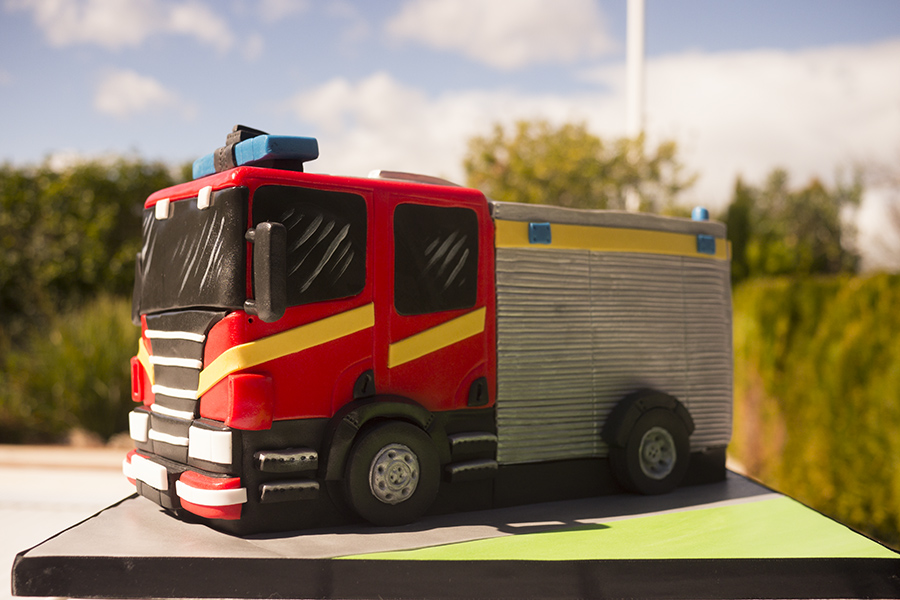
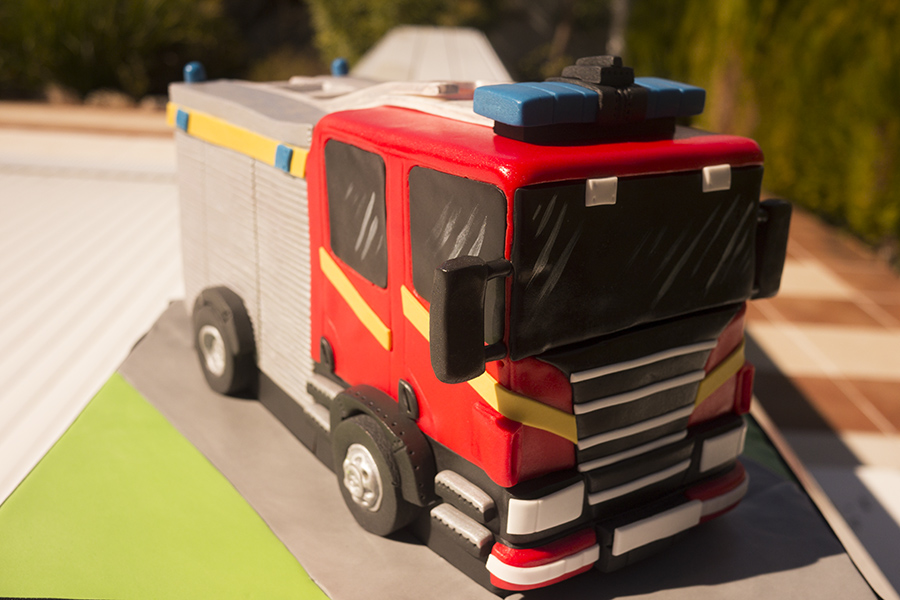
Fire Engine
with Paul Bradford
Skill level:
Easy Cake Decorating | Cakeflix - Beginner Level Courses
HD Lessons:
20
05:40
1. Ladders
The first thing to create is the ladders, as you’ll want these to dry over a long period of time to allow them to set straight for when they are place on top of your fire engine cake.
07:43
2. Carving
This is always a tricky part of any cake, Paul shows you how to carve the shape of your Fire Engine without wasting any cake. Although, feel free to leave a little bit of cake spare for a quick treat 
28:41
3. Ganache
Another tricky part of any cake is the ganache, so in this 25 minute lesson, Paul goes through exactly how to put this jigsaw together. Paul also adds some orange baileys to the cake for an extra bit of cheeky zest.
10:07
4. Icing the Cab
The big red cab is the first thing that most people will notice on this cake. Although later in the course we’ll be adding all the detail, it’s important to get this right from the outset.
10:07
5. Icing the Body
Again, getting the body iced perfectly is another important part of the base to build up from. This is iced in Panels rather than one sheet of sugarpaste.
07:44
6. Wheels and Body
A little work is still needed on the foundations of the cake to give it that extra bit of wow…it’s all in the details. Pail also cuts out the wheel arches in this lesson.
08:47
7. Blacking Out
To give the fire engine cake some real depth and value, Paul starts to black out the bottom of the cake to make a shadow like base for the fire engine to stand on.
NOTE: Paul changes the depth of the blacking out a little in a later lesson.
11:22
8. Side Windows
Paul marks out the side windows based on a template he makes after studying a picture. Even though we’re not cutting the windows out in this lesson, it helps going forward for scale on the rest of the cake.
28:38
9. Cab Details
There’s still a bit of work to do on that cab! So Paul goes into a bit more detail in working out the proportions of the fire engine.
08:48
10. Windows
Paul starts to work on the windows based on previous markings (side windows for scale). All the windows are marked out now, so it’s time to add them in!
10:29
11. Front of the Cab
This is a big part of the cake, there are some real key identifiers for a fire engine, but it isn’t really possible to put them all on the cake, so Paul starts to work on the most important parts on the front of the cab. This cab could be used for any truck really.
17:05
12. Front Detail
More detail on that cab! It’s going to look pretty special! Paul works on the Grill and bumper of the cab in this lesson, along with some other finer details.
19:32
13. Nee Naws
The crowning glory of any fire engine has to be the Nee Naws! Everybody knows what these are and it just wouldn’t be a fire engine without them!
11:39
14. Wheels
It’s not going to go anywhere without any wheels. We look at creating two different types of wheels to give your fire engine that real authentic look.
08:13
15. Yellow Stripes
The Yellow stripes are such a simple and quick addition, but they add so much to the cake! Our fire engine cake is really becoming a fire engine now!
06:38
16. Silver Paint and Roof
In this lesson, we look at adding a more authentic silver coat to the fire engine, and work on the roof some more. With all that detail on the cab, Paul has to add some more detail to the roof too!
11:43
17. Yellow Stripes and Blue Lights
More lights and stripes! Again, the add a lot to our fire engine cake. It’s amazing how such small additions can change the entire look of a cake.
18:52
18. Finishing Touches
In this 20 minute lesson, Paul has to walk away from the cake otherwise he’d be there for weeks adding detail. He picks out and adds the most important items still missing, then adds the wheels and ladders.
01:26
19. Other Ideas
Paul talks through some of the techniques he ran out of time to add, some customisation you could do and also, a few other ways you could achieve the same results.
01:19
20. Pro Lesson
We look at pricing and customisation in this weeks Pro lesson. Paul talks about how long you should really be spending on a cake like this and how it’s important to keep track of your time.
In this course, Paul creates a cake that has been requested so many times, that we just had to release it…and it’s a cracker! This bumper course of 20 lessons involves lots of new tips and techniques and is approached in very much the same way as if you were running your own cake shop and this order came in, working from pictures and a basic brief to create this stunning Fire Engine.