Golden Damask Rose Wedding Cake Decorating and Baking Tutorial

Tutorial Preview

Join NOW to access 1661 courses Watch Now
14 Day FREE Trial
Golden Damask Rose Wedding
with Paul Bradford
Skill level: Intermediate
HD Lessons: 15
Decorating time: 9 hours
Now Playing
11:12

Highlights

The perfect place to come if you are struggling for time. This video will touch on all the key points required to make this cake and you will find links to the various equipment that Paul used for this cake within the Tools tab above.

Now Playing
11:58

1. Introducing the Design and Making the Leaves

Strapped for time? Why not skip to the Highlights section where you can learn the fast way.

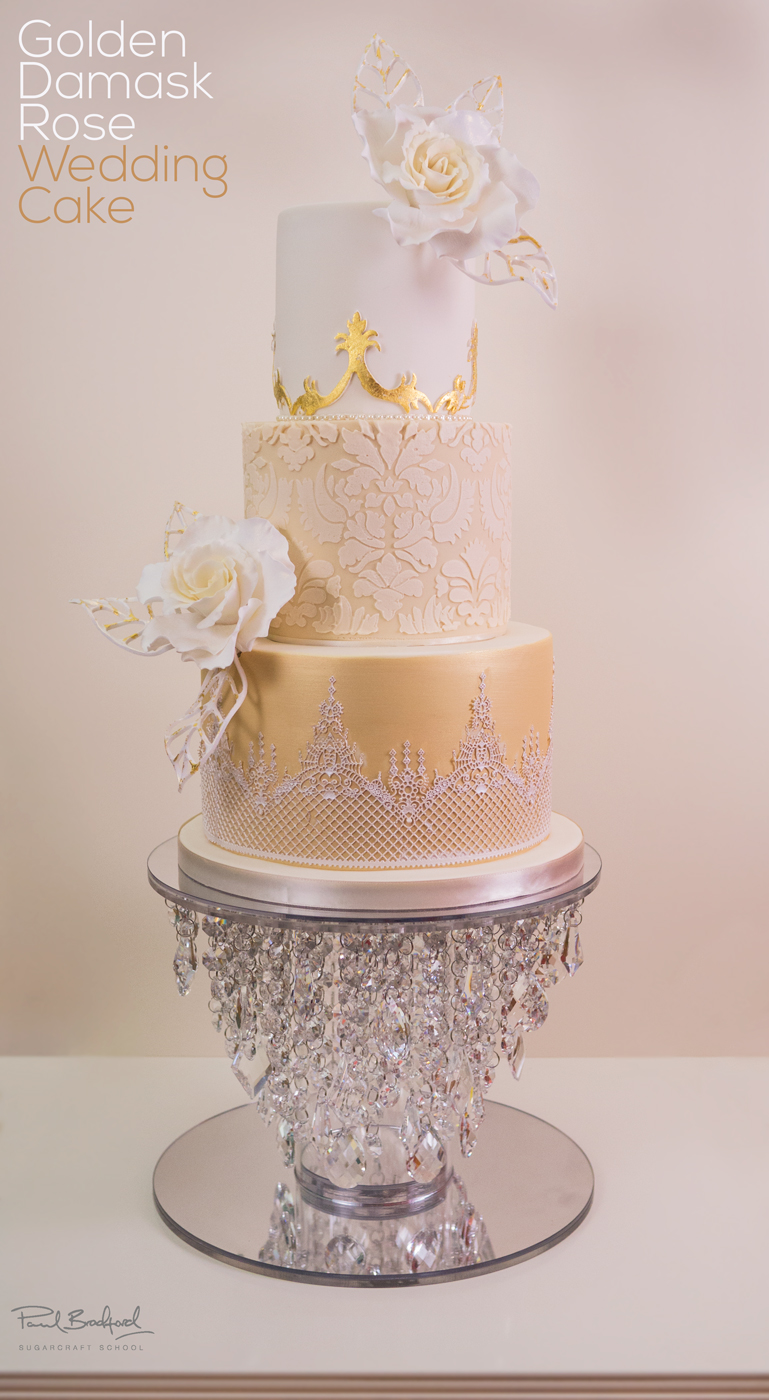
You will see from all the organised chaos in Paul’s kitchen that this is going to be a fun cake to make with lots of toys and exciting techniques. To start us off, Paul talks us through his design and tells us about all the cutters and stencils he is using as well as the stunning stand he has chosen for this cake. Then it’s onto making the naked leaves. We’re sure you will agree that they look lovely and will be very pleased to know that they are incredibly easy to make. You will need to roll some flower paste to about 1mm in thickness with vegetable fat added on top of the cutter, but not too much. You then place the flower paste over the cutter and press down on it with a cake smoother and then roll over it with a rolling pin. Now just cut away the inserts with a scriber tool and neaten up any rough edges and then place the leaf on a surface that will allow it to dry with a nice shape, such as a foam pad.

You can find the various tools and equipment online, by clicking the links within the Tools tab above.
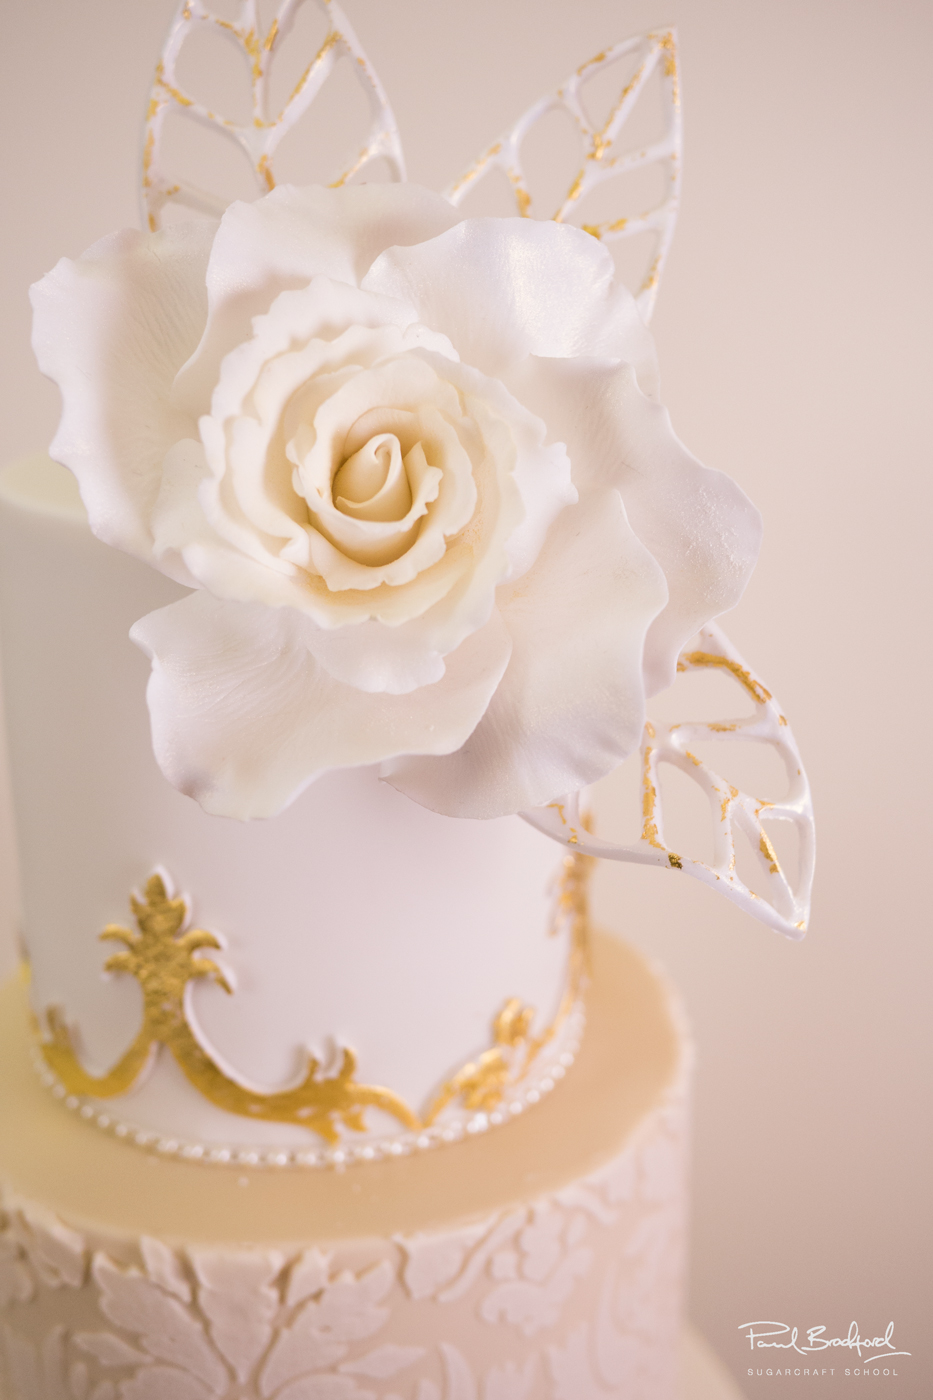
Now Playing
23:43

2. Making the Roses

When making the rose buds, try and make them around half the size of the smallest cutter and allow them to dry overnight until they are solid. This rose is built up of three sets of petals with each set being a little bigger than the last so you will need three different rose cutters. Try and source some foam that you can cut up as it will come in handy when forming that open rose shape when you are letting it dry. For the purpose of this tutorial, Paul is making the rose in one go but it’s best to make all the petals in one go and form a production line and allow them to dry before putting them all together.
Now Playing
05:08

3. Creating the Metallic Look

In this lesson we will be painting a beautiful gold colour onto the bottom tier using a mixture of sugarflair dusts and high percentage alcohol. To get that realistic brushed metal look simply use a soft large brush (like a shaving brush used for applying shaving foam) and brush over what you have just painted. If you have a cake turntable, simply hold the brush still and spin the cake and gradually move the brush lower. Allow the first coat to dry and then apply a further three, or however many you feel it takes to achieve the desired effect.
Now Playing
09:42

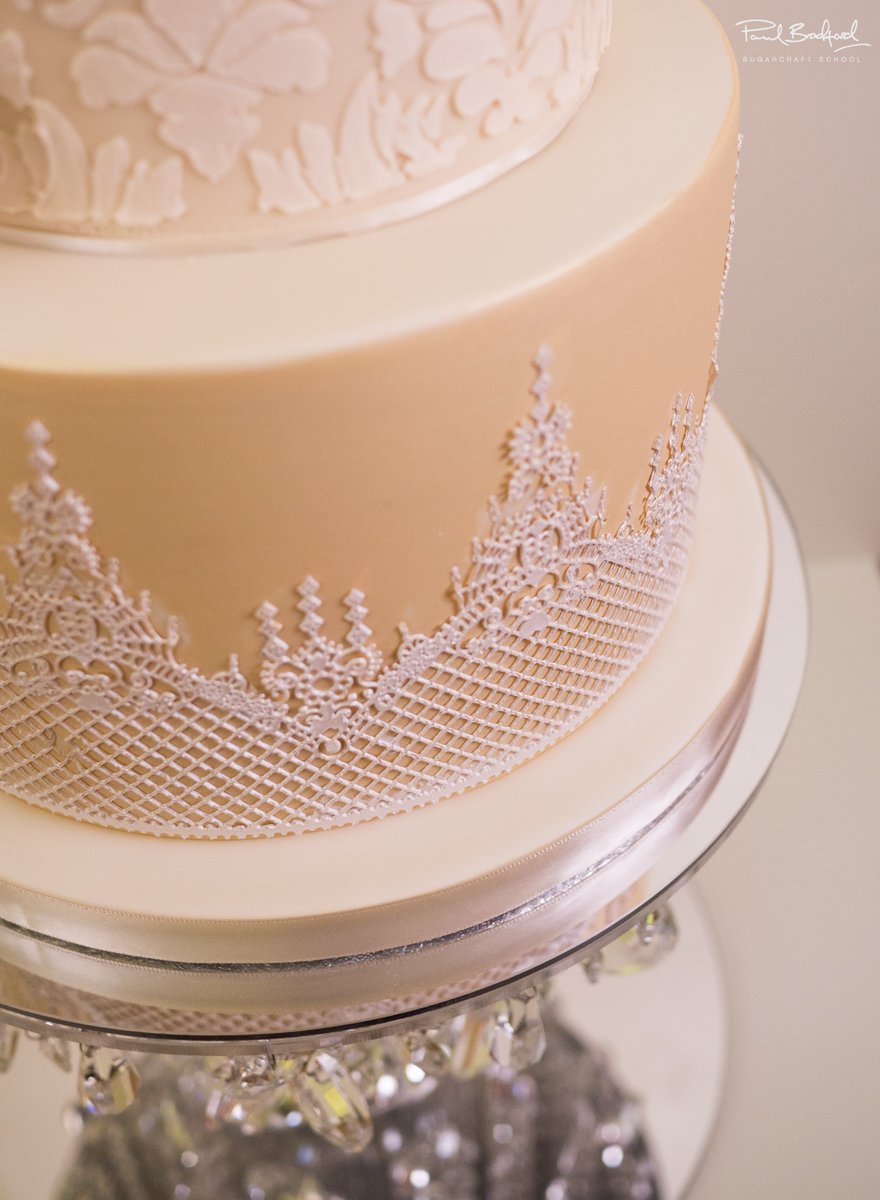
4. Making the Cake Lace and Icing the Board

When making cake lace, the best way to let it dry is to actually leave it for around three hours at room temperature, but of course this can take forever especially if you only have one mat and need to make a few. As you will see later on Paul has some difficulty with his lace caused by moisture in the air. It’s sensitive stuff making lace!
Now Playing
09:12

5. Adding the Cake Lace

Poor Paul! He tried so many times to get the cake lace right but it just wouldn’t play nice. In the end he found that he was able to get a good result in four simple steps. Hopefully you won’t have a similar issue and we should add that this has never happened to Paul before, but if for some reason you have any difficulties, try the following:

1.Wash the mat thoroughly and then dry it in the oven
2. Apply the first layer of cake lace and put it in the oven for 10 minutes
3. Repeat the above step
4. Allow it to dry at room temperature for 30 minutes

Now Playing
12:43

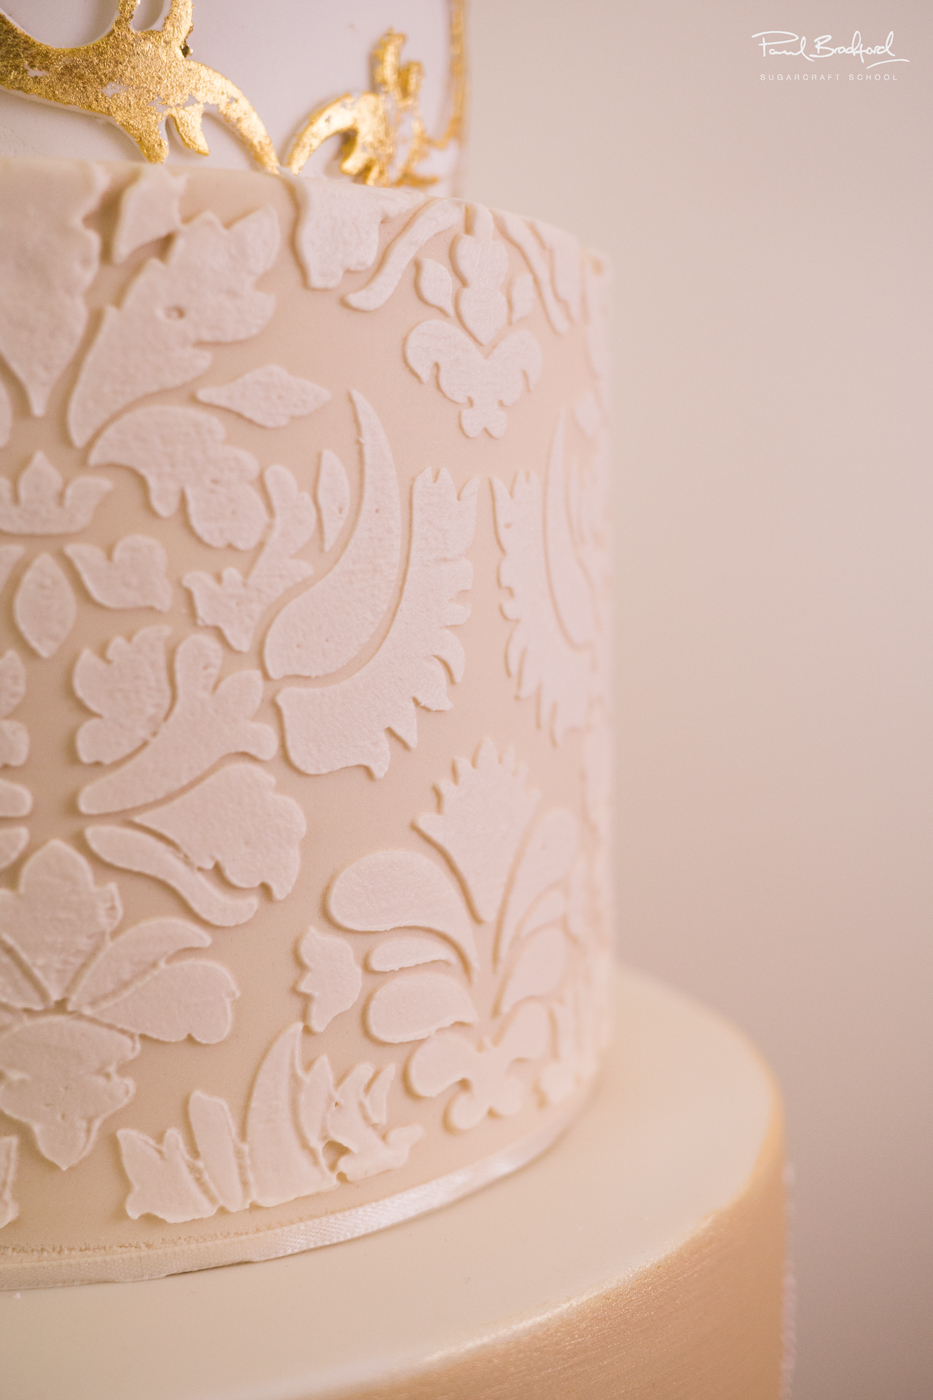
6. Adding the Stencilling

Paul has managed to get a beautiful colour for the cake by mixing Ivory sugarpaste with a little Teddy Bear Brown sugarpaste. To get the royal icing to a similar colour he has added Soft Beige food colouring from Squires Kitchen which makes it just a shade lighter than the cake to allow it to stand out. Paul has made stiff peak royal icing and then makes it to more of a medium peak by simply dipping his cranked palette knife in a cup of water and mixing some royal icing on the kitchen surface. He recommends using medical tape to attach the stencil as it is food safe and not too sticky, reducing the risk of damage to your iced cake. Once you have removed your stencil, it’s just a case of neatening up your royal icing by using a damp paint brush and removing any excess icing to bring back the detail in the design.
Now Playing
04:43

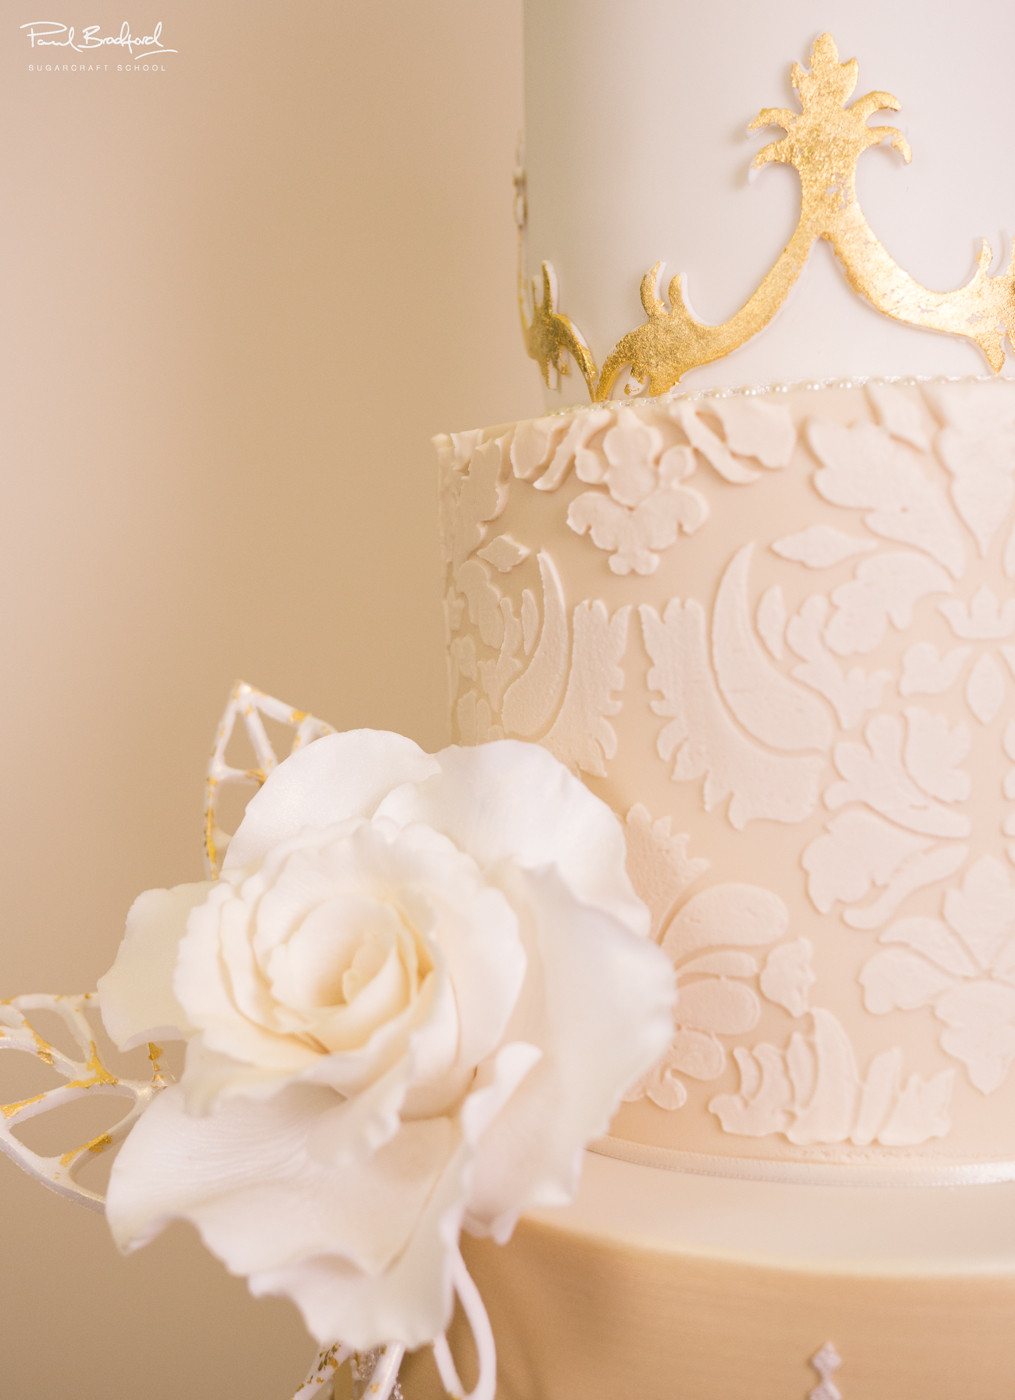
7. Using the Baroque Cutter

We’re sure you will agree that this is a beautiful and intricate cutter! Yet, it is just so easy to use. Rub a little vegetable fat on the cutter before using it so that the flower paste separates from it easily. To help push it out, use a paint brush as Paul has as this stops you from marking it. Once you have cut them all out, give them some time to dry while moving onto adding the final part of the stencil.
Now Playing
16:49

8. Adding Gold Leaf to the Baroque Cut-outs

It gets quite fiddly here and takes some time and patience but the end result makes it all well worth it. When you watch the video you will see that Paul discovers that using water as opposed to glue was more effective when sticking the gold leaf down. If you lightly paint some water over the cut out and then dab away the excess with some paper kitchen towel it creates the perfect amount of tackiness. Then place the gold leaf over it and use a dry brush to lightly press over the design to help it attach itself. Wait a few minutes and then slowly pull it away. Once you have neatened them all up, all you have to do is attach them to your cake and this is where you will need to use some edible glue. Remember to consider how much of a gap to leave at the bottom of the cake so that you have space to add ribbon.
Now Playing
05:18

9. Adding the Second Half of the Stencil

This is pretty much exactly as we did before but of course there is the challenge of trying to match it up as accurately as possible so that the break in the design isn’t too obvious. Make sure that the royal icing has set on your first half so that it doesn’t get damaged when you wrap the stencil around the cake. Once you have removed the stencil, it’s time to tidy up with a damp paint brush and get rid of those joins and neaten up the design again. Very satisfying work indeed!
Now Playing
05:14

10. Stacking the Cake

Support is key and as this will be quite a heavy cake, plenty of dowels will be required. Paul has opted for nine dowels for the bottom and middle tiers. Once you have inserted the dowels you will then have to cover them in royal icing and place the appropriate cake on it. The royal icing will set quite quickly so make sure it is centred.
Now Playing
08:49

11. Adding the Ribbon and Dusting the Roses and Leaves

We’re almost there! It has been a bit of a challenge but definitely worth it as we see the came coming together beautifully. Now to add some lovely ribbon and then it’s time to dust the roses and leaves. Feel free to use any dust you like but Paul chooses to add a little warmth to the middle of the rose which adds a realistic and classy look.
Now Playing
08:40

12. Adding the Flowers

It has been one thing after another with this cake and it just shows that it can happen to anyone. This should reinforce how important it is to give your flowers plenty of drying time. If however you come across similar issues, follow Paul’s advice of placing them in front of an open oven at a low temperature and leave them for half a day or so. Just make sure they are definitely dry before adding them as they can easily be damaged and they will change shape if left on the cake.
Now Playing
05:16

13. Finishing Touches

We made it! Now it’s just to add the leaves and you can add as many as you like to finish off the cake. Paul decides to go with six, with three on the top two tiers which seems to be a perfect amount.
Now Playing
02:18

14. Other Ideas

In this lesson Paul shares ideas that you can implement to make your cake design unique.

We would love to see your take on the Golden Damask Rose Wedding Cake – please share your photos with us on our Facebook page!

Paul introduces us to this beautiful contemporary wedding cake that incorporates many different techniques including damask stencilling, lace work, baroque-style touches, creating a brushed metallic effect and making beautiful sugar roses. He also creates some lovely, delicate naked leaves to bring the whole design together. This damask cake is perfect for weddings or for other special occasions such as an anniversary or significant birthday. This is aimed at intermediate to advance cake designers and will take around three days to make, allowing for drying time.

There are some techniques that are assumed knowledge and are therefore not listed as lessons within this tutorial, but they can be found by following the links to Icing Round Cakes, Ganaching Cakes and Stacking Cakes which are within our Free Beginners section. Feel free to ask for any advice at any time.

We would love to see your take on the Golden Damask Rose Wedding Cake – please share your photos with us on our Facebook page!

Paul Bradford

Paul Bradford

Paul Bradford´s mission is to ‘Empower people to achieve their cake decorating dreams’ by providing a range of cake decorating courses and online tutorials through their website, which currently teaches 195,000+ students.  
14 Day Free Trial