Rustic Wedding Cake Decorating and Baking Tutorial

Tutorial Preview

Join NOW to access 1661 courses Watch Now
14 Day FREE Trial
Rustic Wedding
with Mish Pattinson
Skill level: Easy
HD Lessons: 21
Decorating time: Two Half Days (allowing for drying time)
Now Playing
07:18

1. Cutting the Cake

Mish uses the Agbay cake levelling tool to cut the cakes into super neat sections. You can use your preferred method for cutting the cakes if you don’t own an Agbay or similar tool but they do make life much easier!
Now Playing
09:02

2. Filling the Cake

Prior to adding buttercream to each layer, we add a thin layer of seedless jam (if you’re using a lemon cake use lemon curd or similar).

For easy application of the buttercream use an ice cream scoop to ensure an equal filling on each layer of the cake.

Here’s the buttercream recipe and method that Mish uses for the filling and covering of the cake.

Buttercream Ingredients:

  • 286g Vegetable Shortening
  • Butter
  • Icing Sugar
  • Milk
  • 1 1⁄2 tablespoons clear Vanilla Extract

Buttercream Method:

Step 1 – Cream butter, shortening & vanilla extract in the bowl of a stand mixer on a medium speed for 3 to 5 mins

Step 2 – Add 1⁄4 of icing sugar to the bowl & mix on a low speed (Helps avoid icing sugar mist round your kitchen). Stop the mixer & scrape down the

Step 3 – Add another 1⁄4 of icing sugar and repeat steps 2 & 3 until all the icing sugar has been added.

Step 4 – Add milk to the desired consistency. May not need all of the milk. This is personal preference.


After stacking the cakes, pop the cake in the fridge for around 30 mins to firm it up 


Now Playing
25:56

3. Making Flowers

Create beautiful flowers with the Dogwood, Succulents and Eucalyptus being Mish’s choice for this cake. The flowers aren’t strictly botanically correct but certainly work great with the cake and are all created using modelling paste and a selection of moulds and cutters (you can find links to these in the Tools section above)
Now Playing
04:04

4. Making Flowers (Continued)

The creation of the sugar flowers is continued with Mish’s expert guidance.
Now Playing
06:54

5. Dusting and Steaming

Adding tiny amounts of coloured dusts to the edges of the petals adds another dimension of realism to your work, to finish the flowers and help the dusts to set follow Mish’s instructions on steaming.
Now Playing
11:06

6. Buttercream

Time to grab your cake from the fridge!

Trim the edges of the cake to make a gap between the edge of the cake and the cake card, then you’re ready to apply the buttercream covering to the top of the stacked cake.

Covering the top of the cake is made easy with a great tip using a cake card and set squares.

Refrigerate for 10 mins + after this lesson.

Now Playing
09:22

7. Buttercream (Continued)

After refrigerating we should have a nice firm top section of the cake and we can apply the buttercream around the sides (cleverly using the top cake card as a guide)

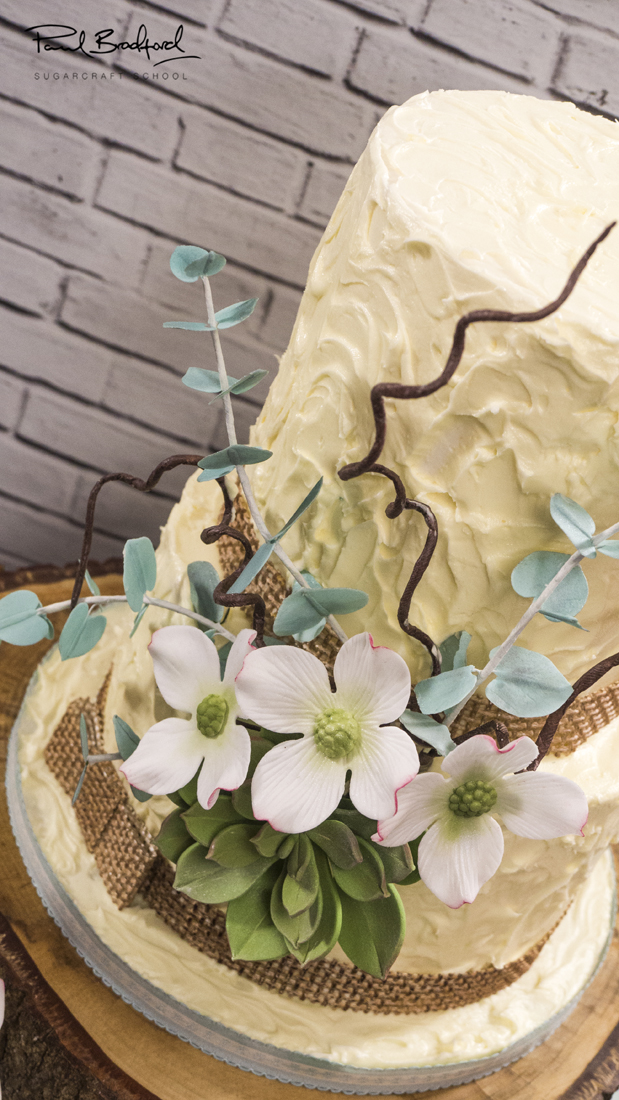
Smooth off the buttercream using a scraper placed against the two cards then add the rustic (but not messy) look using a palette knife to make gentle swirls.

Now Playing
20:50

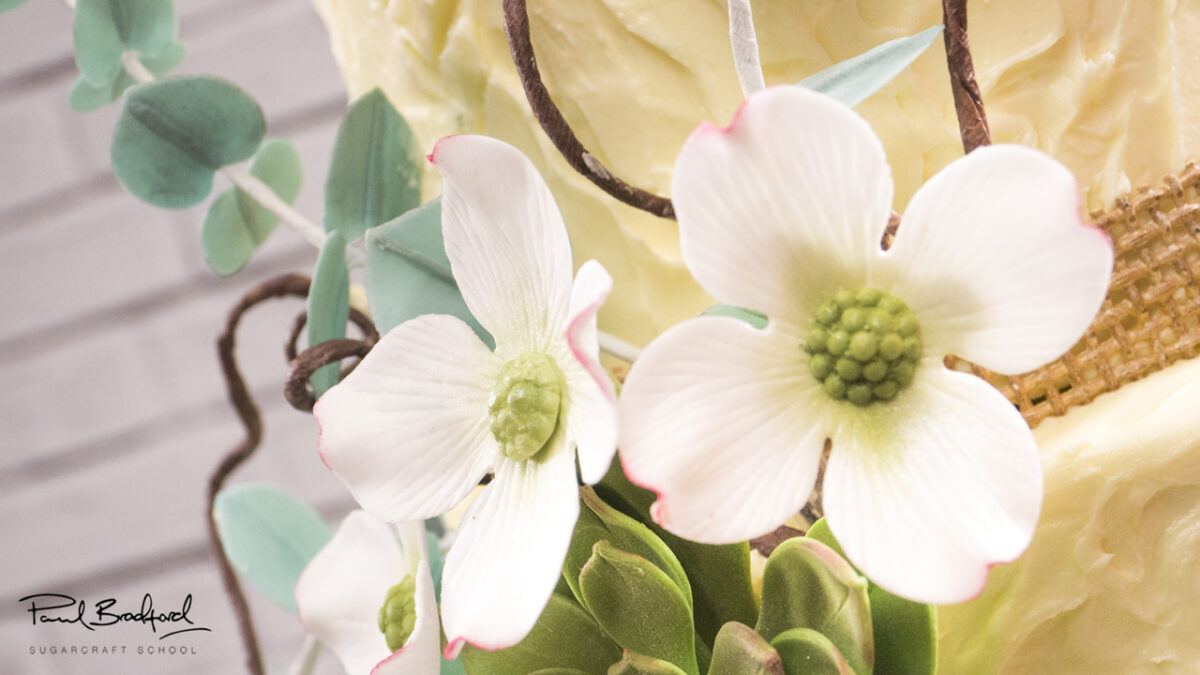
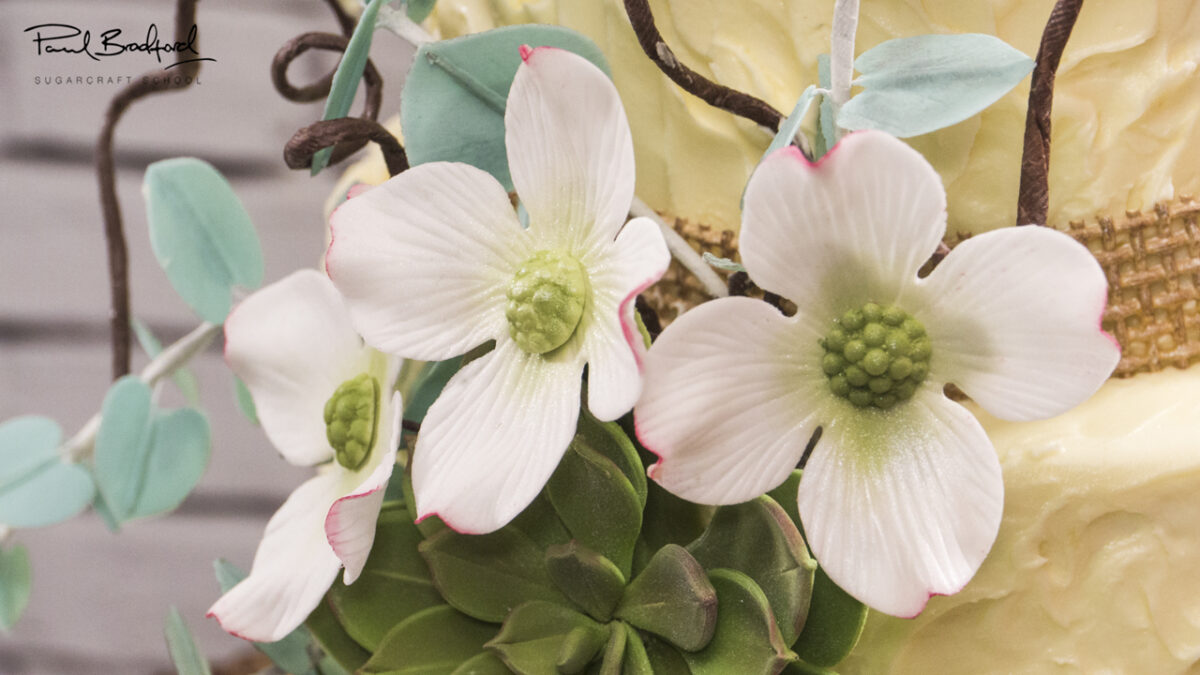
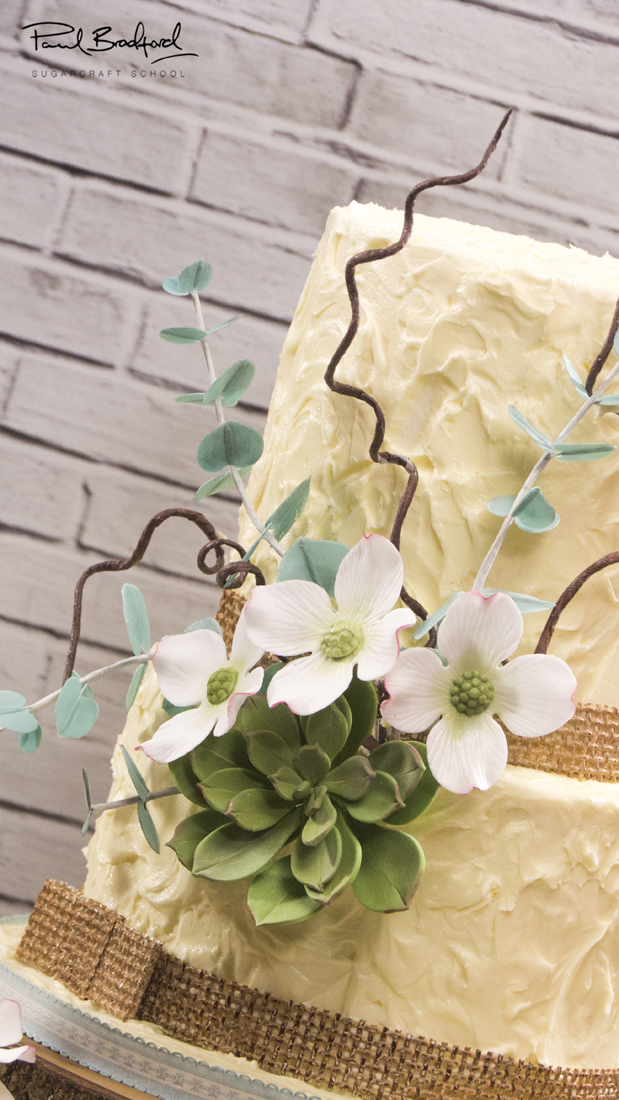
8. Leaves and Petals

Decorative sugar leaves and petals are created as we continue the creation of the sugar flowers. This is delicate work so don’t worry if there’s the odd breakage.
Now Playing
08:15

9. Dusting the Eucalyptus

Eucalyptus edible paint and silver foliage edible paint are used to add life to the eucalyptus leaves – finish this off by steaming the leaves to enhance the paintwork.
Now Playing
10:20

10. Succulent Plant

Using a set of succulent cutters arranged in size order we can create the leaves for the succulent plant ready to be fastened together.

Different sized wire gauges are used for the different sized petals as follows :

  • Small petals – 28 gauge wire
  • Medium – 26 gauge wire
  • Large – 24 gauge wire
Now Playing
09:29

11. Wiring the Petals

Assemble the succulent as shown making sure to bend the leaves out the correct way and fix everything together using florist tape.
Now Playing
15:06

12. Dusting the Petals

Mish starts the lesson with a chat about colour schemes which will aid in your dust colour selection. For this lesson we use a mixture of Sunflower Sugar Art Chartreuse and Moss Green coloured edible dusts.
Now Playing
03:36

13. Twigs

Use cling-film and use as a wrap for your florist wire to start. We’re aiming to make twigs from these so don’t worry about lumps and bumps. Following this, finish the twigs / branches off with florist tape and then bend until you have something that looks the part.
Now Playing
08:32

14. The Ribbon

An edible ribbon is created using a Sugarveil woven silicone impression mat. Add to this a combination of premixed Claire Bowman cake lace mixed with some Sugarflair caramel colouring which will help achieve the burlap look.
Now Playing
07:11

15. Stacking the Cake

Remove the lid of the bottom tier and get ready to stack! Plastic cake dowels are added (9 in total) and then cut to size after marking them with an edible pen.
Now Playing
05:15

16. Stacking the Cake (Continued)

The stacking of the cake is continued with the top tier, some finishing off with the buttercream is done which takes the cake into the final stages.
Now Playing
04:00

17. Adding the Ribbon

Mish explains how to attach the edible Burlap ribbon we made earlier on to the buttercream. Once done refrigerate the cake to firm everything up.
Now Playing
07:10

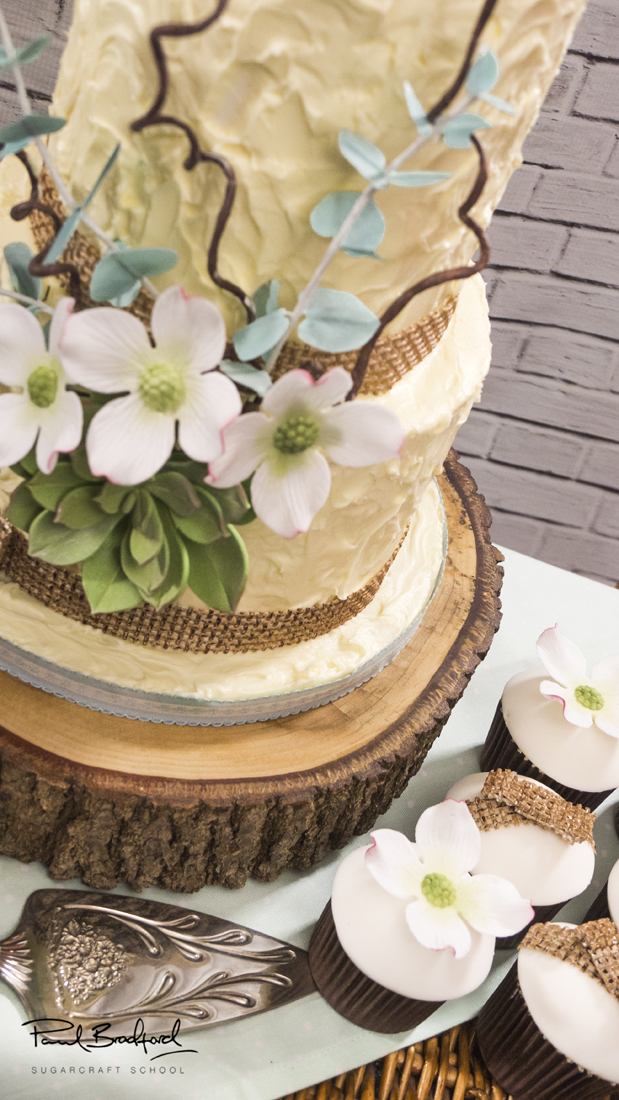
18. Finishing Touches

It’s time to wire the flowers together and assemble everything to create the finished cake. Add the flowers by using posy picks in the areas of the cake that you’d like the flower to be located.
Now Playing
02:11

19. Finishing Touches (Continued)

The finishing touch is the addition of a ribbon to match the colour of the eucalyptus. You could choose a ribbon colour of your choice or one that suits the occasion.
Now Playing
05:02

20. Other Ideas

Mish is joined by our very own Paul Bradford to talk about the plenty of other ideas for this cake and it’s design. Rustic cupcakes that accompany the cake work really well and are worth considering along with some great ideas for cake stands and presenting the cake at a wedding.
Now Playing
03:43

21. Pro Lesson

The Pro lesson mainly focuses on the costs of the cake & confidence in pricing your cakes along with other important information for our Pro members that may be considering making this cake to sell.

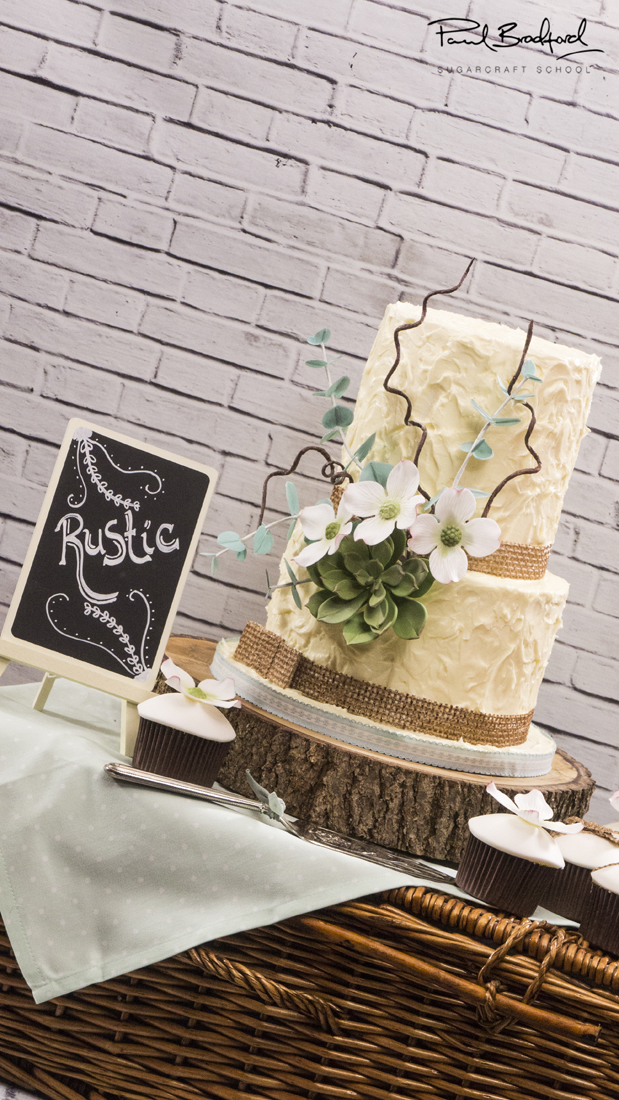
We welcome Mish of VS Cakes back to the school with her Rustic Wedding Cake tutorial. The cake is a slight diversion from our usual offerings and explores the use of buttercream, edible burlap and sugar flowers to produce the perfect rustic wedding cake. Because the cake uses buttercream in a rustic fashion the design is very forgiving and is suited for a beginner to cake decorating, the flowers do take the level of skill up slightly to a more intermediate skill level.

Mish Pattinson

Mish Pattinson

Based in West Yorkshire, Mish from VS Cakes is a full time IT consultant with a cake hobby on steroids! She is also a self confessed cake productaholic. Mish got into cake decorating as she didn’t want to suffer empty nest syndrome when her rugby playing son left home to go to university. She decided she need a hobby to keep her busy and booked her self on a cupcake course at Fair Cake in London. This was very quickly followed with a cake course with Paul Bradford where she completely fell in love with cake art Since then she has won multiple cake awards including golds and a very well deserved Best in Class at Cake International. She has recorded tutorials for CakeFlix, written for cake magazines, and has participated in multiple features and collaborations. She is also responsible for creating and organising the Cake International features Wedding Gowns Through the Ages (2017) and Weddings 2 - The Posh Frock Shop (2019), both of which were stunning and very well received by the Cake Community. Mish is also known for her Cake Shed in the garden. This is filled to the brim with cake products and all things Duck Egg Blue. The shed has recently been turned into a mini filming studio. This is where she films her tutorials and Facebook lives.
14 Day Free Trial