Tutorial Preview


Bite Sized
Here is a short promotional summary of the tutorial.
Highlights
Short of time? Watch the edited highlights in under 9 minutes!
1. Making the Flower Centres
Anna starts by preparing the centres.
2. Making the Petals
Now to the main part, making the wafer paper petals and forming the poppy.
Anna is a pastry chef, award-winning Wedding Cake Artist, content creator, and educator for cake designers. It is an absolute pleasure to introduce this Icelandic Wafer Paper Poppy Tutorial by Anna | Florea Cakes
At Florea Cakes, the mission is to help home bakers learn to design modern wedding cakes with wafer paper flowers and build the creative business of their dreams.
Chef Anna’s cakes have been featured on magazine covers, TV commercials and digital publications worldwide.
Chef Anna is the name behind the very popular 1K Cake Design Programme. Scan the code below to learn more.

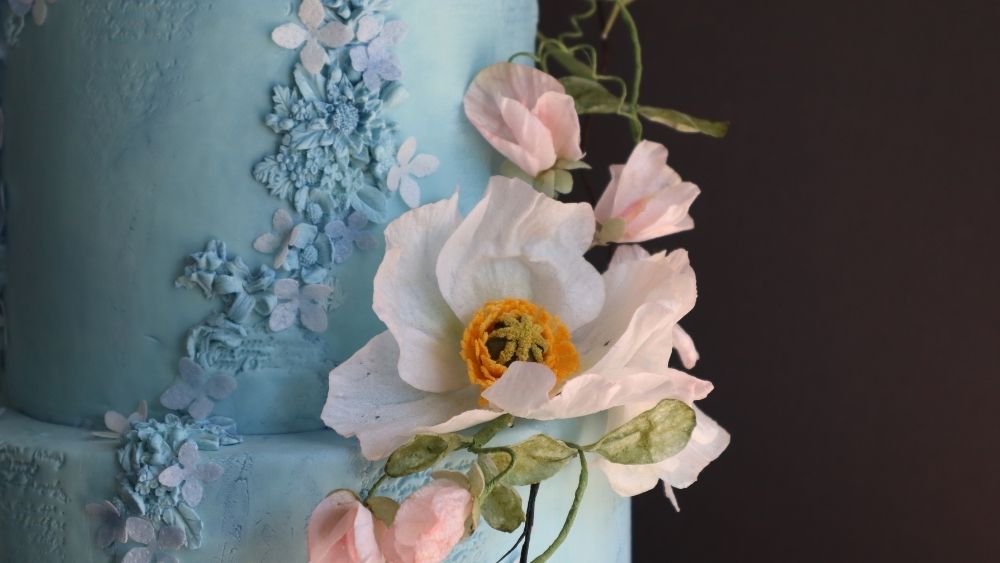
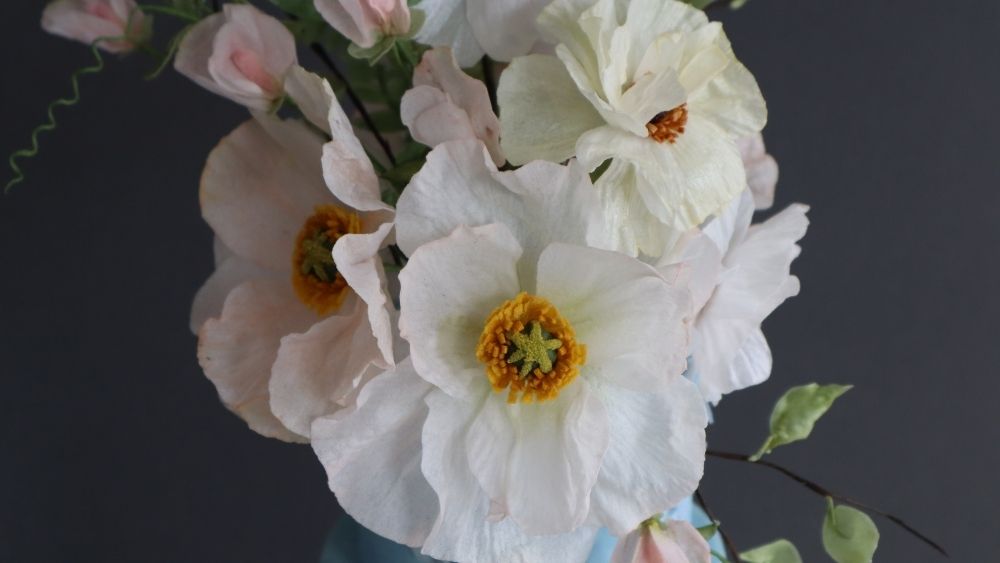
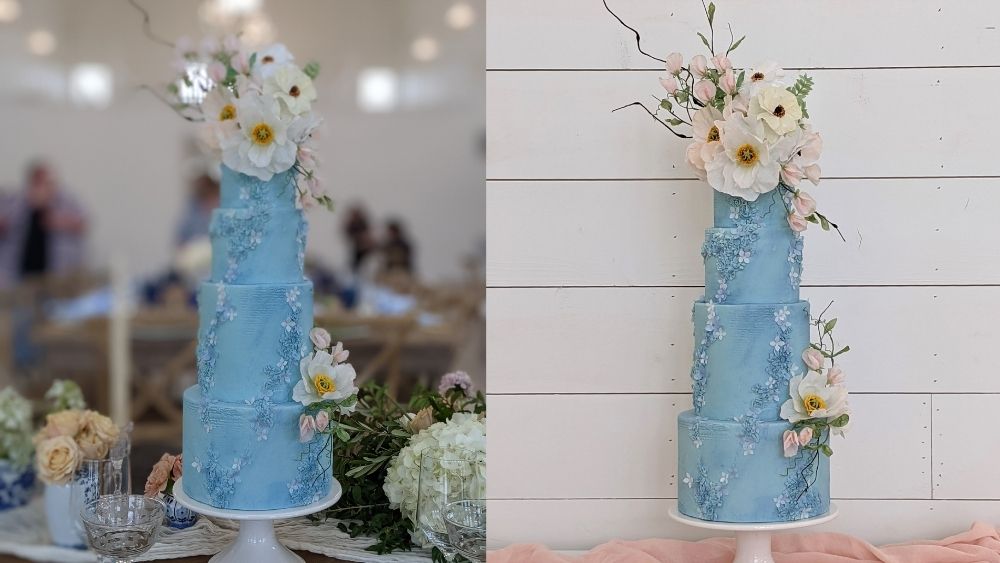
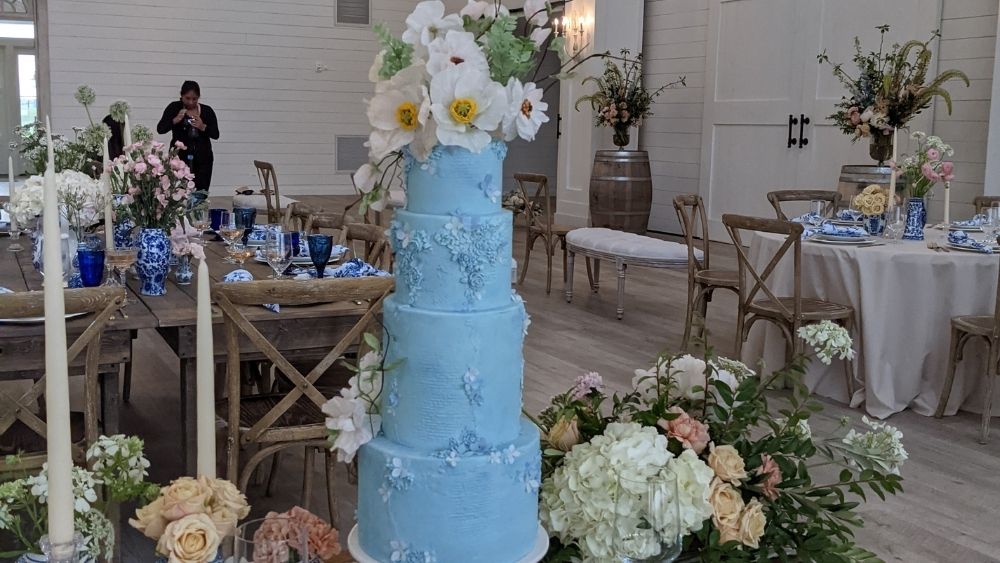
It is an absolutely honour to have Anna create the amazing Icelandic Poppy from wafer paper.
Anna has provided detailed notes below to support your learning on this tutorial:
WHAT IS WAFER PAPER:
Wafer paper is a sheet of edible paper, typically starch-based.
It’s safe to eat and the flavor is very subtle, so it won’t interfere with what’s going on in your cake.
You can manipulate wafer paper in all kinds of ways, which is another reason it’s so great for cake decorating.
Ingredients: potato starch, water, and vegetable oil.
HOW TO CHOOSE WAFER PAPER:
There are two types of wafer paper:
Single Thickness (Premium or 0.22-0.35 mm) – the most common type of paper to make flowers, foliage, and decorations. Takes on texture beautifully and is very versatile. I use it for most of my decorations.
My most used brand in this category is 0.27mm is Saracino Wafer Paper or Oasis Supply AD-grade
DD-grade (double-thickness or 0.60mm) – smooth on both sides and relatively thick. Great for printing designs or painting. I wouldn’t recommend this type of wafer paper for making flowers. It may work for making foliage and structured decoration, but it is stiff and fragile.
I have Saracino Cardstock and Icing Images Double-thickness wafer paper, but you can also buy Oasis Supply DD-grade.
AC TONIC™ Recipe
alcohol free wafer paper conditioner
INGREDIENTS
3 gr (½ tsp) food-grade glycerin
28 gr (2 tbsp) water [preferably distilled]
DIRECTIONS
- In a small bottle, mix your
- Shake well to mix
To color the mixture, add airbrush or gel color.
Tip: You can use AC Tonic to airbrush wafer paper. Mix any gel color with the conditioner and add to your airbrush. If you live in a very humid area, substitute 1 tbsp of water with lemon extract or high-proof alcohol in the conditioner to airbrush wafer paper without melting.
Storing: If you are using tap water to make AC TONIC, discard it after a day. A distilled water-based mixture can be stored in a dark place for up to one month.
Wafer Paper Glue
that won’t melt your petals
INGREDIENTS
Scraps of plain wafer paper Water
DIRECTIONS
- Gather scraps of plain wafer
- Using a pair of scissors, cut the wafer paper into small pieces, roughly the size of a grain of Alternatively, you can use a food processor to chop the wafer paper into smaller pieces.
- Place the wafer paper in a small bowl, cover it with water, and
- Microwave the mixture in 10-second intervals until the wafer paper melts and the mixture turns translucent.
Tip: Add more water if you need to adjust the consistency. The mixture should be thick and smooth.
Storage: Keep it in the fridge for up to a week.
HOW TO PREVENT WAFER PAPER FROM MELTING?
Generally, humidity below 65% should not cause any wilting.
Uncontrolled humidity can cause wafer paper flowers to soften. Regardless of the humidity of your environment, I encourage you to try and test for yourself.
Here are a few things you can do if you’re struggling with high humidity levels:
- Know your humidity! I use a humidity gauge to adjust my conditioner. I can place it in my fridge or keep it in my studio to know when my humidity is too high (above 65%).
- Make wafer paper decorations in advance (at least 3-5 days) and let them dry completely.
- If you are in a very humid environment and using my AC Tonic conditioner recipe, use less glycerin. It attracts moisture from the air and can soften wafer
- Be more generous with cornstarch; it will help the wafer paper to stay dry (just keep in mind it might make it brittle).
- I would not recommend leaving wafer paper flowers on a buttercream cake overnight if you are not sure about the humidity level. But wafer paper is totally fine placed on buttercream in a controlled environment!
- I store my flowers in a box with lots of silica gel packets and assemble them at the venue because I like to sleep peacefully at
HOW TO STORE WAFER PAPER IN THE FRIDGE: FLOREA CAKES GUIDE
Can you store wafer paper in the fridge?
Absolutely! Wafer paper is actually easier to handle than fondant or gumpaste, but there are a few things to keep in mind.
Most of the time, issues with wafer paper flowers aren’t caused by the flowers themselves, but by changes in your environment.
Here’s what you need to know:
If your fridge is very cold and dry, and your room is warm and humid, moving a cake straight from the fridge to the room is very likely to cause condensation. That moisture can make buttercream sweat, create droplets on fondant, and affect wafer paper or sugar flowers. The same thing can happen if the room is dry and the fridge is humid.
It’s not really about the fridge—it’s the sudden change in humidity that causes issues, and that’s what you need to watch out for.
USING COMMERCIAL FRIDGES
Commercial refrigerators often have higher humidity levels than home fridges, so it’s best to avoid storing decorated cakes in them whenever possible.
If you don’t have another option, take extra precautions. Place your cake in a cardboard box and seal it tightly to protect it from moisture. When I was renting a commercial kitchen, I’d place my decorated cakes in delivery boxes, then slide the boxes into large proofing bags (you can even use a clean trash bag) and seal them with tape. This created a protective barrier and helped keep humidity out.
PREPARING WAFER PAPER BEFORE REFRIGERATION
Make Wafer Paper Decorations in Advance
Create your flowers, bows, or ruffles 3–5 days ahead of time to give the conditioner mixture plenty of time to fully evaporate.
Adjust the Conditioner Formula
If you’re using my AC Tonic wafer paper conditioner (page 6), try reducing the amount of glycerin and replacing it with water. Glycerin is a humectant
—it attracts moisture, which can cause your wafer paper to soften in the fridge.
Use Cornstarch for Added Protection
Lightly dust your wafer paper decorations with cornstarch. It helps absorb excess moisture and protects your decorations, especially important if you’re working in a high-humidity environment.
Storing Wafer Paper on Cakes in the Fridge
Before placing a cake with wafer paper decorations in the fridge, the key is to manage the humidity.
Check and monitor your humidity. Use a humidity checker (I use this one), and make sure the level is below 65% before storing your cake.
Take out or limit items that release moisture, like fresh produce (fruits, vegetables, herbs, and salad mixes) and open dairy products (like cottage cheese), as they can raise the humidity inside your fridge.
Use a cardboard box! If you live in a humid area—or just want to be extra cautious—place your cake inside a cardboard box before refrigerating. The box acts as a buffer by absorbing excess moisture and protecting your cake.
When removing the cake from the fridge, keep it inside the cardboard box for a while before opening it. This allows the temperature to adjust gradually, preventing condensation from forming on the cake itself.
Don’t forget to share your interpretations of this wonderful cake with Paul and the rest of the CakeFlix community on our Family Facebook group.
View hundreds of more world-class tutorials only at www.cakeflix.com.