Tutorial Preview
1. Building the Cake Structure
Let’s start at the beginning and learn how to put together your own DIY cake structure that is both sturdy and food safe. We’ll look at the different materials required, all of which are easily accessible from local hardware stores and is a useful lesson in general for any type of cake that requires an internal lifted structure.
2. Forming the Urn Base
Using Rice Krispy Treats, Zoë will show you how best to form the base of the urn, and her tips for using RKT in sculpted cakes.
3. Cake Carving and Ganache
Stack your cakes onto the structure and use your own personal template to make sure you keep that carving on track! Fill in any gaps between the cake and base with cake clay, and then watch as Zoë covers the whole cake in chocolate ganache to form an extra sturdy shell for our cake. Use a flexible dough scraper or similar to help you navigate the curves of your cake.
4. Enhancing the Shape
This is a trick to get those finer details onto your cake whilst keeping the cake carving element as simple as possible. Use modelling chocolate (for extra flavour), as a skeletal underlay before the sugar paste is applied to cover the cake.
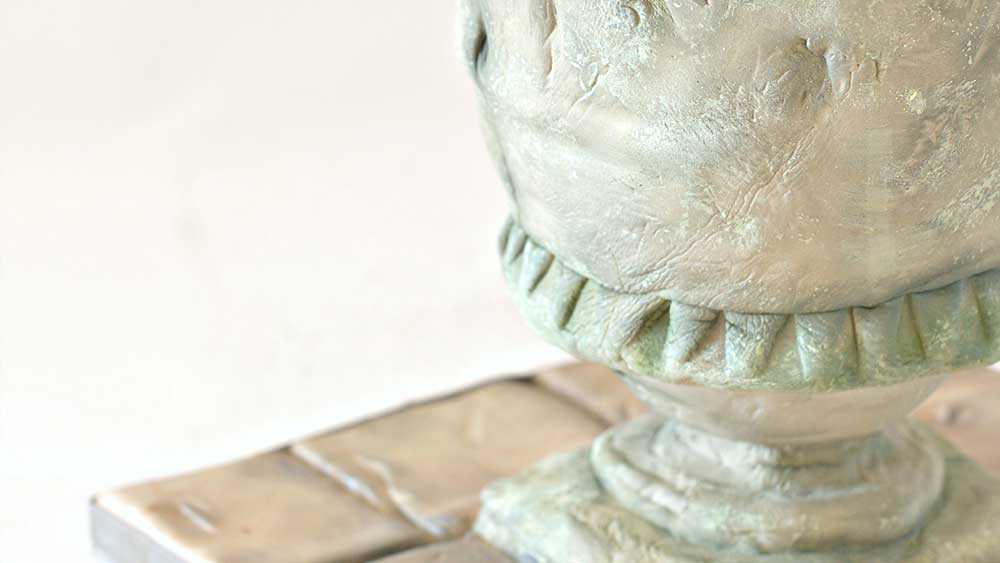
5. Covering the Cake
Mix up your own stone coloured fondant and roll out in large panels. Remember to leave the panels to dry out so that natural cracking occurs on the surface of the paste as it dries, helping us with that aged texture. Apply the fondant in sections to the cake, now get creative and decide how you want to decorate your urn. Zoë uses a swag mold and then places these elements around the cake, but you could choose your own design!
6. Adding Stone Texture
Foil paper is so versatile for texturing and for this cake it is no exception. Loosely scrunch the foil and press into the cake for a random texture. Accentuate the seams of where the cake was covered to look like deeper cracks, and use a tool or your fingers to stretch and mark the fondant further. Remember that random irregular patterning is most effective here.
7. Colouring the Urn
Now we will use a range of petal dusts and apply to our cake with brushes. Rubbing the colours into the crevices and around the molded parts of the cake will really help bring out the texture. Zoë will also show you how to combine dry dusting with paint sponging to really layer the colour, and heighten the realism of the urn. Set all the colour work with a light steam.
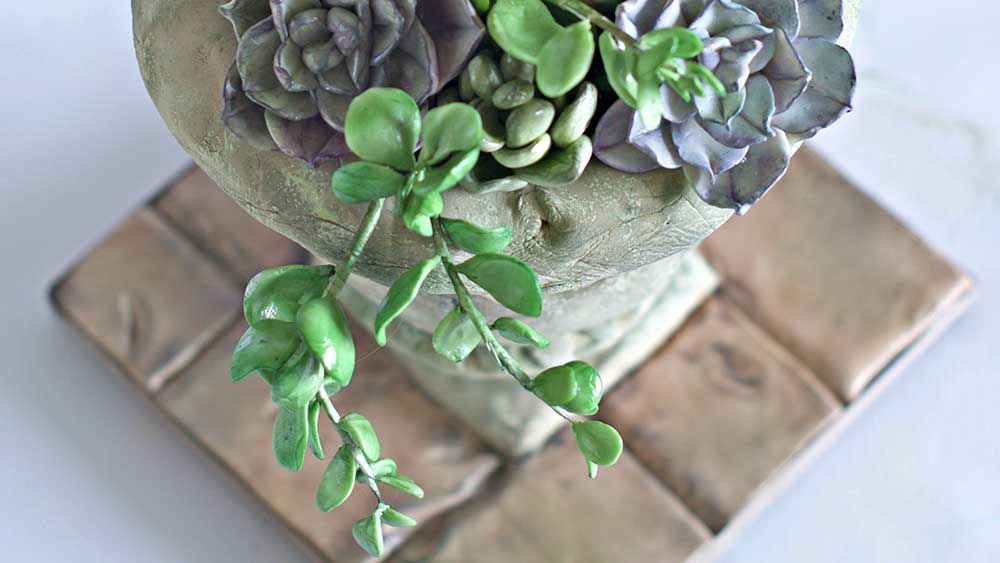
8. Decorating the Cake Board
Whilst you can pre decorate your board ahead of making the structure, on this cake it is just as easy to decorate it at this stage. Colour some paste to a pale complimentary colour of your choice and Zoe shows you how to apply it to the board and then use a blade tool and some petal dusts to create an aged tile effect.
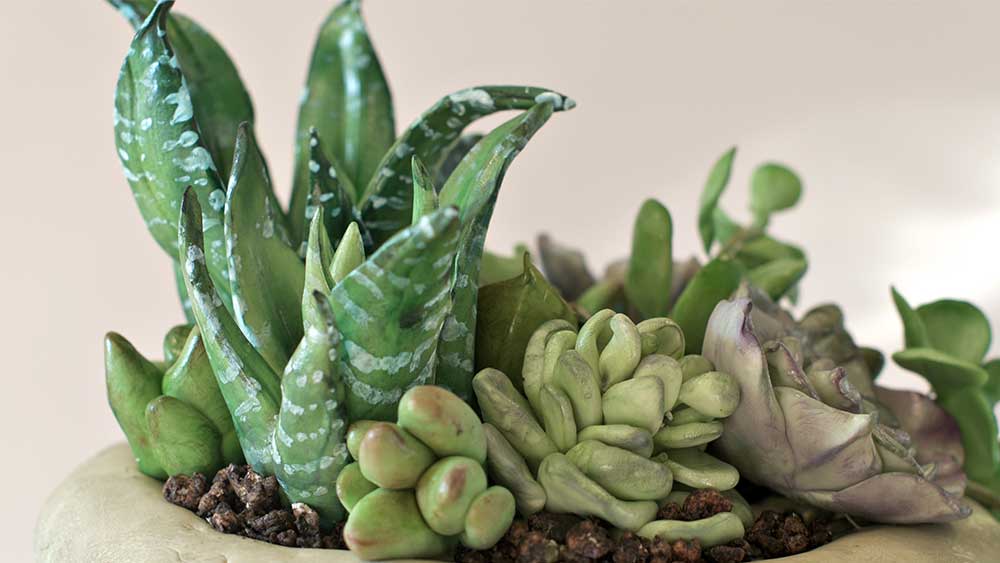
9. Making Succulents ‘Little Jewel’ and ‘Zebra’
Zoë uses sugar clay coloured with green gel colour to model a variety of succulents, although you can use modelling chocolate too. She explains why this is so much easier and quicker to use than traditional flower paste, and how due to the plumped nature of the succulent leaves, thinning and shaping in our hands is ideal. The first variety uses very simple clumped elongated shapes, and the second curved leaves recreate a spiky striped succulent.
10. Making Succulents ‘Jovibarba’ and ‘Echeveria Peacock’
Continuing to make the next pair of succulents, the jovibarba is formed from a simple teardrop central bud and the leaves are cut using teardrop cutters, although you could easily cut them by hand. The next succulent is a classic open design which again is achieved by rolling and shaping balls and then placing them in a graduating pattern.
11. Making Succulents ‘Sedum’ and ‘Jade’
Zoë throws in a quick lesson on making the nobbly sedum variety of succulent, and then moves onto the trailing Jade plant. This succulent is a wired variety, and we will learn how to create a succession of lollipop leaves on short florist wires and then assemble them together on one central stiff gauge wire to create the effect of a trailing stem.
12. Colouring the Succulents
Back to our petal dusts and in this lesson we learn how careful application of a small handful of colours will help bring our succulents to life and add an extra layer of dimension. Remember to be judicious with where you place the colour and use photo reference of similar succulents if you need more guidance. Set the dusts with edible glaze spray to give the plants a lovely waxy look.
13. Making Edible Gravel and Assembling the Cake
We are at the fun part where we can now start assembling our plants onto the stone urn. Zoë shows you a quick and easy technique to make some edible gravel which is perfect for filling in the gaps between the succulents. We also discuss how the succulents can be either inserted into the cake or placed on top depending on your preference.
14. Other Ideas
Whilst this is a fabulous cake for a gardener, Zoë also gives you some ideas on how you can tweak the design to vary it even more. The cake structure itself lends itself to other cake designs and hopefully now that you know how to recreate realistic stone you can apply this technique to a wide variety of non urn related cakes too!
15. Pro Lesson
Everything a professional needs to know about making and selling a cake like this.
16. Highlights
If you want to whizz through the tutorial just looking at the best bits, this is the video for you. It will give you some idea of the order of putting the cake together but delve into the individual videos for detailed instructions on each succulent.
Antique Urn Cake Tutorial complete with succulent…
In this class, Zoë shares techniques so that you can achieve a highly realistic antique urn complete with edible succulents. Zoë has designed the cake using as few cutters and tools as possible. Encouraging you to have a go at developing your own templates and even your own succulent designs.
This cake is perfect for a keen gardener or as a mother’s day gift. It can also be easily adapted to other designs as well.
Succulents are still very trendy and make the perfect alternative to those who prefer not to make sugar flowers whilst still achieving a similar aesthetic.
In the following tutorial, you will learn how to…
- Create a stone texture finish
- Give a paint ageing effect
- Make edible gravel
- Hand model wired and non-wired succulents
- Achieve a stone floor cake board
- and much, much more
Don’t forget to share your interpretations of this wonderful cake with Paul and the rest of the CakeFlix community on our Facebook group.
View hundreds of more world-class tutorials only at www.cakeflix.com.