Tutorial Preview


Bite Sized
Watch Dot make her cake in just one minute!
Highlights
A short selection of clips from the whole tutorial!
1. Board and Cake Preparation
Preparing your board for your cake is important for health and safety and Dot will show you a clever trick to save on cake when cutting a circular design.
2. Carving and placing of cake
In this lesson, Dot shows you how to carve your cat body shape and place it on your board for maximum drama.
3. Sealing the Cake with Chocolate
It’s very important to seal your cake for freshness and in this lesson Dot shows you how she uses chocolate to crumb coat and create a smooth and hard surface to sculpt on.
4. Armature and First Sculpt
Dot uses kitchen materials to create the legs and tail of the cat. This is an easy way that takes away the stresses of hardware products and unfamiliar tools and gives you confidence to try structure in your cakes.
5. Sculpting legs and Paws
Dot shows you how to create movement and interest when sculpting the four legs in different positions then you’ll create realistic paws and tail movement.
6. Face Sculpting Part 1
Here Dot shows you how to create the cat face from the inside out. Starting with a polystyrene ball, Dot creates the eye sockets, eye brow bones, bridge of the nose and other face details as a base to cover with a fondant ‘skin’.
7. Face Sculpting Part 2
Dot shows you how to cover your sculpted head base with fondant and create the details of the nose, mouth and chin. Dot will also show you how to sculpt the ears and the correct positioning in relation to the cat’s eyes.
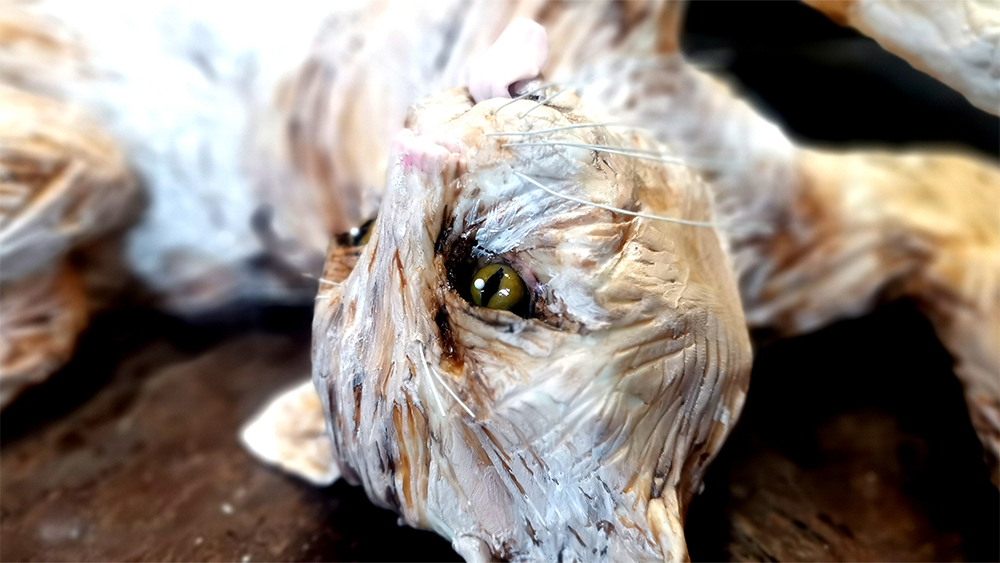
8. Creating the eyes
Always the crucial part of any realistic sculpt, the eyes are an important element in convincing your audience of what you’ve created. Dot will show you step by step how to create a realistic cat eye that’s easy and ‘eye-catching’!
9. Attaching the head and covering the Board
Having sculpted the head off the cake body to make it easier to create the details, Dot will show you how to sculpt the neck and attach the cat’s head in a playful position with the ears on the board.
10. Creating the Fur
With the twist in the cat’s body as he plays, it’s important to create the fur in a way that gives direction and texture to your cake. Dot will add pieces of fondant and using tools, create texture that adds to the movement you created with the sculpting. This final fur layer also ‘fattens’ up the cat to create the final shape.
11. Creating Facial Fur and Paws
Without changing the shape of the cat’s face, Dot adds some fine fur detail to the face and neck to complete the texture and bring it all together for the final details.
12. Painting the face
Using cocoa butter to paint is a wonderful way to layer colours. They blend easily and take time to dry and set. Dot starts by painting the cute nose and then outlining the eyes and other face details. She continues with some ginger stripes laying colours showing techniques to create realistic fur and texture.
13. Painting the Body
Using cocoa butter to layer colours and create ginger stripes, Dot begins by circling the legs and moving on to the body. Each colour is laid on other colours and brushed to create a realistic finish.
14. Finishing touches
There’s always some little details that can finish the cake off and make a perfect finish. Here Dot shows you how to add a cute pink tongue in the mouth, a white dot in the eyes and then finally add wire whiskers to the face.
15. Other Ideas
Dot provides some other ideas to use on your own designs.
16. PRO Lesson
Dot has some professional tips to take this design to a unique level.
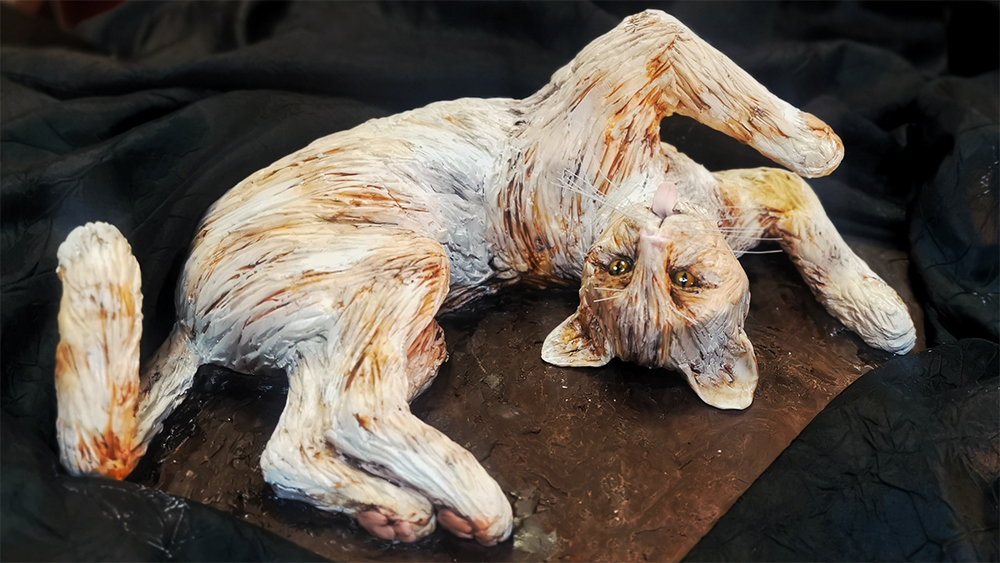
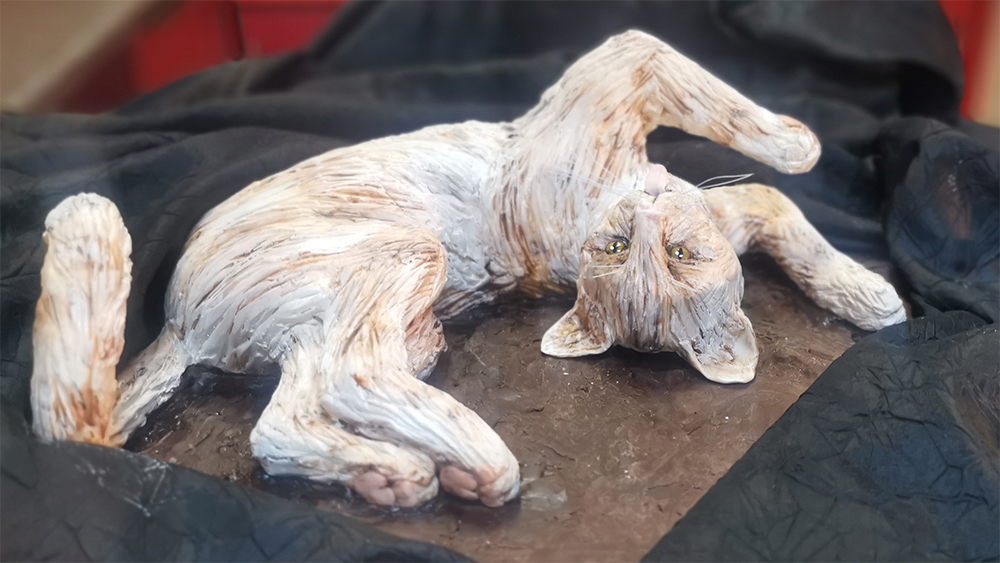
Realistic Cat Cake Tutorial
Have you ever wanted to create a realistic cat cake that looks almost too good to cut? In this tutorial, award-winning cake artist Dot Klerck shows you exactly how she created Harry, a relaxed roly-poly cat lying comfortably on his back.
Dot has built an international reputation for her realistic animal cakes. Her teaching style is calm, practical and easy to follow. She breaks every stage into manageable steps, so you can build your skills with confidence.
Whether you enjoy making novelty cakes, realistic sculptures or celebration cakes, this tutorial introduces techniques that you can use again and again. Dot and Paul are best of friends and both have different skill sets so it is a pleasure to bring Dot to CakeFlix. This was filmed during the Covid crisis from Dot’s home studio.
Learn to Carve a Realistic Cat Cake
Every great sculpted cake starts with good structure. Dot begins by showing you how to carve the cake into natural shapes. She explains how to achieve realistic proportions without making the process complicated.
You will also learn how to create a simple armature using everyday kitchen materials. This clever method provides support without the need for specialist hardware.
Sculpt with Modelling Chocolate
Once the structure is complete, Dot demonstrates how to sculpt the cat using modelling chocolate. She explains how to build soft body shapes and realistic muscle definition.
Next, she focuses on the finer details. You’ll learn how to shape expressive eyes, delicate ears, a realistic nose and a convincing mouth. These small features help bring Harry’s personality to life.
Paint Realistic Fur with Cocoa Butter
Painting transforms the sculpture into a lifelike cat.
Dot shows you how to layer cocoa butter colours to build depth and texture. She explains where to place darker tones, lighter highlights and subtle colour changes. By working in layers, she creates realistic fur that looks soft and natural.
These painting techniques work beautifully on many other animal cake projects too.
Build Skills You Can Use Again
This tutorial teaches far more than one cake design. The carving, sculpting and painting techniques can help you create dogs, wildlife, teddy bears and many other realistic cake projects.
Whether you decorate cakes for family, friends or paying customers, these skills will help you produce more professional results.
In This Tutorial You Will Learn How To:
- Carve awkward and rounded cake shapes
- Build a simple armature from everyday kitchen materials
- Sculpt realistic features using modelling chocolate
- Create expressive eyes, ears, nose and mouth details
- Paint realistic fur with layered cocoa butter colours
- Add depth, texture and natural colour variation
- Finish a professional-quality realistic cat cake
Who Is This Tutorial For?
This realistic cat cake tutorial suits decorators with basic cake covering skills who want to move into sculpted cakes. More experienced cake artists will also discover new techniques for creating realistic fur, facial details and lifelike finishes.
If you’ve always wanted to master realistic animal cakes, Dot Klerck’s expert guidance will help you create a stunning cat cake that looks remarkably lifelike.
Don’t forget to share your interpretations of this wonderful cake with Paul and the rest of the CakeFlix community on our Facebook group.
View hundreds of more world-class tutorials only at www.cakeflix.com.