Tutorial Preview
Highlights
Struggling for time? Then you’ve come to the right place. In this lesson, we have carefully selected all the key points covered in the tutorial and condensed these into one video which you can view in 15 minutes.
1. Cutting the Cake
Struggling for time? Why not watch our highlights video?
Paul has to do some trickery with his two 8” cakes to get all the sizes he needs but basically you want to have three cakes consisting of 4”, 6” and 8” each being 2” deep. Cut each cake in half and fill them with buttercream and then put them in the fridge to allow them to firm up.
2. Adding the Buttercream
In this lesson Paul show us how to cover the cakes in yummy buttercream in preparation for being iced. Paul uses the buttercream in much the same way as he does ganache and starts off by adding the butter cream to the sides of the cake with a cranked palette knife making sure he gets a lip at the top and then smooths round the cake with a wet metal scraper. Once it’s been in the fridge for 5 mins he then cuts away the lip and adds buttercream to the top of the cake and smooths the top with a wet metal scraper. Do this for all three cakes and allow them to harden in the fridge for 10 – 15 mins. You will see later in the tutorial that Paul begins to regret using buttercream so perhaps you will want to use ganache to make life easier.
3. Adding the Lip to Cakes
Paul uses Renshaw grey sugarpaste and rolls in out to around 6mm in thickness and cuts a long line using a ribbon cutter. He then adds it round the edge of the top of the cake so that when it is covered with sugarpaste it creates a nice realistic raised ring around the edge of the cakes.Do this with all three cakes.
4. Icing the Cakes
Paul rolls out the grey sugarpaste to around 4mm uses a cake smoothers and acetate smoothers to get a nice smooth finish. To create a sharp edge on the lip at the top of the cake he first of all uses his index fingers on either hand to pinch the icing and then finishes it off by using the acetate smoothers. To bring back the shape to the top of the cake Paul uses a ball tool and a leaf veining tool to go around the inside edge of the ring at the top of the cake.
5. Lesson 5 Texturing the Cake
You may have noticed that the cakes were looking a little too perfect to be realistic looking weights and Paul has also noticed this. To make them feel a little more used and rugged Paul decides to use a leather texture mat and uses a smoother to press it around the cake. To finish it off he sprays them a clear edible glaze which really brings it all together.
6. Covering the Board
For the board Paul uses black sugarpaste and rolls it to around 3mm in thickness. Measure the piece you have rolled out making sure it will cover the board and then get your 8” round card and put it off centre on the sugarpaste and cut an extra inch around it. Wet the board with some water and then lift the sugarpaste over the cake onto the board. This should fit nicely around the cake and now you can smooth it down and tuck it in around the cake. Paul uses a gothic texture mat and randomly presses it down around the board.To finish he uses a pit of kitchen paper to paint some silver onto the board to make the texture pop out. Using kitchen paper just helps to create a distressed effect which adds to the overall look.
7. Arranging the Cakes
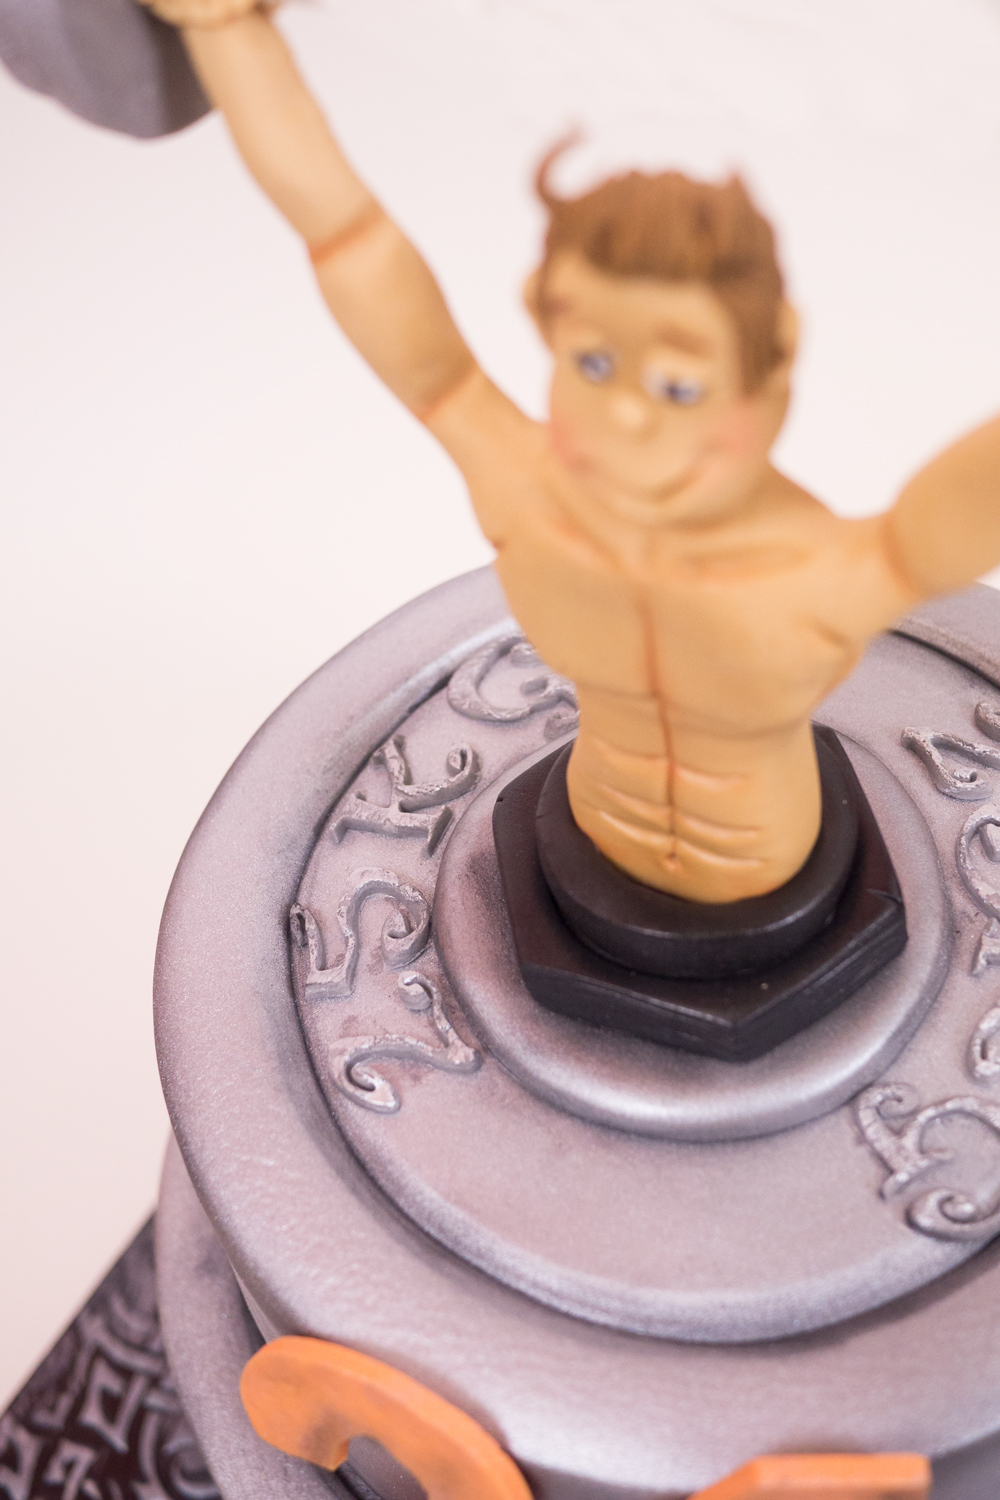
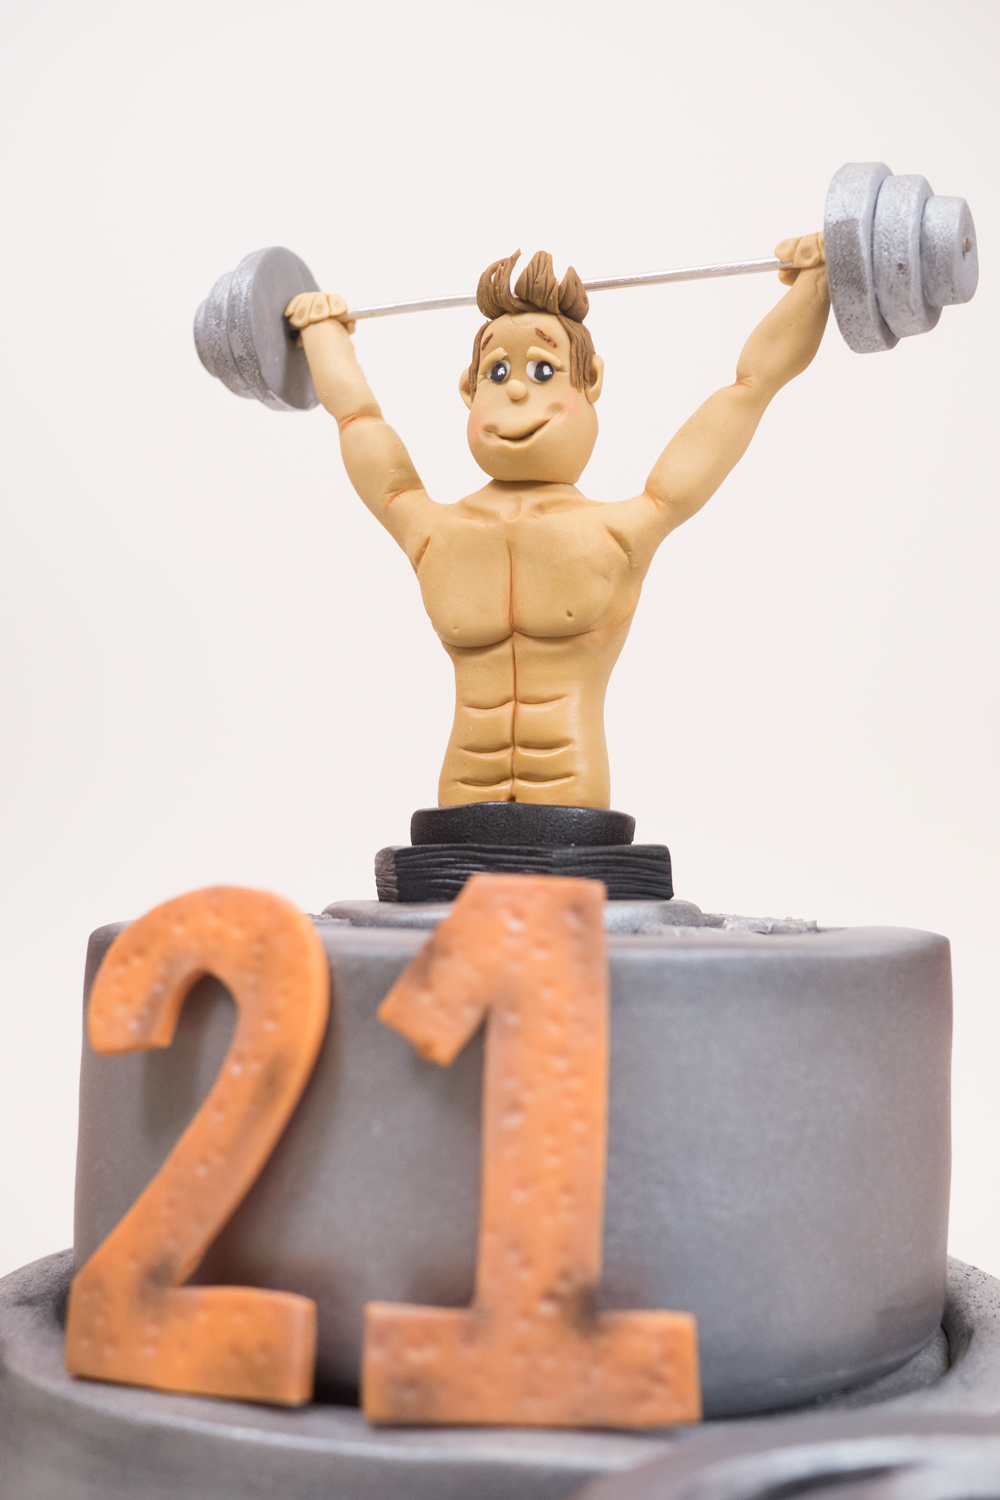
Originally Paul was planning on having all the cakes sitting on top of each other but then decided it might look a little boring. Instead he opted to have the largest two stacked a little off centre and have the smallest one on the board next to them. Once the figure is added to the cake this should all look great. Paul uses 8 dowels to the bottom cake which adds a huge amount of support and if you want to go even further you could add an extra one to the centre.
8. Making the Figure Frame and Cutting Out the Letters
Paul starts off by showing us how to make the frame for the figure to molded around using 20 gauge wire, florist tape and a bamboo skewer. He uses a drawing he made of his figure to as a reference for making the frame which makes it a lot easier. It is all very straight forward as you will see. Paul also shows us how to make to the bolt for the weights which again is very easy and all you need is circle cutters, a rolling pin and a knife…oh and some black sugarpaste. For the numbers for the weights Paul uses a tap letter cutter and finds in the ned that the most effective way to use it is as follows…Roll out your flower paste to approx 2mm, rub a little icing sugar over it and then push the tap cutter into it and then lift without wiggling. You should then easily be able to lift the excess flower paste from it. For the large numbers Paul created his own templates from paper and then cut around them from orange flower paste and left them to dry in front of an open oven at 200 degrees celsius.
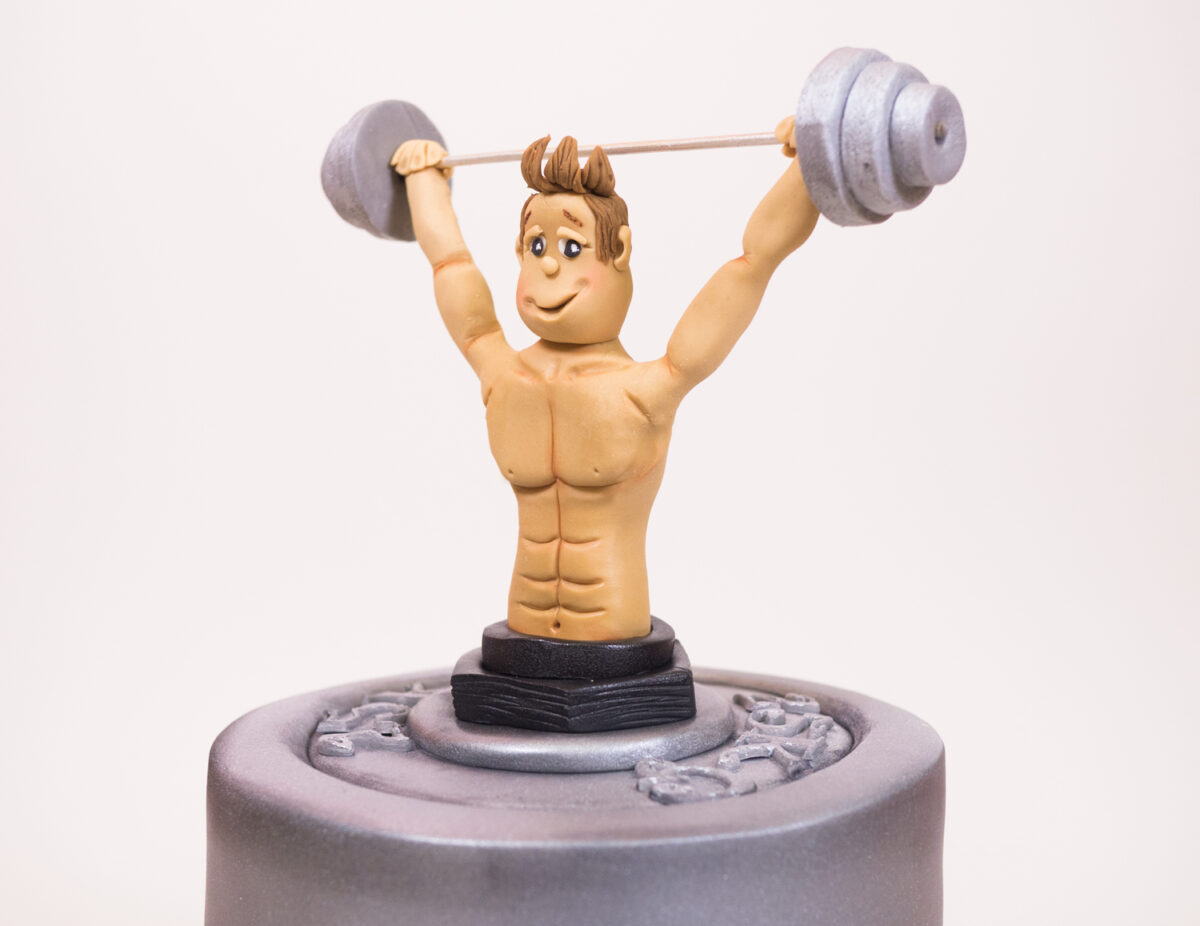
9. Making the Figure’s Torso
In this lesson Paul shows us how to make the torso of the figure using 50/50 of brown teddy bear brown sugarpaste and modelling paste. He uses a picture of a manakin as a reference and shapes the body with his hands and adds details such as pectorals and abdominal muscles with a small ball tool and a leaf veining tool. Don’t spend too much time on this part as when you shape it around the wire frame and get rid of the join mark you will lose a lot of the detail but the lines will remain. This enables to you to shape it back to how you had it.
10. Making the Figure’s Arms
Paul starts of by rolling out a sausage of the same 50/50 paste as used for the body and then cuts it in half to then be shaped into the arms. This is a fairly bullet proof way of making sure both the arms are the same size. As before you will be having to do a lot of reshaping once you start putting them on the wire frame so don’t be too precious about them at first.
11. Making the Figure’s Head
Paul starts off by inserting the frame into the tip of the cake. To create the whole and keep everything food safe he pushes in a large posy pick which he leaves in and then stuffs in some sugarpatse so that the frame has something to go into. For the head Paul rolls out of ball of the same paste and makes it into a kind of egg shape with accentuated cheeks. Later in the tutorial he decides that they are perhaps a little too big and reshapes it slightly. It’s always the same….when you look again with fresh eyes there’s always something you want to change but that’s a good thing.
12. Making the Figure’s Hair
For the hair Paul uses a mixture of brown and yellow sugarpaste which creates a nice light brown colour. He starts off by adding hair to the sides and back of the head and builds it up by making tiny little sausage and marking them with lines and adding to the head with a little glue. For the top of the head he makes them a little bigger and puts them on flat and flicks them at the end to create a nice stick up fringe. He then dusts his cheeks with rose petal dust and paints on eyebrows with some brown paint.
13. Making the Figures Hands and Making the Weights
First of all we need to get that barbell that the figure is holding to look a little more realistic and what better for the job than some silver paint? Two coats will do nicely so go back to it later once it has dried. For the small weights to go on either end paul uses grey sugarpaste with some CMC added to it and uses three different circle cutter to create the sizes. He secures them on with a little glue once he has pierced a hole through the middle of them all. Again they will need a coat of silver paint so you could maybe paint them before adding them. Remember when attaching the hand to make sure the thumb goes under the barbell and not over it. Now it’s on to dusting the figure to add definition to the body. Paul uses a mixture of red and brown dust.
14. Finishing Touches
Now it’s time to paint all the numbers and add them to the cake. For the grey numbers on the weights Paul uses the silver paint again and for the large orange numbers he decides to dust them with a mixture and black and grey. This gives them a nice grungy distressed look that fits well with the rest of the cake. After trying a few different ribbons Paul opts for black to keep it super masculine but blues and oranges may have worked too.
15. Other Ideas
In this lesson Paul shares some other ideas you an implement when making this cake to make it unique to you, We are sure however that you have some of your own brilliant ideas and we would love to see your take on this cake. Please share your pictures with us on our facebook page.
16. Pro Lesson
Paul goes into detail about the cost of ingredients and as well how much to charge if you were commissioned to make this cake. Vital information for any professional cake designer.
Paul introduces us to his brilliant Weightlifting Cake Tutorial on CakeFlix. Perfect for fitness and gym enthusiasts, this cake involves a number of techniques including carving, stacking, basic modelling, cutting letters and painting to create realistic metallic textures. Aimed at intermediate to advanced cake designers, this cake will take two half days to make allowing for drying time.
There are a number of sports cakes on the site but once you have learned the skills on the Weightlifting Cake Tutorial on CakeFlix, you will be able to adapt the design.
Has the Weightlifting cake tutorial on CakeFlix inspired you to take up weightlifting?
-
Warm up before lifting weights.
This will help prevent injuries.
-
Use proper form when lifting weights.
This means keeping your back straight, your core engaged, and your shoulders back.
-
Start with a light weight and gradually increase it as you get stronger.
Don’t try to lift too much weight too soon, or you could injure yourself.
-
Lift weights slowly and deliberately.
Don’t jerk or swing the weights, as this can also lead to injuries.
-
Focus on compound exercises.
These exercises work multiple muscle groups at once, which is more efficient than doing isolation exercises.
-
Lift weights 2-3 times per week.
This will give your muscles time to recover.
-
Eat a healthy diet and get enough rest.
These things are essential for building muscle.
-
Listen to your body and stop lifting if you feel pain.
Pain is a sign that you are doing something wrong or that you need to take a break.
-
Be patient and consistent.
Building muscle takes time and effort. Don’t get discouraged if you don’t see results immediately.
Have fun! Weightlifting can be a great way to get in shape and improve your overall health.
Don’t forget to share your interpretations of this wonderful cake with Paul and the rest of the CakeFlix Family on our Facebook group.
View hundreds of more world-class tutorials only at www.cakeflix.com.