Tiffany Style Lamp Cake Decorating and Baking Tutorial

Tutorial Preview

Join NOW to access 1661 courses Watch Now
14 Day FREE Trial
Tiffany Style Lamp
with Paul Bradford
Skill level: Intermediate
HD Lessons: 26
Decorating time: Two Days
Now Playing
02:26

1. Creating the Lamp Shade Part 1

In this tutorial, Paul opts to use Rice Crispies Treats rather than cake. This works great for more structural designs, however you can of course use a cake if you wish. The treats are squashed into a domed bowl (grease with butter first) to produce a great lamp shape. If you’re using cake, you can bake the cake in a bowl instead to achieve the perfect shape without carving.
Now Playing
12:16

2. Creating the Lamp Shade Part 2

In this lesson, it’s to the kitchen!

For the Rice Crispies Treats, use: 300g of Rice Krispies, 420g of marshmallow (mini ones work great) and 90g of butter (salted or unsalted)

Using a flexible spatula works great when mixing the rice crispy treat mixture, first melt butter on a low heat (gas mark 4) and don’t let the butter brown. Then add the marshmallow pieces, coat them with butter as soon as you add them to the mix, around five minutes should be enough for the marshmallow pieces to melt properly, then pour the rice krispies in and mix.

Once you have your mixture prepared, pat down into the bowl.

Note: You may need to do this lesson two to three times depending on the size of your bowl. A large tray of rice crispy treats is useful for the building of the lamps neck, seen in Lesson 4.

Now Playing
05:05

3. Making the Stand

Because we’re using Rice Crispies Treats for this course, cake boards work great for the structure. If you’re planning on using real cake, it will be worth getting the boards cut from wood for strength.

This lesson requires the use of a drill and glue gun as shown – if you’re not sure how to use these, ask someone who is good at DIY to help you prepare the structural parts of the cake.

Now Playing
18:20

4. Neck of the Lamp Part 1

Paul uses circular cutters to build a stack of Rice Crispies Treats which will form the decorative neck of the lamp. Once the structure is created and the shape of the bottom section is trimmed down, the neck of the lamp can be ganached.

Once ganaching is completed, refrigerate for 10-15 minutes to make it easier to work with.

Now Playing
04:49

5. Neck of the Lamp Part 2

Once refrigerated, you may need to cover with ganache again for a smoother finish. As Paul demonstrates, once you’ve done this, use a pastry brush and hot water to smooth further. Use a small cake card to divide the top section from the neck of the lamp.
Now Playing
04:21

6. The Lamp

In this lesson, Paul uses a 10” cake card and places it on the Rice Crispie Treats (or cake) that was made in the bowl. Flip over and ganache to a smooth finish with the help of a pastry brush and water.
Now Playing
11:45

7. Icing Part 1

Using a thick sausage of brown sugarpaste, we can now make a smoother neck for the lamp prior to icing. Icing the cylindrical shape can be a bit tricky so stay patient and follow Paul’s tips on achieving as smooth a finish as possible.
Now Playing
03:27

8. Icing Part 2

Paul opts to ice the board earlier than usual in this lesson to avoid any tricky situations and damage to the design later on. Black sugarpaste is used with a circular cut out in the center, this is then placed over the neck of the lamp and moved into position onto the board.
Now Playing
11:42

9. The Moulding

Vertical lines, spaced around 1 cm apart are marked out on the centre of the neck with the help of a straight piece of card. The Karen Davies Butterfly and Insect Brooch mould is used to create the extra moulded design elements for the lamp (five large and five smaller butterflies).
Now Playing
11:42

10. Light Shade Part 1

For the Shade of the lamp, Paul initially uses a pastry brush with hot water to add a bit of moisture and tackiness. Once prepared the white sugarpaste is rolled out and applied to the shade. To get the finish super smooth, Paul uses a cake smoother followed by using another piece of sugarpaste to smooth things over again.
Now Playing
11:41

11. Light Shade Part 2

This lesson focuses on some more of the structural elements of the cake and how to get the top tiers’ support just right so that they can support the lampshade section of the cake. Following this, the design needs to be left overnight to dry…it’s time to put your feet up.
Now Playing
11:10

12. Drawing the Design Part 1

After leaving the supporting section to dry overnight everything is a lot stronger and in an ideal state to bring the cake to life. Start with ganache as a glue to keep the top section in place (it’s advisable to do this on location if you’re travelling far with the cake).

A white sugarpaste strip is added to disguise the cake board supporting the top tier. Try and neaten this up as much as possible and blend the top edge of the strip with that of the lampshade piece.

Now Playing
11:10

13. Drawing the Design Part 2

Before drawing the design, Paul mixes some water with a small amount of the white sugarpaste to act as a sort of filler for the gap in the cake.

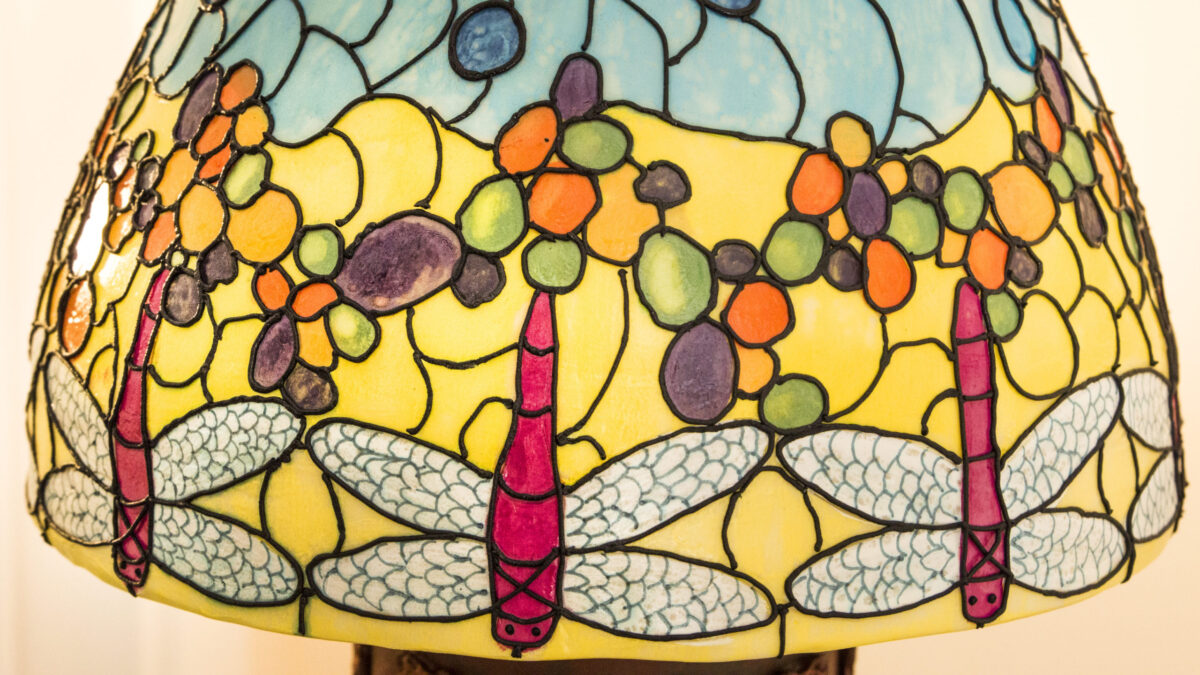
The scribe tool is best used to plot out where the dragonfly designs are going to be added (you can find the dragonfly templates in the Tools tab above.

Now Playing
02:57

14. Drawing the Design Part 3

In this lesson, Paul continues with the design for the shade using the scribe tool. Using different sized cutters as a marker for the very top of the cake is a great starting point for a neater finish. Don’t worry about how neat the lower parts of the design are as it will still look great as a stained glass finish.
Now Playing
02:40

15. Painting Part 1

Moving on to the actual painting of the lampshade, Paul starts by using a sugarmill colour called Forget Me Not mixed with a small amount of vodka to make the consistency more watery and to achieve that glass effect that we’re after.
Now Playing
04:26

16. Painting Part 2

After painting the blue sections on the lampshade, we move on to adding the yellow (Hot Mustard from Sugarmill and Primrose Yellow from Sugarflair). Use a paint-free brush with vodka to thin out the yellow colour once it’s on the cake.
Now Playing
06:32

17. Painting Part 3

Following on from the previous lesson, Paul uses a white dust (using a dust and vodka mix) to add the white sections to the shade. Your own preferred white paint can be used for this. Darker coloured circular spots are then added to the design.
Now Playing
05:43

18. Painting Part 4

A selection of other contrasting colours are used, continuing the spots made in Lesson 17. Add these at random and try not to be too uniform in the design.

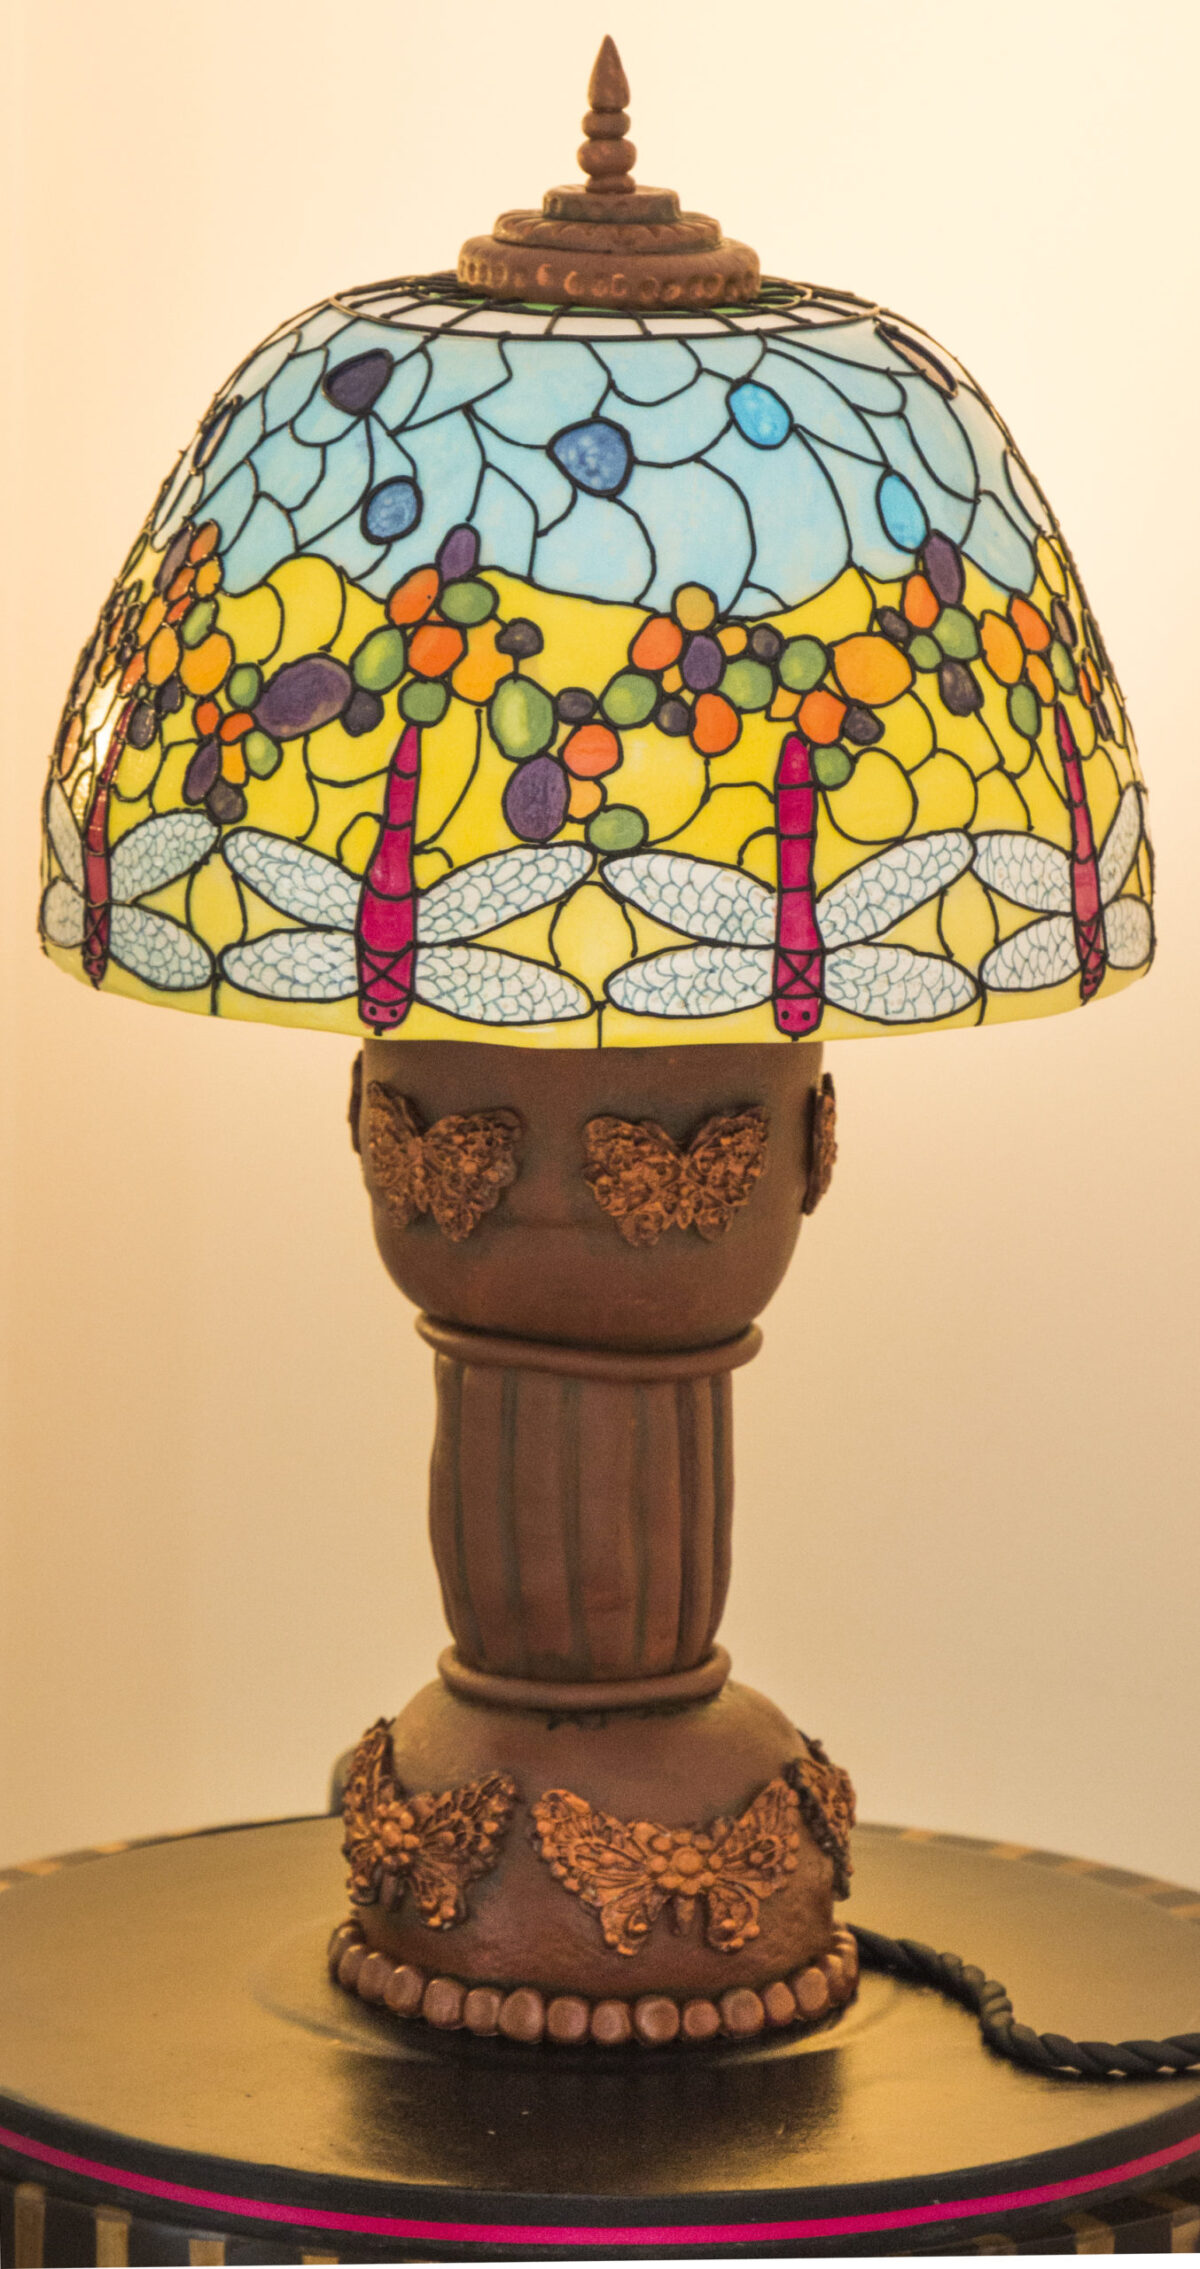
The neck of the lamp is also painted using a mixture of vodka and a chestnut brown paint. An aged look can be achieved by adding black highlights to the neck of the lamp.

Now Playing
02:34

19. Painting Part 5

An aged look can be achieved by adding black highlights to the neck of the lamp using a mixture of black paint and vodka and applying around any detailed sections. Don’t worry about putting too much on! We can always lighten the effect up with a small brushing of vodka.
Now Playing
05:29

20. Painting Part 6

To finish the base off, Paul opts for a metallic copper colour from Rainbow Dust which gives a great finish that really stands out and looks authentic.

To make the colours more translucent, Paul uses a cloth/tissue with a small amount of vodka to get rid of a small amount of paint from the main design.

Now Playing
06:50

21. Royal Icing Part 1

Black royal icing has been created to make the edible glass leading for the lamp shade.

Paul uses a number 2 piping nozzle (and a 1.5 nozzle for some finer parts) and starts to pipe the design on the cake. Pop the cake on a turntable to make the uniform circular sections much easier to achieve.

Now Playing
07:45

22. Royal Icing Part 2

In this lesson, finishing touches are added to the royal icing starting with details on the dragonfly wings using a black food pen.

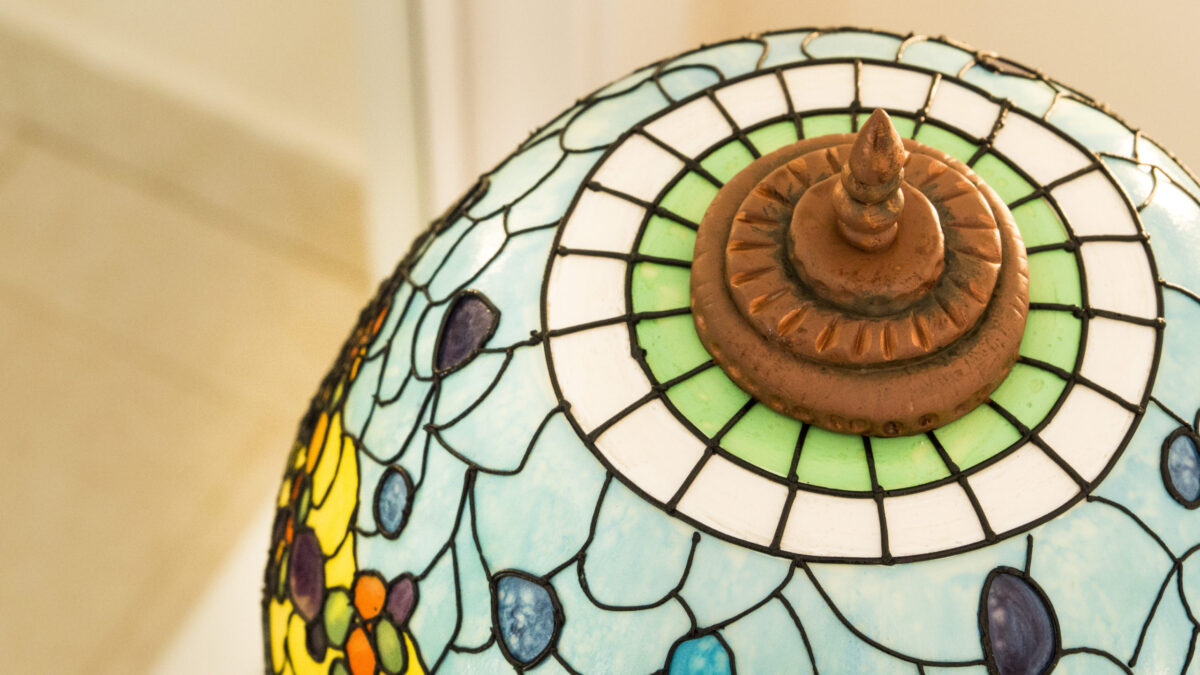
Once the royal icing is completed, Paul uses layers of a clear edible spray glaze to add a lovely shine to the cake.

Now Playing
11:34

23. Top of the Lamp

After several coats of the spray glaze, white sugarpaste is used to create a top section for the lamp. Paul uses a ball tool to decorate the disc shaped pieces for the top section and smoothens any edges off using his fingers.
Now Playing
03:00

24. Finishing Touches

In this final lesson, Paul adds a fantastic looking electrical cord to the cake, certainly the easiest bit so far, and this really finishes things off nicely!
Now Playing
01:57

25. Other Ideas

Paul shares some other ideas for this cake and how to adapt the design to fit your needs.
Now Playing
03:33

26. Pro Lesson

This lesson covers the business related aspects of this cake including costing, time to make the cake and more..

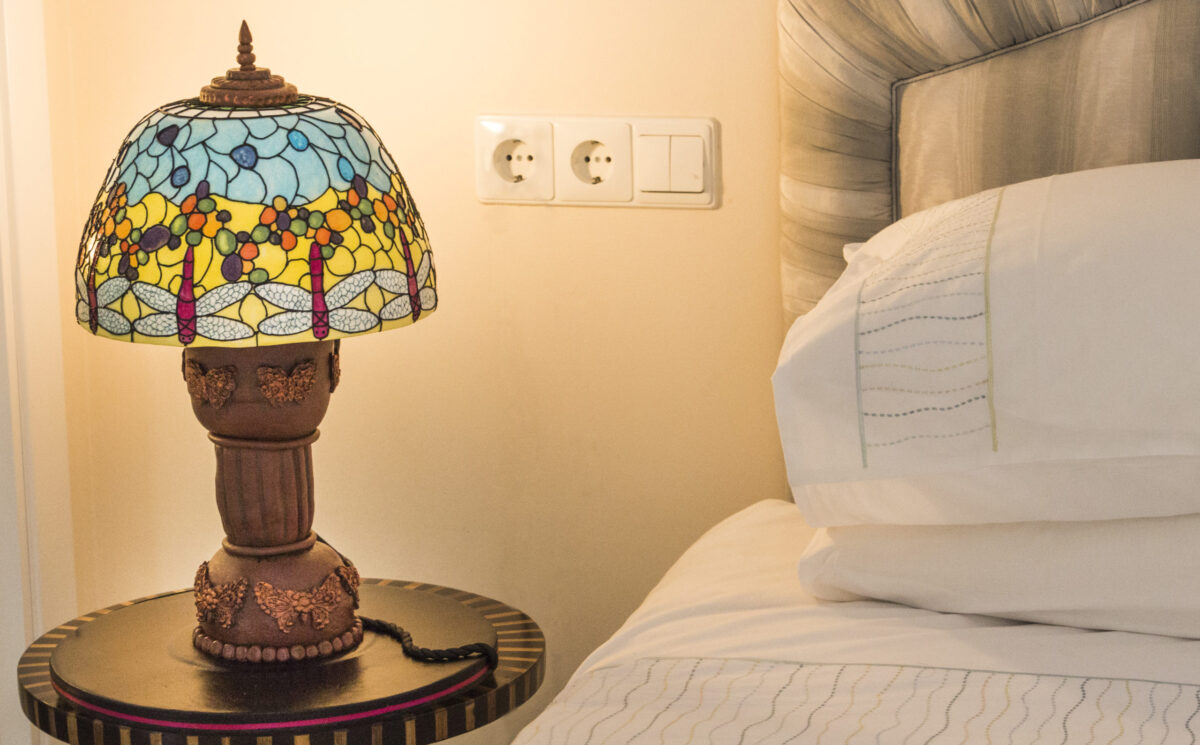
Paul introduces us to his Art Nouveau inspired Tiffany Style Lamp Cake, a structural design incorporating painting skills to produce a stunning stained glass effect. This cake is for intermediate level cake decorators and will take two days to create.

We would love to see your take on the Tiffany Style Lamp Cake – please share your photos with us on our Facebook Page.

Paul Bradford

Paul Bradford

Paul Bradford´s mission is to ‘Empower people to achieve their cake decorating dreams’ by providing a range of cake decorating courses and online tutorials through their website, which currently teaches 195,000+ students.  
14 Day Free Trial